
Bathroom Extractor Fans - A DIY Guide
After about 4 years’ service, my bathroom fan gave up the ghost. I was going to show you guys a quick like for like swap, but as so often happens, I then realised that this wouldn’t scratch the surface of all the things we should be thinking about when installing or replacing a bathroom fan.
I will divide this blog up into two sections.
Section 1: The Theory
Section 2: Putting it to Practice
Why do you need a bathroom fan in the first place?
If your bathroom has an openable window, strictly speaking under building regulations you don’t need a fan. However, they’re generally required in any new build, especially if natural ventilation isn’t sufficient. So when I did a refurbishment of my bathroom a few years ago I decided to put one in, despite having a few windows.
I’m not going to go into too much detail on moisture and condensation - you can see more on that in a video here, but suffice to say cooking and bathing produces massive amounts of moisture - we breathe out 1/2 litre a day alone! All of that can lead to mould and damp.
If you’ve got a window like I have, keep it open during showers. If you haven’t, get a Karcher window vac - or Screwfix do a Titan for £19! or a Squeegee (I squeegee the glass screen tiled wall and shower tray after each shower) - this alone removes 200ml of water in our bathroom and stops it circulating back around the house, and some of you have told me you keep your Karchers permanently in the bathroom.
Or if you haven’t got a window or a fan, consider getting a dehumidifier like my Ebac 3850 and keep it running in smart mode all day. This will quickly remove all the vapour from your bathroom, and the laundry mode is a godsend if you’re in the habit of hanging clothes to dry inside.
how to choose a bathroom fan?
There’s quite a lot to think about here - not least because of all the different fans on the market - but if you break it down it becomes reasonably straightforward, and when you understand what types of fans are available, you can work out which one would be most appropriate for the space you’ve got.

Axial Fans
Designed for installation directly through an external wall or in the ceiling on a very short duct, air is pulled through the impeller or fan blades and ducted straight through the wall or window. These are what you typically think of when you imagine a bathroom fan. They look great aesthetically and depending on how much you spend, you’re looking at an extraction range of between 70 and 110m3/hr. They typically have different switching options from pullcord, timer, humidstat or occupancy sensor.
But they’re also limited to short duct runs and so what do you do if you haven’t got an external wall, or a convenient place to put the fan, or you’ve got a longer duct run?
Well you’ve got 2 options.
Centrifugal Fans
Some of these fans look similar to axial fans but they’re a bit more bulky and generate far greater pressure – so where the industry leading axial can extract between 95 and 110m3/hr centrifugal fans can pull out between 80 and 216m3/hr. So they’re ideal for a bathroom with no external walls and a longer ducting run and they typically have more switching and operating options than an axial. But in my view they’re a bit ugly due to how bulky they are, so if you had one of these you wouldn’t necessarily want it on show!
Inline Fans - my top pick!
These fans are basically your best option in a bathroom IF you have room in your loft or ceiling void to install them. Three times as powerful as axial fans, they sit within the run of ducting, completely out of sight, and they trounce axial and inline fans on extraction rates, going up to 245m3/hr. They’re great for installations that require a longer ducting run or where you’ve got serious mould or condensation problems - and being in the loft, they’re the quietest of the three options.
And crucially, with no electrics in the bathroom, you can position them wherever you want (more on this in a minute).

Extractorfanworld have sent me one to give you an idea of their size and I’ve been online and bought a roof tile vent adaptor for extractor fans to show you how you vent all that moisture out of the property. We’ll have a further look at this fan a bit later.
Extraction Rates
Extraction rates are to some extent dictated by what’s under the bonnet in the fan - which is why you see extraction rates in 4 inch fans ranging from 70 to 110m3/hr. However the diameter of the spigot at the back of the fan is the main driver on extraction rates - particularly with axial fans. Most bathroom fans typically have 100mm or 4 inch diameter spigots and the current industry leader is I think the Vent Axia Svara at 110m3/hr.
But you can also get 6 inch or 150mm variants - more typically seen in kitchens - but with IP ratings that enable them to be fitted in bathrooms. In fact, when I polled my YouTube subscribers in a Community post, Aaron said he fitted a 150mm dia Vent Axia fan in his last property activated with a humidity sensor, and the air movement created was powerful enough to close the bathroom door. In his new property he fitted a 100mm Vent Axia - and it was nowhere near as good. Swwils chipped in to say that the difference between 100 and 150mm spigots isn’t just a linear 50mm. It makes a massive difference to static pressure which greatly affects performance of the fan - and you’ve also got the ducting to consider - more on which in a bit.
Which you choose will depend on what zone in the bathroom your fan is going in and what size ducting you’re able to fit but 4 inch or 100mm fans are the most common in the UK and a stat quoted by Extractorfanworld is that just 1% of bathrooms worldwide can’t be adequately extracted with a 4 inch fan.
What fan size do I need?
Well, it’s a good idea to do a quick calculation, because that will help you to decide which fan to buy, but also to ensure compliance with building regulations.
So taking my bathroom for example:

The room volume 4.2x 2.2x 2.3 = 21.25 cubic metres
So to change the air in my bathroom, the fan needs an extraction rate of 21.25 cubic metres. However, building regulations require a rate of 4 air changes per hour - so we multiply 21.25 x 4 to give us 85m3/hr
So given I have an Axial fan installation, the two fans I’m going to show you today, the Vent Axia Svara at 110m3/hr gives me just over 5 air changes and the Silent Tornado 97m3/hr = 4.56 air changes. The inline fan would give me a whopping 11.5 air changes per hour
For me it’s slightly academic though as I tend to leave the window open most of the time anyway!
So here are some typical extraction rates for 4 inch spigot fans:
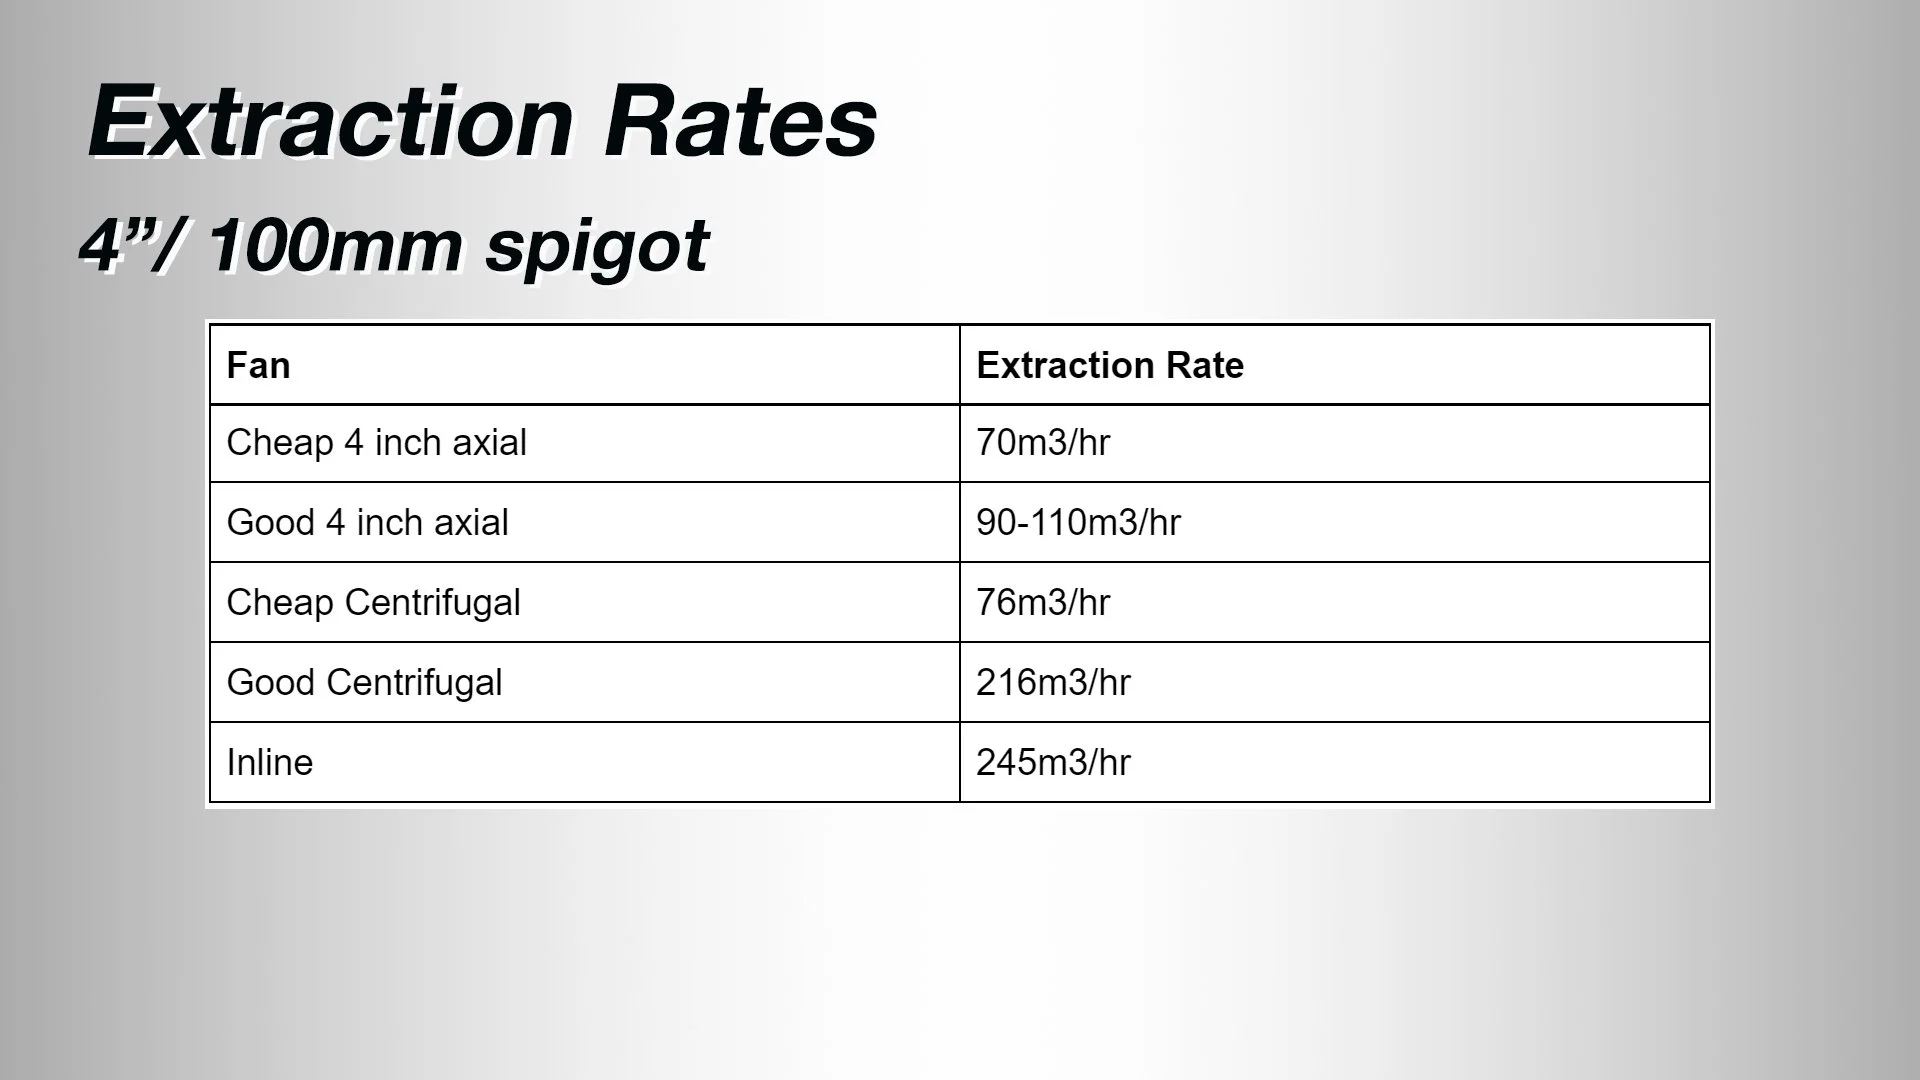
Ducting
So these are the extraction rates for a typical axial, centrifugal or inline fan. But these extraction rates assume optimum circumstances. As soon as you introduce ducting the extraction rate will be affected, and the type and length of the ducting you use will have a huge bearing on the efficiency of your fan.
As one of my regular contributors Norman Boyes said - minimising turbulence and resistance to flow in the ductwork is crucial. The cheap plastic ducting causes losses, and the best is rigid PVC pipe, with short lengths of flexible only for the connects to the fan and outlet terminals.
Also, as George at Extractorfan world said to me, as well as crinkles or holes in the ducting causing decrease in extraction rate and mould from the condensation, any 90 degree bend you have in the duct effectively adds a metre to the overall length of the ducting.
You want your ducting to be as short and efficient as possible, and remember, flexi hose ducting can cause water traps and therefore build up of mould, and in the case of the metal flexi hose I installed for our tumble drier, I’ve had a real problem over the years cleaning the fluff out that gets caught in the hose.
For an axial fan, you ideally want to fit rigid PVC pipe and have it sloping down slightly from the fan to the outside.
In terms of installing ducting, I hired a core drill when I installed the tumble drier duct, but the old Victorian bricks were fired to within an inch of their life and very hard to drill through so these days I tend to just knock a hole through the wall with the chisel on my SDS and then make good afterwards. This takes a matter of minutes rather than the hours it does with a core drill.
Backdraught Shutters
The third thing that has an impact on extraction rates is the backdraught shutter. Whilst this is an important addition to the installation to prevent cold air flowing back into the bathroom (particularly for inline fans that don’t have them incorporated), there are certain things you need to be aware of.


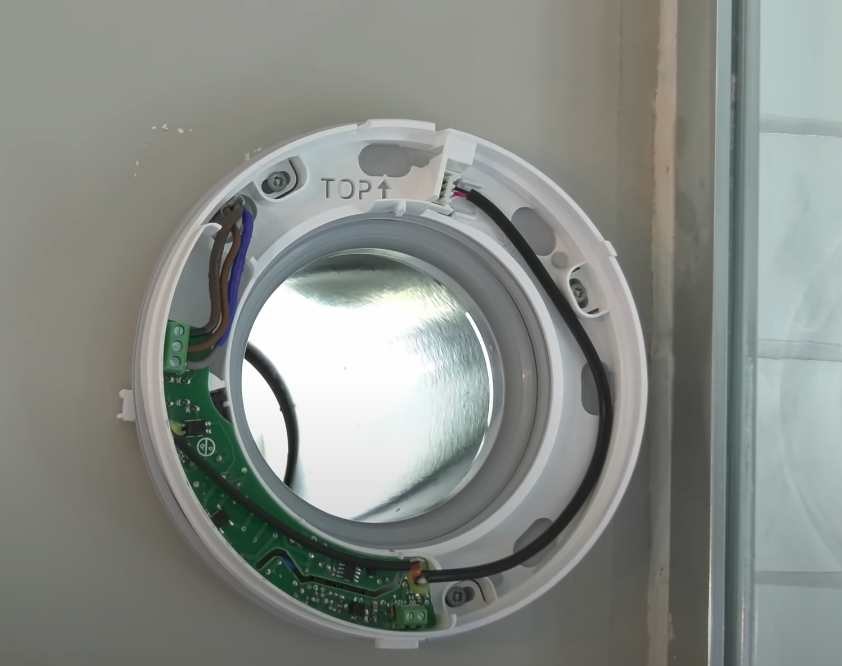
So Axial fans often have the backdraught shutter built into the back of the fan. A lot of people take these off thinking it’s just flimsy packaging.
It’s not, and the flimsy design and the fact that it’s fitted so close to the exhaust end of the fan makes it very efficient at preventing cold air coming back whilst not significantly reducing the extraction rates. The shutter is still in place and going strong on my 3 year old fan that I’m replacing, but being flimsy, it does make a bit of a noise, clicking every time wind buffers against it.
As I’m going to be installing the Vent Axia Svara fan today, which doesn’t have a backdraught shutter, I do need to install a backdraught shutter.
Backdraught shutters like a wall cowl that sits at the end of the run are going to have a dramatic impact on extraction, because the air won’t be travelling as fast at the end of the run as it was when it exited the fan. I think the shutter on my one is too heavy and the build quality is poor. It arrived damaged and the shutter hinge is snapped. I read a lot of reviews where these have stuck shut even before their first use.
This inline backdraught shutter is probably the best, but impractical for me, as it needs to be installed mid run, which I can’t.
I also bought a Blauberg sound baffle vent cover - which is great quality, but absolutely massive and won’t fit under my eaves.
So the shutter I’ve ended up installing is this energy saver grille. It’s decent quality stops wind getting in without reducing the fan’s efficiency in the way that one of those gravity shutters would.

Air Starvation
One last point to consider - the fan is obviously extracting all of this air out of the room. So if you don’t allow more air into the room, the fan will become suffocated or starved of air.
Make sure you allow fresh air into the room, with a sufficient gap under your bathroom door or a passive air vent.
Electrical
Switching Modes
Bathroom fans are typically wired into the lighting circuit enabling you to activate them when you turn the lights on. Depending on how they’re wired, some will switch off when you turn off the lights, and some will be wired slightly differently enabling them to keep running while the lights are off, until switched off by a humidity sensor (known as a humidstat) or a simple timer.

For these you need a 3 core and earth cable supplying the fan, with a live, switch live neutral and earth (and one of those wires becoming a switch live). Although the new Vent Axia Svara I’ll be installing shortly only needs a live and neutral for it’s overrun timer.
This means if you’ve only got 2 core and earth cabling, you can still install it without an expensive rewire.
Humidstat sensors are a great way to keep the bathroom air as dry as possible without running the fan excessively. Some also have pull switches (rarer these days) or PIR (motion) sensors.
Clearly, if your fan is intended to be triggered by humidity or motion, (not turned on when you switch on the lights) you can power it from a fused spur rather than the lighting circuit.
Fan Isolators

Speaking of fuses, it’s a good idea to have your fan on an isolator in an obvious location near to the fan (usually on the wall outside the bathroom) or if located in the bathroom, outside Zone 2. And I think in this case the lighting circuit needs to be protected, as mine is, by an RCD. The isolator allows you to switch off power to the fan whilst enabling your electrician to leave the lights on to carry out the repair or replacement work on the fan.
Whilst fan isolators are often not fused, increasingly manufacturers are specifying that their fans should be protected with a 3A fuse. Opinion in the community is divided on why, when the lighting circuit 6A MCB is going to pop before a 3A fuse melts, but I can see two points here:
As one of my Discord forum members recently pointed out, the 3amp fuse makes sense if the house wiring is still supplied by one of those old fashioned BS3036 rewireable fuse boards. The manufacturer doesn't know what sort of fuse box you’ve got.
Although a lot of people say the 3A fuse isn’t a building regulations requirement, it's stated in BS7671 134.1.1 and 510.3 that accessories must be installed in accordance with manufacturers instructions - so it looks like it is. See the building regulations here.
But what works can DIY’ers do? Well, whilst on the face of it a fan replacement doesn’t constitute a change or alteration to an existing wiring circuit - which is notifiable when carried out in a special location - special location being the area shaded green in the image below, there are a few problems with us DIY’ers replacing our own fans.

Your fan instruction manual will make a big point of the fact that all electrical work must be carried out by a fully qualified electrician, and with good reason because any electrical work in Zone 1 carries with it a lot of dangers. Assuming the fan has been correctly wired - which isn’t guaranteed, the wiring to the fan will need testing with a professional tester which can cost up to £600. The RCD needs testing to make sure it’s tripping as it should, and dare I say it, whilst the fan itself is double insulated and therefore must not be earthed, the earthing in your bathroom should also be checked.
So for these reasons, I can’t recommend you replace the fan yourself - for peace of mind get a qualified electrician involved.
Bathroom Zones
Which brings us neatly onto bathroom zones. Where you install your fan is a combination of electrical safety and common sense.
There are 3 bathroom zones. Zone 0 is the interior of the bath or shower tray. Zone 1, mirrors the special zone in the building regs, and is basically the bath or shower area, up to 2.25m off the floor. Zone 2 is 60cms outside zone 1 in all directions and zone 3 is anywhere outside that.
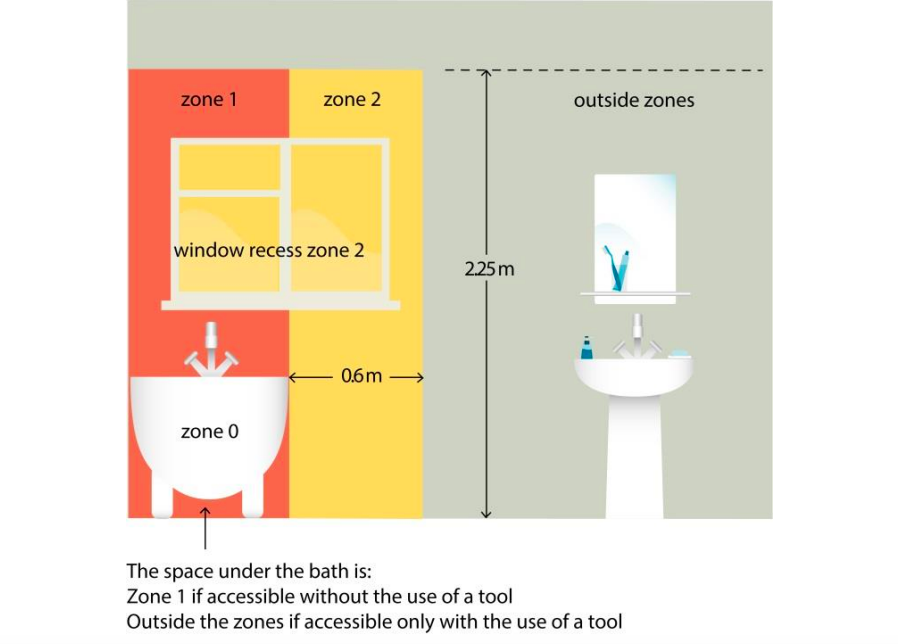
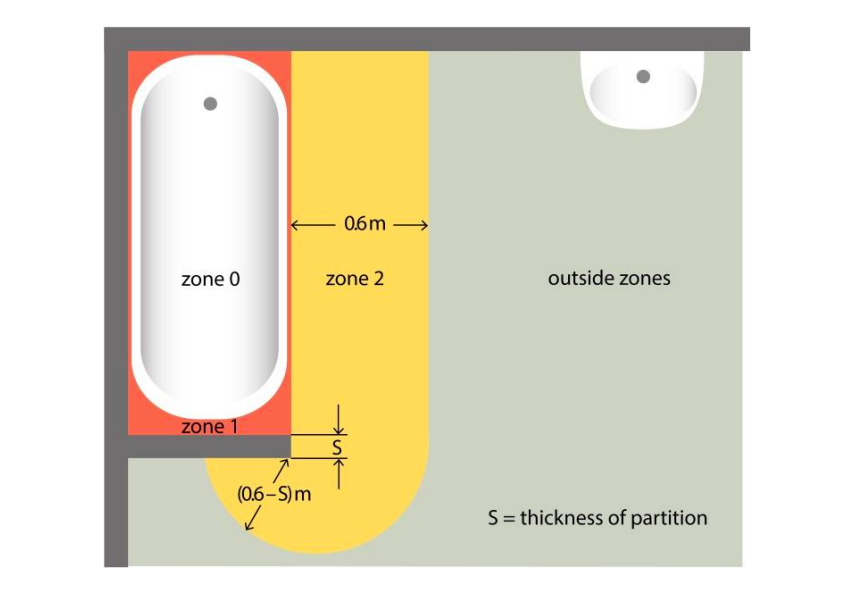
It’s best to fit your fan in Zone 1 closest to the source of steam, but to do this, products should be low voltage or 240v appliances must have a minimum IP44 rating or higher, a 30milliamp RCD (residual current device) to protect the circuit. Low voltage 12 v fans don’t require an IP rating but are trickier to fit as the transformer for them needs to be located in Zone 3 or buried in the wall - so it’s widely considered to be easier to install an IP rated fan.
So the IP rating basically denotes the zone the fan is suitable for. The first digit describes its protection from solid materials, and so because solid materials aren’t generally relevant for bathroom fans, you typically see them rated IPX4 or IPX5 - with X replacing the solid materials classification. The second digit refers to protection from water and moisture.

So the location of my fan, whilst protected from water by a screen (it’s not the perfect location for it to be honest) is still in Zone 1 and for the two fans I’m looking at today the Vent Axia is IP44 rated and the Silent Tornado IP45.
Now, onto section 2…
The three fans that I’m showing you have been provided to me by Extractorfanworld. I’ve bought all my previous fans from them, having found them super efficient and good at honouring product warranties. When I called up to buy the current Silent Tornado, I cheekily told their marketing team about this video and they kindly provided me with these three sample fans free of charge, but I stress they haven’t paid anything to mention them in this video. Special thanks go to George in marketing who has been incredibly helpful in providing me with much of the info for this vid and I’ll post a link to all the resources in the description below the video.
So I’m going to show you just the three fans I’ve featured today, and then at the end I’ll run through a few other fans recommended by you all in my community post.
comparing two axial fans
First up is the Silent Tornado. If I hadn’t had my head turned by the Svara smart fan, I’d be very happy with this, as this is my second of these fans, the original one I installed being the cheaper Envirovent equivalent. It comes with lots of different switching options, this one being the second most expensive being the PIR version at £89 with its humidstat and timer overrun, each adjustable by using the plastic screwdriver tool that comes with it.
Whilst humidstats and timers can be tricky to adjust and temperamental in operation (either never switching off or never switching on) I’ve never had this issue with the Silent Tornado.

And the noise level - it’s definitely not silent but its a noise you can happily live with in the background as you wait for it to do its work.
And you can see why it’s got such a high, IP45 rating, with all the electrics safely housed behind these rubber sealed perspex plates.
But, next up is the fan I’ve decided to install…
Installation was pretty straightforward with the fan secured to the wall with 3 fixing points, 5mm holes drilled into the plasterboard and pan head screws secured into red wall plugs. You’ll recall this fan only requires a live and neutral, but unsure how I was going to configure it, I wired in the switch live anyway. The fan also supports low voltage connection.
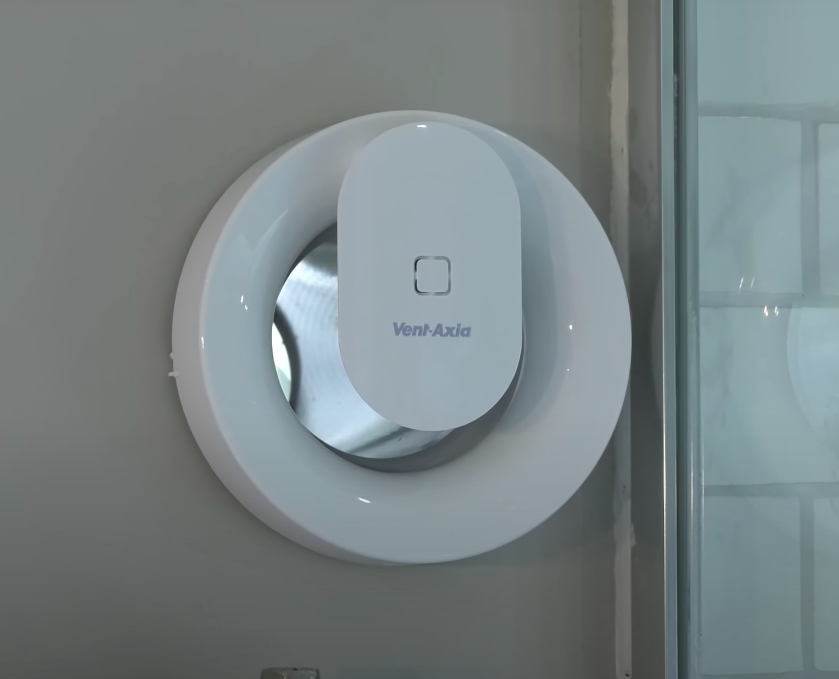
And then it was back on with the wall frame and motor unit, and time to switch the fan on and have a play.
When it comes on, the first thing you’ll notice is how quiet it is! 20DB - very low noise - one of the quietest fans ever.
You then download the Vent Axia Connect app, and run through some basic configuration settings. If you choose to set it up using the light switch to switch it on, it automatically disables the light and humidstat sensor leaving you with just the basic timer overrun, which is a bit of a shame.
So I reset the fan, and chose the option of not using a remote switch into the switch live (even though I had wired it in - more on this in a minute). At this point you’ve two final options - continuous mode where the fan will go into trickle mode rather than switching off, and intermittent, where it will operate more like a standard humidstat fan, switching off when it’s done. You might as well opt for continuous mode as you can disable the trickle fan when you configure the settings.
You’ve then got lots of customisable settings, like changing the trickle rate fan speed from 41% to 70%, and you can also set during the week or weekend when the trickle works - that point I just made about disabling it. In run mode with the fan at 41% power it’s almost inaudible. I’m not sure I need the trickle setting on given the backdraft grill I have lets a continuous stream of air in, but I suppose it stops flies and things getting into the bathroom.
You can also adjust the light sensor timer settings and humidstat, the sensitivity of the sensor and how long the timer runs for once activated. There’s a 5 and 10 minute delay function when you’re only popping briefly into the bathroom - which I think is genius as how often have you accidentally triggered your noisy fan in the night when you press the wrong light switch!
With the Humidstat - you can adjust the fan speed from 88% to high power and low medium and high sensitivity options
You can also set Silent running hours during which the fan only runs on trickle speed, assuming you haven’t turned that off - eg over night, which is another big tick
And finally, there are Automatic purge cycles - to run the fan at full power for 30-60 or 90 minutes every 12 hours - to ensure the air in the room is refreshed twice a day. Another brilliant idea.
Downsides of this fan?
I’m conscious I haven’t lived with this for more than a few days so I haven’t had too many teething problems to report back on. You connect to the fan via bluetooth rather than Wifi, so you have to be close to it when making changes. Annoying but understandable, and actually you don’t change the settings very often, so I’ll accept this, and sometimes, you have to go out and back into the app for the fan to connect to the app.
The main issue I’ve found is that if you do wire in the switch live - it overrides the light sensor and triggers every time you turn on the lights, and with that you lose, all of the light sensor functionality - detection sensitivity, running time or delay.
So I’ve basically had to remove disconnect the switch live at the fan and also at the isolator itself, in order to run the fan in true Automatic mode.
But other than that, all the customisable settings that come with this fan make the Silent Tornado seem pretty prehistoric.
Other options?
So those are my three fans - and I’ll mention the inline fan in the tests below. But what about other options? Well the best I can suggest is to trawl through the excellent contributions so many people left on my Community post.
For example, for another smart fan option, James and Karl recommend the Zehnder (formerly Greenwood) CV3.
Ricky and Julian like that Envirovent I showed you earlier, and the manufacturer doesn’t require a 3A fuse to be fitted.
Justin and Johathan - have the Airflow Icon fans with their camera style shutter - eliminating any back draughts. Available with Pull cord, PIR, timer, and humidistat. Paul adds that the iris completely closing is great because you don’t have that shutter flapping around in the wind that I mentioned earlier.
a few basic tests
My old Silent Tornado was super dusty, and I suspect this was instrumental in it failing, so try and clean your fan as often as possible. And to test whether your fan is working…
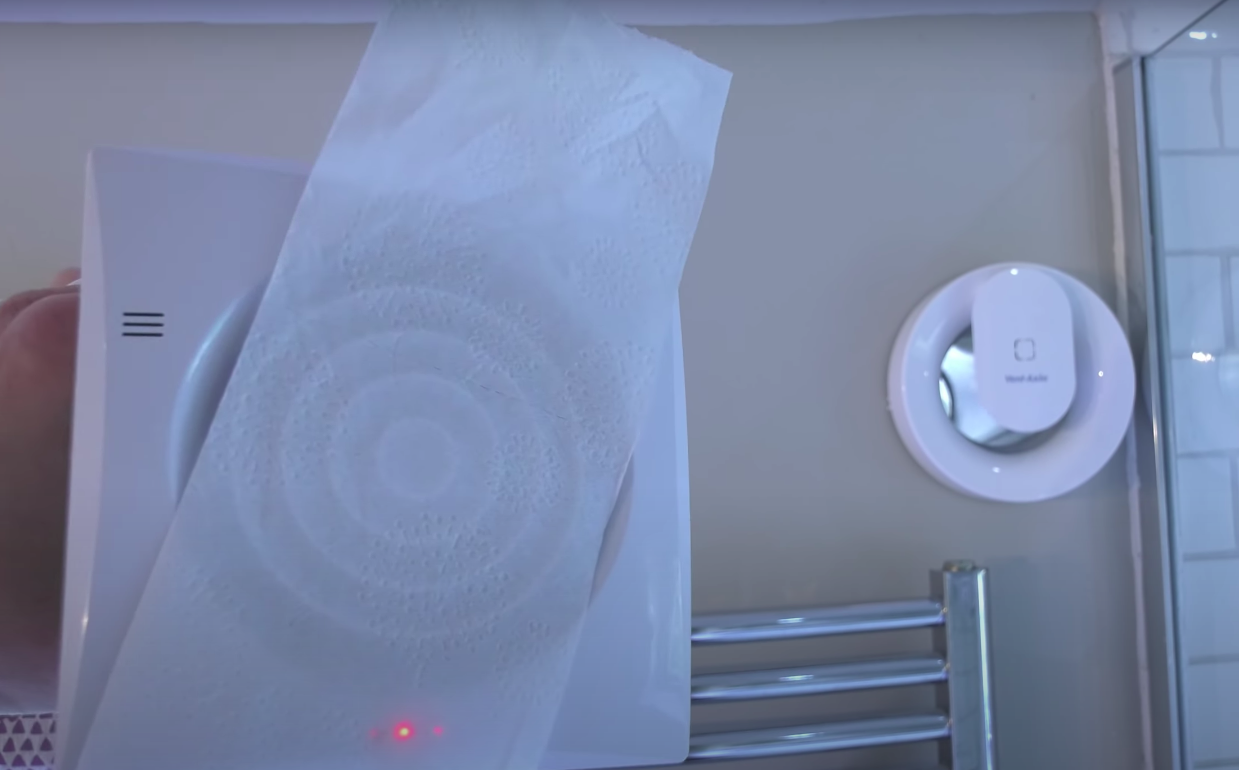
…the most effective test is to hold a tissue in front of the fan and see if it sticks. I stupidly forgot to do this with the Silent Tornado installed earlier, so I’ve wired it up outside the wall so you can see what I mean.
And the Svara - I didn’t test it at full power because it will tear the tissue to shreds, but with the fan in trickle mode at 40% it still works!!
And that TT Pro inline fan is strong enough to hold a sock with its suction!
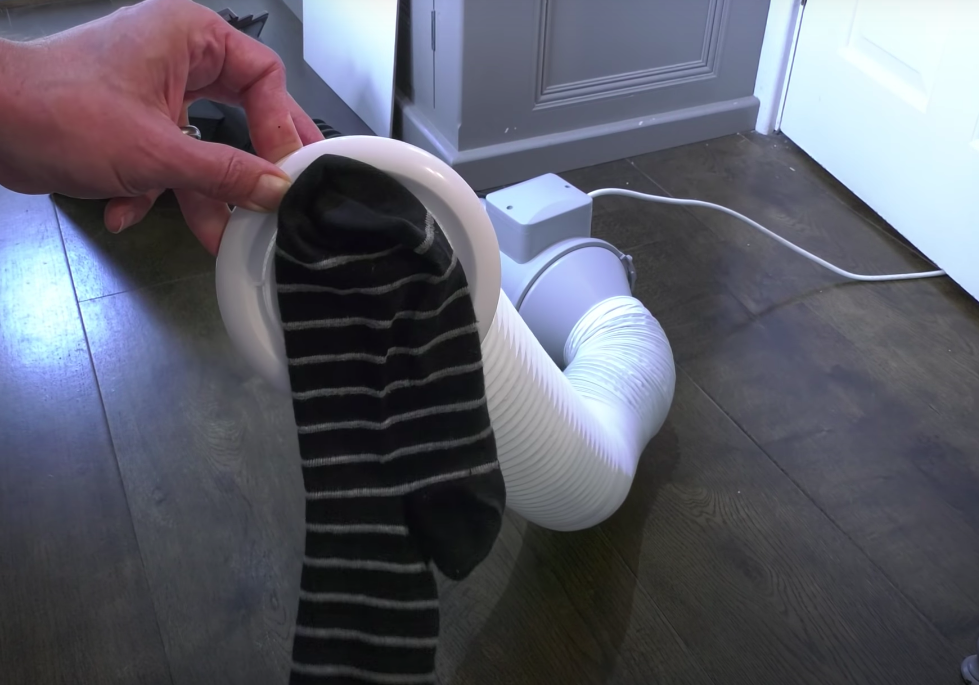
This inline fan is so powerful, so whilst I do love the Svara, I am 100% installing one of these inline fans on my next bathroom project.
So that’s it for today! It did turn into a bit of an epic length video but I hope it was useful.
See you soon! Once again, massive thank you for reading and watching. Feel free to leave a comment below and let me know how you get on with your own bathroom project.
Oh, and if you’re new to my YouTube channel, click on the link here to subscribe!
I’m always looking for ways to make this sustainable now I’m doing it full time, so if you like my content and to help me keep providing it here on this channel for free, I would be so grateful if you could visit my Patreon page, to support me. For just £5 per month, you have daily contact with me through my Discord member forum behind the scenes videos and automatic entry to my free monthly giveaways. Please click here.
* The Amazon links above (if any) are affiliate links. It doesn't cost you anything to click on them but I do earn a small commission if you do.
And here's the legal bit I have to state: As an Amazon Associate I earn from qualifying purchases.