
Designing the ultimate kitchen lighting system
A chance comment from one of you on a completely unrelated video has set me on a path to find a kitchen lighting system that we’re absolutely delighted with. In today’s blog I’m going to share with you my top tips and everything else I’ve learnt from the initial design stages of our lighting, all the way through to installation itself.
So what was that comment?
Well back in Jan 2003 my viewer, Ben got in touch to say he’d been watching my knife sharpening vid and couldn’t help noticing the electrician’s grid of lighting - electricians putting up lanes of uniform lighting on the ceiling. You typically end up with a brightly lit uniform pattern of lights, often cool white, non-dimming and if you’re lucky the odd under cupboard light.

However, this sort of system takes no account of any of your intended activities in the kitchen…
Ben put it brilliantly “it prioritises neatness of the pattern of lights in the ceiling over where the lights should actually go”. It’s basically all on or all off, or dimmed if you’re lucky. And that’s exactly what I had in my old kitchen, where I later installed a dimmer which at least helped to reduce a bit of the glare and enable us to do a bit of mood lighting when entertaining. But to be honest, half the time I forgot about the dimmer so we just put up with our electricians’ grid.
Ben had made a bit of a mess of his hallway/ landing and got in touch with a bloke called Guy at a lighting company, where lighting design and the quality of the hardware is very much the priority. He suggested I pick Guy’s brains in case I was ever thinking of redoing my lighting. Conveniently, my kitchen renovation was coming up, and I instantly remembered Ben’s email.
Guy works at a company called Phos, and I should point out that other than getting a small discount on the lights they haven’t otherwise paid me in any shape or form for mentioning them in today’s video.
I sent him over the plans for my kitchen, and he sent back some suggestions as to how I should light it. Initially he sent over to me some basic notes and ideas. But when I pointed out the velux window we had in this area, he refined it and we ended up with this lighting plan. I’ll run through the various elements later on. But take a look at this new lighting plan in comparison to what we might have ended up with and you can immediately see the glaring brutality of the classic electrician’s grid framework.
New lighting plan:

Old electricians’ grid plan:

Another viewer called Denise very kindly wrote me the most brilliant guidance she herself picked up from an interior designer. You can view this guidance in my YouTube video and see her notes in the description as a lot of what I explain in the video and in this blog is modelled on Denise’s guidelines.
Different circuits
This is the key to producing your own professional style kitchen lighting system. The components I show you today are more expensive than your average LED gu10s from Screwfix or an electrical wholesaler, but you don’t need to spend what I have to achieve similar results.

I’ve got 7 circuits in total. These are all designed to light different areas depending on where you are in the kitchen or crucially if you’ve got friends over, to light different areas to suit different moods or ambience settings. They’re all dimmable but they don’t need to be because having this many circuits means you can switch off half of them to create a similar effect you do when you dim lights.
Starting in the kitchen over the units, I’ve got lights in two different placements. Where we’ve got wall cupboards, the lights are placed directly above the edge of the floor cabinets - this means they’re in exactly the right place when you’re working on the counter.

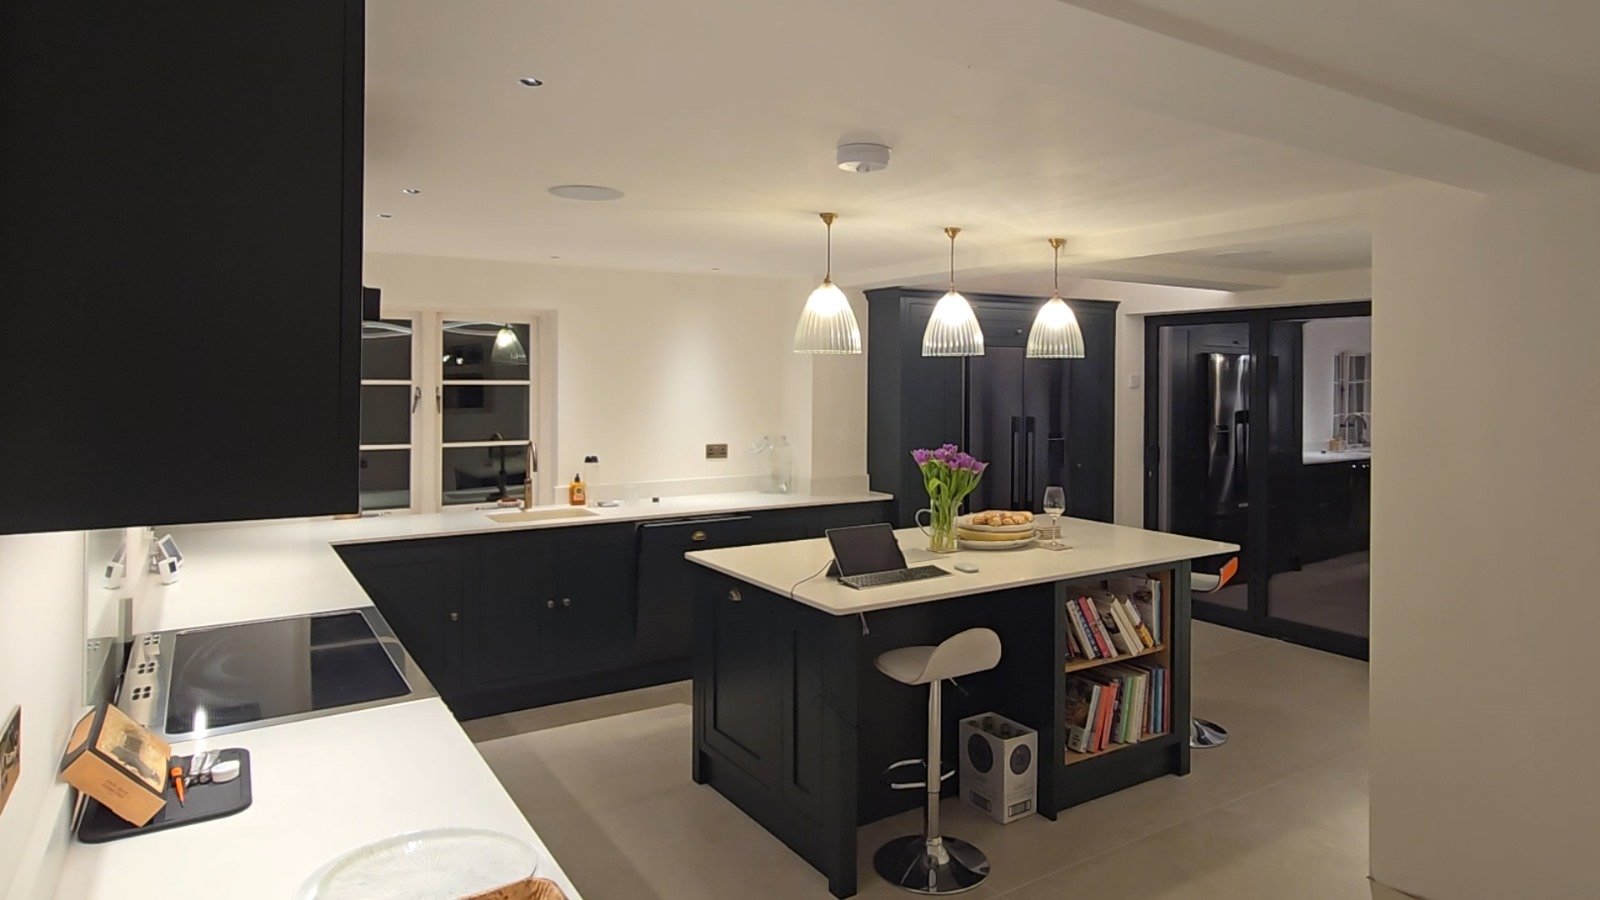
Above the sink the lights are placed centrally on the units 30 cms in from the wall. This means, as Denise said, the lights shine directly onto the worktop rather than shining down behind you which would cast a shadow over what you were chopping etc. These are all on one circuit with these two lights which will illuminate a seating area possibly at some point - we haven’t decided yet.
Circuit number 2 is 3 pendants above the island and finally I mentioned to you about the velux. This meant we couldn’t put downlighters here. But Guy wasn’t phased with this. He suggested an LED strip, also dimmable, hidden in an aluminium cornice profile - and this was circuit number 3.

We’ve actually got a 4th circuit. Guy specified undercupboard led strips which I paid for. I didn’t think we needed these and so I didn’t bother putting them in but when we switched everything on we realised the lights cast a shadow under the cupboards, so I hastily retrofitted the led strips under the cabinets - which are both powered by a single transformer hidden in one of the cupboards. I’ve got to say I’m really pleased with how this went and now we’ve got this stunningly illuminated area should we need it.
The eagle eyed amongst you will notice he also specced up an led strip under the island. I haven’t gone for this in the end, although I could install something in the future should I decide to.
Moving into the dining area we’ve got the main circuit which lights up this butlers pantry cupboard - again they can be angled to light up the inside of the cupboard, and a further 4 lights illuminate this zone - I guess you’d call this the kitchen walkways or common areas of the room.


On a separate circuit we’ve got 3 downlighters over where the dining table will be, and finally another led strip lighting up this area which could be a bit of a deadzone without them. This is in an aluminium slot recessed profile.
In what will be the utility I’ve got 4 more downlighters on a simple, non- dimmable circuit.
So these lights are wired into a standard 2 way lighting circuit with varilight v pro dimmers at one end of the circuit. We’ve got the ugly dimmer board here in what will be the utility and a more aesthetic screwless plate light switch here in the kitchen. (see below) There is also smart phone app functionality, but I’ve already got too many gateways in my kitchen and I wanted to keep this simple and operable by anyone who walked into the room.

Symmetry
Let’s go back to Denise’s brilliant guide. As she says, with this bespoke system you have to throw symmetry out of the window. You put them where you need them. I have to say with my slightly OCD tendencies I rather struggled with this. I made sure everything that was meant to be in a line was lined up using my DeWalt laser level.

One of the lights in the dining room should have been central to the wall, but I couldn’t resist lining it up with the dining table lights. I think this will be handy if we end up moving the dining table into the corner of the room rather than here where we have put lights to illuminate it.
colour/light engine
In the past we’ve been lured down the cool white route which produces an anaestheticsed laboratory/ clinic style look. These days on the advice of various lighting designers we always go for warm white which is easier on the eye and gives you a more real life, natural light.
So the main lights are 3000k, 30 degree beam and 9w which is up to 635lm, with the dining table lights a narrower 20degree beam and 4w up to 378lm.

The led strips are also 3000k 14.4w, 24v. Each have their own transformer although I’ve got both undercupboard LEDs running off the same one and the pendant light bulbs weren’t chosen that scientifically - I ended up with 2700k, 7.5w bulbs with the traditional looking led filaments.


The LEDs for what it’s worth are 14.4w 3000k - basically to match the light warmth of the rest of the room.
angling, anti-glare and cost
The angling is something I’ve never thought about before but it really is pretty useful - particularly here above the pantry cupboard, and having black linings to the downlight sockets helps to reduce glare.
What about the cost?
Well these things aren’t cheap. I will leave a quick breakdown of the components on my project below, and at £110 for the downlight and frame you’ll immediately be thinking of how you can reduce this cost with adjustable alternatives on the market.
Phos will point to the tiny, almost ingenious design of these trimless lights. They will also point out the increased heat sinking built into the light and therefore increasing the longevity you get from a downlight that has a separate transformer. They are able to offer a 5 year warranty alongside this. Whilst gu10s might be a fraction of the price with the transformer being inbuilt, this also means that the heat sinking ability is weaker than that of the quality of the diode and the accuracy of its colour temperature matching.

But is this worth the jump in price?
I leave you to decide that and at the end of the day it depends on budget and whether you’re after a premium or functional system. Time will tell how long these lights last and I’ll post a vid in a few years time to let you know how I’m getting on with them.
the installation
Downlights
My electrician came in and did the first fix of the electrics before the plasterboard went. Armed with Guy’s plan we positioned the lighting cables roughly where we wanted the downlights and I created a plan so I could remember where we had positioned the cables once the plasterboard was up. This was great, but it didn’t stop us peppering the ceiling with holes as we kept moving the lights whilst we decided where the dining table was going to go.
We put rockwool in the ceiling to try and dampen sound travelling from the kitchen upstairs, which was done with the aim of reducing the ceiling space. The downlights require a total void space of 98 mm - which is partly to guarantee enough space for the heat to dissipate properly from the heat sink in the light, but also because any less than this and you’ll struggle to get the transformer up and into the ceiling space.
DON’T…
…put the transformers up beforehand as then you can’t connect the downlights to them and you might need to remove them later down the line anyway if they fail. And suffice to say I was right on the limit in terms of the void space.


With the ceiling up I then had to cut the 64mm holes for the lights before it was plastered, because I’ve gone for these trimless frames. With the first one drilled, I couldn’t feel any electrical cable in the ceiling, and so we had to take down the entire sheet only to find it just out of finger reach near the hole so I bought this endoscope on amazon and it’s been a complete game changer. You plug it into your phone and can immediately see each cable which then gives you the ability to send your wire hook in the right direction to snag the cable.
The trimless frame is then glued and screwed in position. I then jammed insulation wrapped in cling film into the hole to protect it whilst my plasterer Gerard plastered in the fitting. This is reasonably effective although you have to remove the plaster as soon as possible and certainly before it starts to harden as if you don’t do this, I found the plaster quite hard to completely remove from the light socket without leaving a white mark.


I did find the downlights to be quite tight in the socket but a bit of plumbers silicone lubricates the rubber o rings that keep the downlight in place and make it really effortless to tilt.
2. LEDs
So as I said I had a few LED strips to install.
First off I installed the under cupboard lights. My kitchen fitter had made the cupboards with removable base and sides which gave me the idea of recessing the led profile in the base, so I cut the base into two with my circular saw. My electrician put the cabling in from a switched fused spur and I just needed to cut a channel in the plasterboard to link the cables between the cupboards - remember these LEDs were very much an afterthought.
The led strips came with cable connecting each end but I found this quite bulky and difficult to bend whilst taking away leds from the profile. So I bought these clever little connectors on Amazon. The alternative was to try and solder the wire onto the led strip which I didn’t fancy doing - particularly up at the ceiling level LEDs - just too fiddly, but the connectors worked a treat. With the transformer hidden in the cupboard and the diffuser in place the leds are stunning when illuminated.


3. Aluminium profiles
Firstly, the cornice needed priming - I used Zinsser Cover Stain spray for this. With the backing plate screwed into place, I pushed the cornice onto the backing plate and caulked the gap underneath for a seamless finish. I later applied a finish coat of emulsion - obviously not what you’re meant to use but it dries fine and adheres well whilst giving you exactly the same colour and textured finish as the walls.
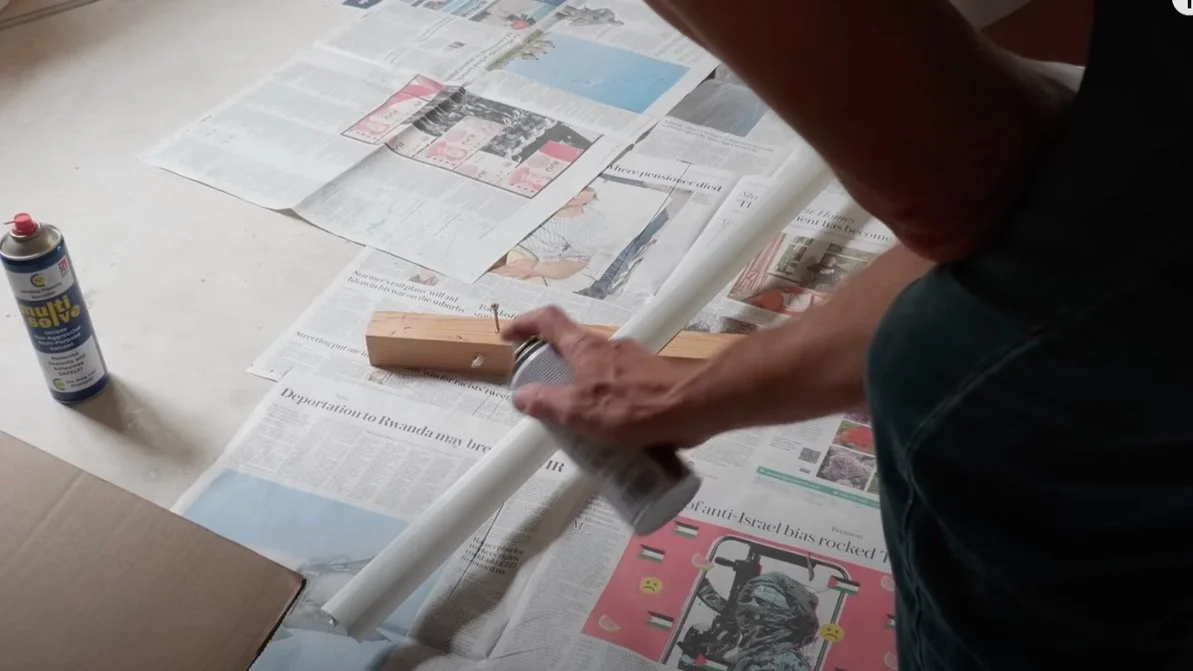

The LED was fiddly to install as I cut the cable very close to the wall. What I should have done is made a hole in the plaster to give me a longer lead that I could have then just threaded into the hole before filling, but I managed it and then peeled off the adhesive strip on the led and fixed it down into the profile before fitting the diffuser on top.
And finally that slot profile - which runs 5m down the dining area wall and was the first to install as it needed to be inlaid above the plasterboard.
The kitchen ceiling in our old cottage is irregular - not ideal for this sort of profile but I worked out where it dipped and mitred the join so the profile followed the ceiling. It does look a bit awkward but the way it lights this area more than makes up for it. I primed the profile with Zinsser BIN. I then applied multiple coats of emulsion, partly because I haven’t got metal paint in a tint to match the walls, but also because as I said also the emulsion guarantees the same colour and texture as the surrounding walls.


So that’s it! I hope you’ve found today’s blog useful and thanks again for reading.
As I said earlier, you don’t have to go for a system exactly like this. However, do feel free to borrow ideas and inspiration from the system I have shown you to craft the perfect lighting for you.
And don’t hesitate to watch my YouTube video if you are stuck or unsure about what your light installation process should look like each step of the way.
If you are new to my channel, don’t forget to subscribe here to stay up to date on new videos!
The Amazon links above are affiliate links. It does not cost you anything to click on them but I do earn a small commission if you do.