
the best wall insulation for old properties
I did a video a few months back explaining all the problems I had when builders dot and dabbed standard plasterboard to my kitchen walls back in 2010.
I explained that this is a thorny subject with a lot of strong views - and the video prompted some great discussions in the comments section. But one comment really stood out…
I had said I didn’t fancy going down the restoration route of just relying on lime plaster because it wouldn’t keep my house warm enough. A viewer called Ironimp pointed out that this wrong as the restoration lobby would actually recommend breathable insulation and lime plaster.
I don’t like making inaccurate or generalised comments so I decided I owed you all more research before I insulated my kitchen. And so today I’m going to explain what system I ended up using and why I think it’s so good as a retrofit solution for old properties like mine.
Problems with dot and dab
If you want to delve in it for more information to understand why I’ve gone for my current system and not dot and dab plasterboard, feel free to watch my previous video on how NOT to plasterboard a wall. Or, in case you have a chance to watch the video, you still need to understand the problems you’ve got installing one of the other options in an old property. So here’s a quick summary:
Plasterboard isn’t insulated
No vapour barrier - interstitial condensation (vapour control vs vapour barrier)
Foil backed - not continuous vapour barrier and can’t be glued.
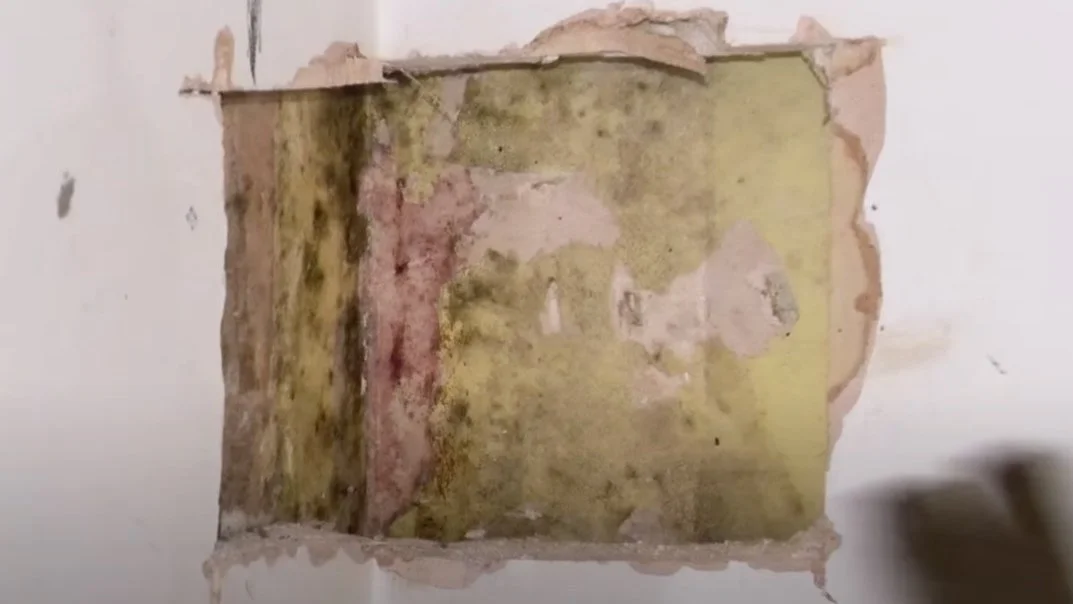
So as you can see in my old kitchen you get mould forming behind the plasterboard. Not as much as I thought I’d find but then I’m a bit over the top keeping humidity levels down.
What are the other options?
External wall insulation
External wall insulation is good on so many levels. By insulating the outside of your property, you can treat the internal brickwork, render, plaster as a property that can be heated up as easily as I’ve done with my underfloor heating. But why is it so effective?
Great thermal massing
With the wall being able to breathe more easily, the issue of condensation issue reduced. But don’t forget, vapour control is still important as it is in any property regardless of the way you’ve insulated. So basically don’t just clamp your windows shut and make sure you watch my video on why you need to keep moisture low during the winter months.
However, could be problematic to retrofit for sills and eaves etc.

2. Internal wall insulation
Before I start on how I have previously used internal wall insulation, there are a few problems with it that you should remember:
Vapour control is not continuous
Barrier is broken between sheets, at corners, as well as where you cut holes for sockets.
Prone to condensation


When I first started insulating internally, I dot and dabbed Kingspan K118. The problems with this are the inbuilt vapour barrier isn’t continuous because you’ve got breaks in the plasterboard between each sheet, around sockets, in the corners and around windows. Whilst you might think the issue of condensation is one you won’t have to deal with, it’s much more common than you’d think. Just like I discovered in my kitchen!

In our bedroom I battened the wall infilled with 1 inch PIR, foil taped over and then screwed K118 to the battens and insulated fully around the reveals. This worked really well and the socket boxes are in front of the vapour barrier.
It’s not perfect though because you’ve still got an unbreathable system which strictly speaking should be ventilated. And in fact in an unventilated system you’re meant to have vents top and bottom between each stud spacing, and that would look terrible wouldn’t it!
swip
After IronImp got me thinking about my insulation process in his comment, I came across a company called SWIP, who do breathable internal wall insulation systems.

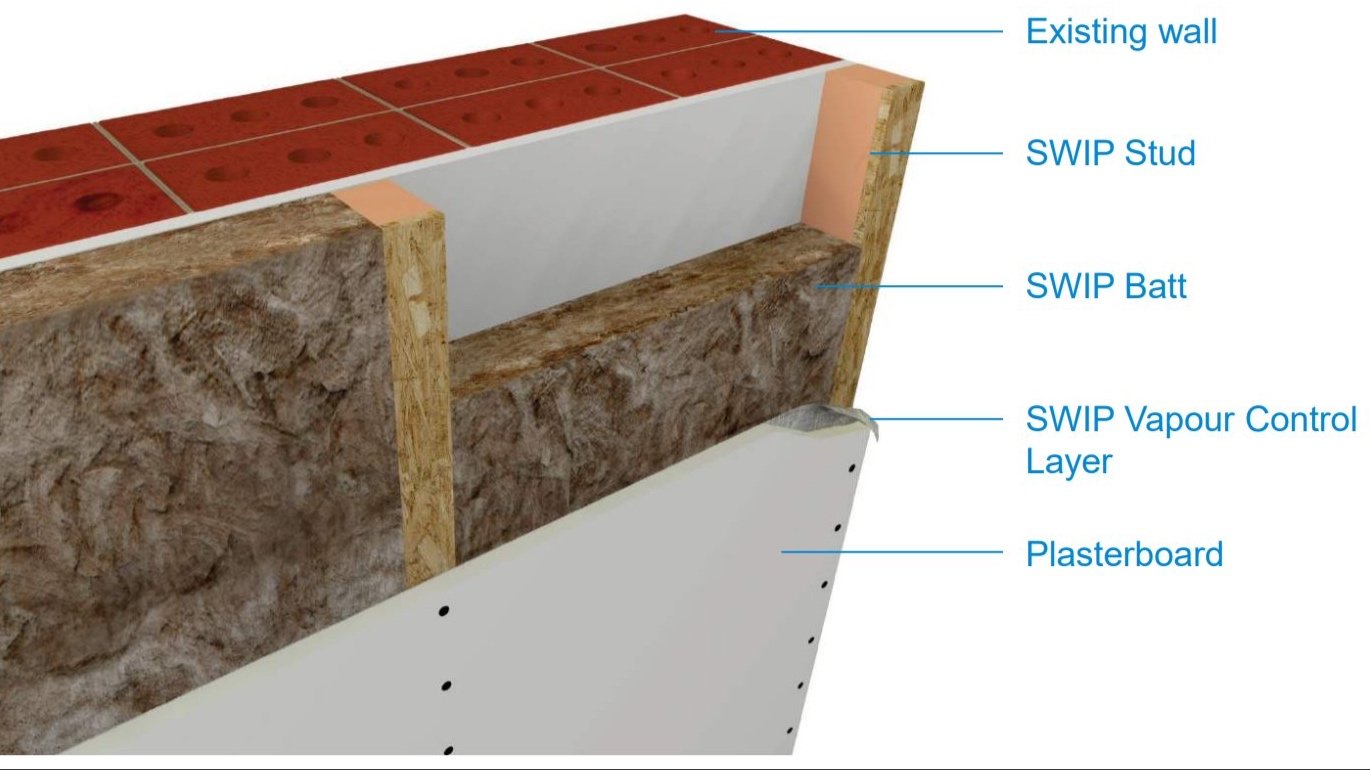
SWIP have taken a system based approach to IWI where each element has been designed to work within the system. It’s specifically designed for retrofitting to existing external walls. Installing the 95mm insulation on a typical uninsulated wall like mine will bring about a u value improvement of over 80% from 2.00W/m2K to 0.30W/m2K.
You’ve got insulated studs which eliminates the cold bridging issue you encounter with standard wood studs. They’re faced with OSB and are anchored in position with screws - 5 fixings per full length stud and when fixed the battens have a huge pull out strength.
You infill between each SWIP stud with a Knauf mineral wool with ecose technology. This means no added formaldehyde or phenol, and therefore very low levels of dust generated and very soft to handle.


You then add a vapour closed or vapour open barrier depending on your requirements (the nature of your walls will have a bearing on this). I went for the intello vapour open membrane to give my walls the best possible chance of breathing which is fully sealed around the perimeters and where the barrier is pierced for services and the like

And on top goes standard plasterboard and plaster. Now this is going to create a lot of debate as a lot of you have already said after my update vid it’s a shame I didn’t use a breathable plasterboard and plaster. Well as you saw from the mould behind the plasterboard in my old kitchen, plasterboard DOES let vapour through. To quote Sam, our resident guru on the Discord forum, the idea is to create a pressure gradient that makes vapour move to the exterior rather than the other way round. Vapour will get through, it will just get through easier with lime based products.
Here’s a simple analogy I’ve pinched off Sam:
Think of plasterboard as a sponge. If the sponge is the material and the water is the vapour trying to get through, this standard sponge is plasterboard. Whereas gypsum plaster and this reticulated sponge is a lime plaster product. Lime plaster has a unique vapour pressure curve where even at lower pressures it still tries to shred vapour through it.
So that’s the background. Let’s have a look at how I got on with the install…
The installation
Step 1: Prep
First up I had to trim down the insulating layer I installed for the underfloor heating screed, and also the expansion strip in front of it to make way for the horizontal section of the insulated stud.

It’s also suggested you apply a parge coat to level off the wall making install easier. I’d had enough mess to last a decade so I decided not to bother doing this. I’ll get onto how I levelled everything off later on.
Step 2: SWIP studs
Before I get into it, here's a list of tools that will come in handy:
Screws and fixings to stick the studs to the wall
2 drills: one with a longer bit to drill through the studs, and one to drill the holes for the fixing.
An impact driver to screw the batons into place.
A heavy duty foam gun.
So I started off on the horizontal sections - fixing the floor and ceiling studs before moving onto the vertical studs. Remember you need 5 fixings per stud, min 75mm from edge, 600mm spacings and a minimum of 40mm penetating into the brick behind.


I wanted everything to be as true as possible, which involved notching or scribing the studs around lumps and bumps in the wall. One of the things I loved about these studs is that they’re straight as a dice, so you know when you’ve over screwed the stud on an uneven wall.
With each stud in position I locked it in place with expanding foam. And a bit of a tip - give the nozzle of the gun a quick spray with some cleaner and it’s ready for the next time you need it. You could of course wait until the end before foaming but I liked to do it incrementally as it breaks up the job and gives you a bit of variation.
With the first two horizontal studs fixed I could turn my attention to the vertical studs, which you position at 600mm centres which leaves a 500m gap between the studs. This is important as it means you can push each sheet of knauff insulation or SWIP batt in place without cutting it down.
Again, I wanted the vertical studs to be plumb or at the very least to line up with the horizontal studs. This involved trimming them back in places. Each gap between the stud and the wall also needs to be filled with foam.


A few people have asked me why I didn’t make a frame of studs like I did here for one of the internal walls. The reason is that the OSB won’t support the entire frame like it would with a thicker stud wall, and my walls were so uneven that it made sense to do each one bit by bit. This was very time consuming but led to an excellent result.
Internal corners and reveals:
To instal your internal corners, you infill the corner void with insulation before fixing in place the adjacent batten so that the insulation is continuous around the corner
For reveals, you stud up to the edge of the reveals. This was the point where I had some pretty wild gaps and so what I tended to do here was loosely position the stud in place foam behind it and then tighten the screw when the foam had gone hard.


Ceilings:
Careful consideration has to be given to the integrity of the intermediate floor joists where they are embedded in external walls. These new ones were mostly tanelised; the ones that weren’t were treated with additional bituminous paint where they were embedded in the wall. So we decided to take the vapour barrier up in between the joists - supported by off cuts of the SWIP studs.

SWIP’s advise was to leave this zone uninsulated however as it contains the original timbers embedded in the wall are not tanelised.
Step 3: Electrical sockets and pipework
I’ve obviously spoken of the complexity of installing sockets in internal wall insulation, but the Swip studs really come into their own here.
I was recommende telescopic stud and joist bracket on the Discord forum and they didn’t disappoint, and my electrician took full advantage of the studs for routing all the electric cables
The telescopic studs also came in handy to fix all pipework. This is because I had to route the hot and cold water feeds from one side of the room where the kitchen was to the other.
I bought some self drilling screws on Amazon which I screwed directly into the side of the OSB and also used these to attach the socket boxes to the telescopic studs


STEP 4: Insulation
So then it was in with the insulation, or SWIP batt as they call it. I’ve said a lot about this already but suffice to say it was easy and pleasant to install. I generally cut it with an old carving knife although it’s also easy to cut with scissors.
The batts need to completely fill the insulation zone between each stud - so you friction fit them and where you have to cut the insulation you make it 5mm wider than the stud gap. Where my centres were less or slightly more than 550mm I turned the insulation at 90 degrees and installed it horizontally.


Step 5: Vapour control membrane
And so it was onto the vapour open intello plus membrane - not to be confused with a vapour barrier or vapour closed membrane that lets nothing through.
How does it work?
Well that’s probably something for another video but it essentially changes its vapor permeability in response to the relative humidity of the surrounding air. The membrane becomes more vapour open when exposed to higher relative humidities and more vapour closed in drier conditions.
Remember me talking about the flaws to insulated plasterboard systems in that there’s a break between each sheet of insulation? Well not any more as you’re applying a complete system and sealing all penetrations and perimeters before you board.
With this you get two types of tape - the blue to join two pieces of the membrane together, and the white to go around the perimeters. You also get a primer for sealing the floor and joists before you apply the tape.


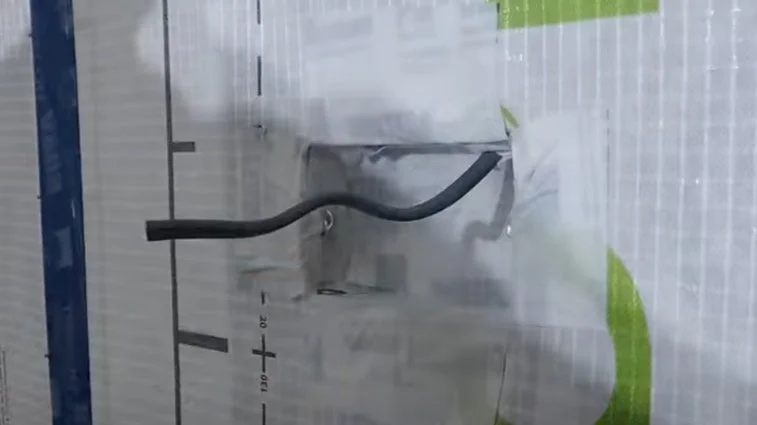
You need a staple gun to fix it in place. On the first room for some reason we fixed it in vertical sections - which means you use up a lot more of the blue tape. This is how you’re meant to do it.
As you can see in the image above, I cut round the socket boxes and use the white tape to totally seal them. I also primed the ceiling joists and taped around them in the area where we were insulating them. And on the floor I applied a coat of the primer and then taped the membrane to the floor.
And around the window reveals, it’s a good idea to tape the reveals before you insulate them.

Step 6: Insulating the reveals
Which brings us nicely onto the reveals. The first point here - you've got two different types of insulation boards to choose from.
This 12.5mm board for reveals where you haven't got a lot of space around the frame, and a 27mm insulated board where you do have room to work with. I chose the 27mm board for the window and door reveals because luckily I've got plenty of space.
To cut the boards to the reveal size I used my circular saw freehand, but if you’ve got one a track saw might be a better option for a straighter cut
I got into a bit of a mess with the first lot because I didn't seal the membrane around the perimeter of the window before adding the insulated plasterboard.
But by the time I got to the TV room windows I was getting the hang of the foaming after all that practice on the kitchen walls. I sealed the membrane to the reveal before adding the insulation board. I'll do another video on the art of using foam adhesive but basically I found the perfect approach was to start with the horizontal section, obviously. You need to cut away the plasterboard from the ends so that when you add the sides the insulation is continuous and not broken by the plasterboard, as shown in the picture below (right). My mini circular saw was brilliant for this.


Foam doesn’t stick instantly and needs a few minutes to cure, and I learnt that the best way to fix it into place was to lightly pin each section with drywall screws to the OSB at the front of the SWIP studs, but also by inserting drywall screws a couple of millimetres into the window frame as these were all covered when the reveals were plastered. Lots of adjustments with my combination square the the spirit level and you have a perfectly plumb and beautifully insulated window reveal.
Add the sides, lightly screwing them to the OSB whilst the foam set and also lightly screwing them to the window frame again to stop any movement. These tiny pin holes will be and have been hidden by the plaster. Then you can add the reveal ceiling section by bending it to fit it in place again pinning to the osb and using my 2.9m Magnusson extension support rod to stop it sagging. Lots of spirit level action and you have a perfectly plumb and beautifully insulated window reveal. And on so doing we've solved that age old conundrum of how to properly insulated window reveals - which are otherwise a major magnet for cold spots and therefore mould.
And that my friends, was that. I finished the IWI just before my old mate Gerard arrived to do the plastering but unfortunately not in time to get the boards up. It was then a 3 week long process of boarding, studding internal walls and using a lot of foam to try and stay ahead of him so that he had enough plastering to do each day. Below I’ll remind you of a few things that you should remember when insulating your walls:
Top tips
Make sure there aren’t any breaks in the barriers when trying to prevent vapour from getting in. Vapour will flood through any weak point!!
Think of plasterboard as a sponge - standard plaster, just like a standard sponge, lets water through a lot easier than lime plaster.
Remember that foam doesn’t set instantly, so use the necessary tools to make sure your OSB doesn’t collapse!
Once again, thank you so much for tuning in. To stay updated on all things DIY head over to my YouTube channel, a platform which will guide you towards your perfect home!
The Amazon links above are affiliate links. It doesn’t cost you anything to click on them, but I do earn a small commission from it if you do.