
How to fill cracks in render
My cottage was rendered with tyrolean back in the 1970s. It has cracks, and I mean a lot of them. So in this blog, and also shown in the video below, I’m going to show you the process I’ve gone through to prep and fill them. Whilst I’ve got a couple of windows that still need installing, the next job will be to strip down and refurbish these gutters and finally paint the render, hopefully before winter sets in. For today’s crack filling and render repairs I’m going to be trying out 3 different products, well actually 4, and telling you which one I think worked best.


Today's Toolkit

Today’s toolkit consists of a few different render products:
Tyrolean render
To extrude the Metoset and Fibacryl I’ve got this high strength geared applicator gun from Chemfix although it only fits the shorter 310ml tubes and my longer 380ml applicator gun would have done the job fine. It does need to be geared though, rather than a cheap skeleton gun - which I’ll come onto in a bit.

I have also got:
my 18v grinder - I started with this JCB I’ve had for a few years now and will also be trying out Ryobi’s new high performance RAG18X

I’m experimenting with two disks - this Duro diamond universal blade, and this Abracs mortar/brick raking blade. I also had a go with this mortar raking tool
My trusty leaf blower for removing all the dust from the joints
Disposable nitrile rubber gloves
Ear defenders - too late for my tinnitus but I’m keen not to make it any worse
My trusty Small tool
Wire brushes - manual and for attaching to a drill and grinder
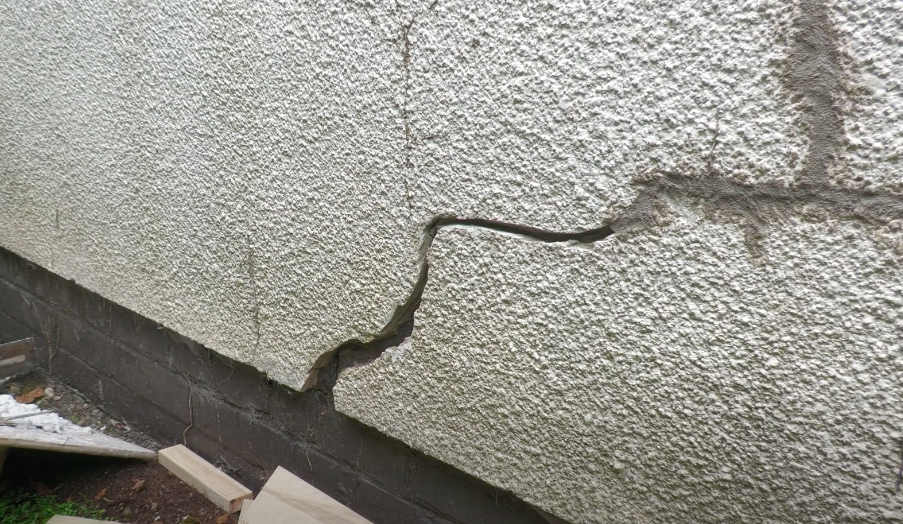
Clearly, on a victorian cottage like this, ideally you’d allow the bricks to breathe. But the problem is mine was rendered by the previous owners back in the ‘70s. The render was done well, is still firmly keyed onto the bricks beneath and is over an inch thick - plus I don’t know what it’s hiding so it’s not really practical for me to remove it. But the numerous cracks need sorting out to prevent rain and moisture getting into the bricks beneath.
When I moved in back in 2010 as a temporary measure I piped an exterior sealant into the cracks without grinding them out. It was fiddly to do and gave no long term protection.
step one: grinding out the cracks
So the first step was to grind out the cracks. Why? Because you need to do this to give the filler something tangible to key onto/ into. Without this, the crack is just too small and you end up smearing all the filler over the surface, like I did.
I have this Bosch grinder I bought about 10 years ago but being 230v it was inconvenient to use outside given it needed a long extension lead, so I reached for this grinder I was sent by JCB a few years ago but which I’ve rarely used. I did use the Bosch later on in the process but found it too powerful for grinding out the cracks, so an 18v grinder is perfect for this type of job.

For the grinding discs themselves, in the past I’ve just used standard stone cutting disks but find they wear out too quickly so a year or so ago I bought this Duro disk (cuts construction materials plus metal) . It’s fantastic, carries much less risk of snapping and has shown little wear given how much I used it.
There was a lot of grinding to do with around 16m of cracks across the render. For the majority of it I used the Duro disk although I did try a small section with the Abracs brick raking blade and found it ground a wider gap than necessary in the wall and actually didn’t penetrate deep enough into the crack.

But the render is easy to grind and it’s not a difficult process - it’s just messy, and I was glad to have my 18v leaf blower that you might have seen in my other videos, to remove all the dust from the ground out cracks and surrounding areas.
I thought I’d do a quick mini review of the Ryobi grinder from their new HP range, as this arrived literally in the middle of this job. Ryobi haven’t paid me to mention this tool. I’ve been using Ryobi right from the start of this channel and they recently started sending me the odd thing to try out. I’m not great on reviews, I prefer to mention the tools in the context of the job I’m doing so that’s why I’m sandwiching this in now. I mentioned the power of the Bosch earlier. At 9200 revolutions per minute the Ryobi sits in between the Bosch and the JCB. More on that in a minute. They’ve done away with the disc spanner in favour of a Milwaukee style toolless fix tec nut, which I had to use a spanner to initially loosen. Personally I prefer the spanner, and I think the button you press to lock the grinder wheel in place to loosen the nut needs some work, as I think I’m reasonably strong, but it took a lot of effort to get it to engage, oh and Ryobi have remodelled their batteries which I think is a pity as I really liked the rubber base on the old battery line. Those are my gripes over though. I think the one handed trigger is genius as I always have a bit of a two handed battle to get grinder triggers to engage, and I love the power. If the Bosch was too powerful the JCB was perhaps a bit underpowered and the Ryobi hits the sweet spot for jobs like this. I really enjoyed grinding out the cracks with this grinder. Review over.


Step two: filling the cracks
And so we’re onto filling the cracks. I thought I’d show you three different processes here so you can assess the merits of each and decide which is best for your job.
Metoset
The first involves this Metolux Metoset 2 part styrene free polyester resin from Chemfix. I first used a Metolux 2 part wood filler (bought from Johnstone’s) in a video 5 years ago. Chemfix got in touch after the vid and I’ve since used their excellent ERC10 and EHB60 epoxy repair systems to rebuild a dormer window and for furniture repairs.
When I told them about the cracks they sent me a few tubes of this Metoset free of charge but are not paying me to mention them.

The filler comes in two parts that are mixed through this nozzle as you extrude it out of the tube. It’s a good idea to squeeze out a short section before you start using it to ensure an even flow of resin and activator are extruded, as the first few cms of a new tube might not be completely mixed and therefore set properly.

But from that point on it’s a joy to use. What stuck me about this set up is just how far into the crack you can penetrate with the filler. How you tool the surface is up to you, but I took to wearing disposable nitrile gloves.
They’re thin and so you can be really precise as you work, pressing the filler firmly against the ground edges at surface level to ensure a complete, comprehensively filled crack. What’s great about using this resin with mortar is that the resin has a sandy texture which I really like for mortar filling jobs. The sandy texture gives it strength and viscosity - so that it doesn’t slump when you tool it even in thick gaps or shrink at all when set.
And I used it to fill the void behind the gutter downpipe where water has historically got in to create these lateral cracks. The gutter was also working loose on its fixing pins but is now rock solid - more on the gutter refurb next time.
I mentioned applicator guns at the start. Now, not all guns are created equal. To extrude reasonably thick resin like this you need a geared gun. The cheap skeleton guns you pick up are typically not geared, which is fine for siliconing jobs but means its a lot harder on your hands when extruding thicker fillers. Geared guns give a more comfortable, controlled extrusion. If you’re interested this one (the red one displayed below) has a trigger ratio of 12:1 and 6mm movement per trigger pull. It was supplied to me by Chemfix for use with their gun but only takes 310ml tubes, so you might consider buying a heavy duty geared gun like my old one (the metal one) here - bought at Travis Perkins in Cornwall many moons ago, that takes 380ml tubes.

And included in that will be these two top of the range Tajima guns, thanks to Sealants Online for sending them to me, with this Tajima Red for super high pressure applications and a ratio of 26:1 and the Tajima Blue being dual powered - you can toggled between 8:1 to 16:1 ratio at the flick of a switch. Frustrating they only take 310ml cartridges, but can be modified to fit a 380ml cartridge cage. Again they haven’t paid me to mention these guns in the video.

2. Toupret Masonry Repair Filler
And so we’re onto the Toupret Masonry Repair filler. I picked this up in my local Johnstone’s decorators centre recently when I went in to pick up the third filler on today’s list and I’ve got to confess I hadn’t heard of it before, and didn’t have high hopes for it.
It comes in a convenient 1.5kg box. As I often do, I mixed it in an old pasta sauce container, using my trusty small tool. You’re always meant to pour the filler into water as I’m doing here, but this way you can end up with more filler than you need (as in fact I’ve done here!) so if you want more control of the quantities, for small amounts like this you can reverse the process and pour the filler into a tub and just add water to it.

This is definitely a slower and messier process than using the Metoset which you can simply pipe into the gap, but with a combination of my small tool, sponge and tooth brush I’ve been able to create a pretty good mottled texture similar to the surface of the tyrolean render.

It’s set to a rock hard consistency, hasn’t slumped or shrunk and I’m going to predict that this gives us the most invisible repair of the three main fillers I’m using today, once painted.
3. Toupret Fibacryl Flexible Crack Filler
Next up, the Toupret Fibacryl flexible crack filler, which I originally caught sight of on the shelves at Johnstone’s a few years ago in it’s old packaging. I was intrigued by this filler, which markets itself as something that is enriched with fibres, moves with the substrate and will not crack.

As you’d expect it penetrates deep into the crack, but when it comes to hand tooling it to the sides of the crack, it felt like a typical decorators caulk. And what about when it’s set.
Well, the trade off for that flexibility is that it doesn’t set hard and in fact has shrunk into the crack a reasonable amount. Bottom line, I’m simply not impressed with this filler. And whilst they make a big claim as to its flexibility, this section that I extruded to test it’s flexibility snapped when I bent it. I’ll wait and see how it looks when painted, just for interest’s sake, but chances are, I’ll grind it out and replace with the Metoset.
4. Tyrolean Render


Which brings us onto the final section of this video, having a bit of fun with tyrolean render itself. Now I ordered this bag from Travis Perkins over a year ago - to cover over a large section of rendered brickwork which I unfortunately haven’t got round to tackling yet, and I bought this machine to splatter the tyrolean onto the render.
I have since used it to repair a small section of render where the tyrolean had broken away - by the kitchen door, and the eagle eyed amongst you will have noticed the shoddy job a roofing company did when they fixed a few soakers way back in about 2012 soon after I bought the cottage.
So I had this deep crack to repair and also two sections badly rendered by the roofers.
Now tyrolean isn’t designed to be laid on too thick - typically in 2 coats, but as a finale to this part of the project I thought I’d just lay it on in one coat anyway - not having high hopes for it given how old the bag of render is.

Mixing it into water as before, you’ll notice the sandy texture of this filler, which makes it easy to work but being so many years out of date was a concern.
I find a plasterer’s hawk and gauging trowel one of the most useful tools when rendering, with the plastering trowel on hand to give the surface a consistent smooth edge. Once I was happy with the render, I used a combination of bristle and wire brush and tooth brush to give it some sort of textured finish, and actually inspite of its age and laying it on in just one coat, it hasn’t done too badly, setting to a rock hard finish, although to be honest I would have done just as well with that Toupret masonry repair filler.

After applying a watered down coat of pva to create a dust free surface and to guarantee adhesion I then turned my attention to the crack round the back of the house, and was pretty happy with the result. The textured surface came from prodding the surface with a dustpan brush.

which product wins?
What conclusions can I draw from today’s project …
Well, the stand out winner for me was the Metoset, it’s just so easy to use, and a fantastic product. Close behind, I’ve been really impressed with the Toupret Masonry Repair Filler. I think you could use these almost in tandem really, the Toupret for wide cracks and the Metoset for ground out cracks.
My advice would be do not touch the Toupret Fibacryl unless you have got render that is subject to movement. Really disappointed with this - sorry, Toupret.
All details for tools today are hyperlinked in this blog and also in the description in my YouTube video.
See you soon! Once again, massive thank you for reading and watching. Feel free to leave a comment below and let me know how you get on with your own project.
Oh, and if you’re new to my YouTube channel, click on the link here to subscribe!
I’m always looking for ways to make this sustainable now I’m doing it full time (and particularly given how much I’m having to spend on kit for each video - £150 alone today on the decking oils and hardware), so if you like my content and to help me keep providing it here on this channel for free, I would be so grateful if you could visit my Patreon page, to support me. For just £5 per month, you have daily contact with me through my Discord member forum behind the scenes videos and automatic entry to my free monthly giveaways. Please click here.
* The Amazon links above are affiliate links. It doesn't cost you anything to click on them but I do earn a small commission if you do.
And here's the legal bit I have to state: As an Amazon Associate I earn from qualifying purchases.