
Installing a home EV CHARGE POINT
Our lease car went back in October last year and so we thought we’d embrace the electrical revolution and lease an EV this time round. Little did I know that just about every barrier that could have existed for an EV install did in my case. So today’s blog is a total run through of everything I’ve learnt since making that decision, including everything I’ve had to go through, financial and DIY related, to make this happen, and I’ll be advising you on all the mistakes I made, the things that didn’t occur to me and the extra costs I’ve had to incur, so you can decide whether getting an EV right now is the right thing for you.
Electrical Cable Upgrades
There are two ways to charge your EV. Firstly slow charging via a 2.3kW 3 pin plug and secondly a lot faster by means of a bespoke chargepoint typically at 7kw or if you’re lucky and have a 3 phase supply, 22kW.
So, a friend has a Golf ID3 and was charging it through the kitchen window, so I thought when we got our car I could go one step better and plug ours into the garage 3 pin plug socket.
Unfortunately it’s not that simple. Firstly with a 3 pin plug charging at about 2.3 kW, charging a 78kWh battery from empty is going to take at least 34 hours.

I say at least, because there are other factors, like the fact that power to this 3 pin plug socket is supplied from my house by a 1970s cable - I’m guessing with no more than 2.5mm cross sectional area.
If you try and send a large flow of electricity down this cable you get what’s called voltage drop - even slow charging from a 3 pin plug.
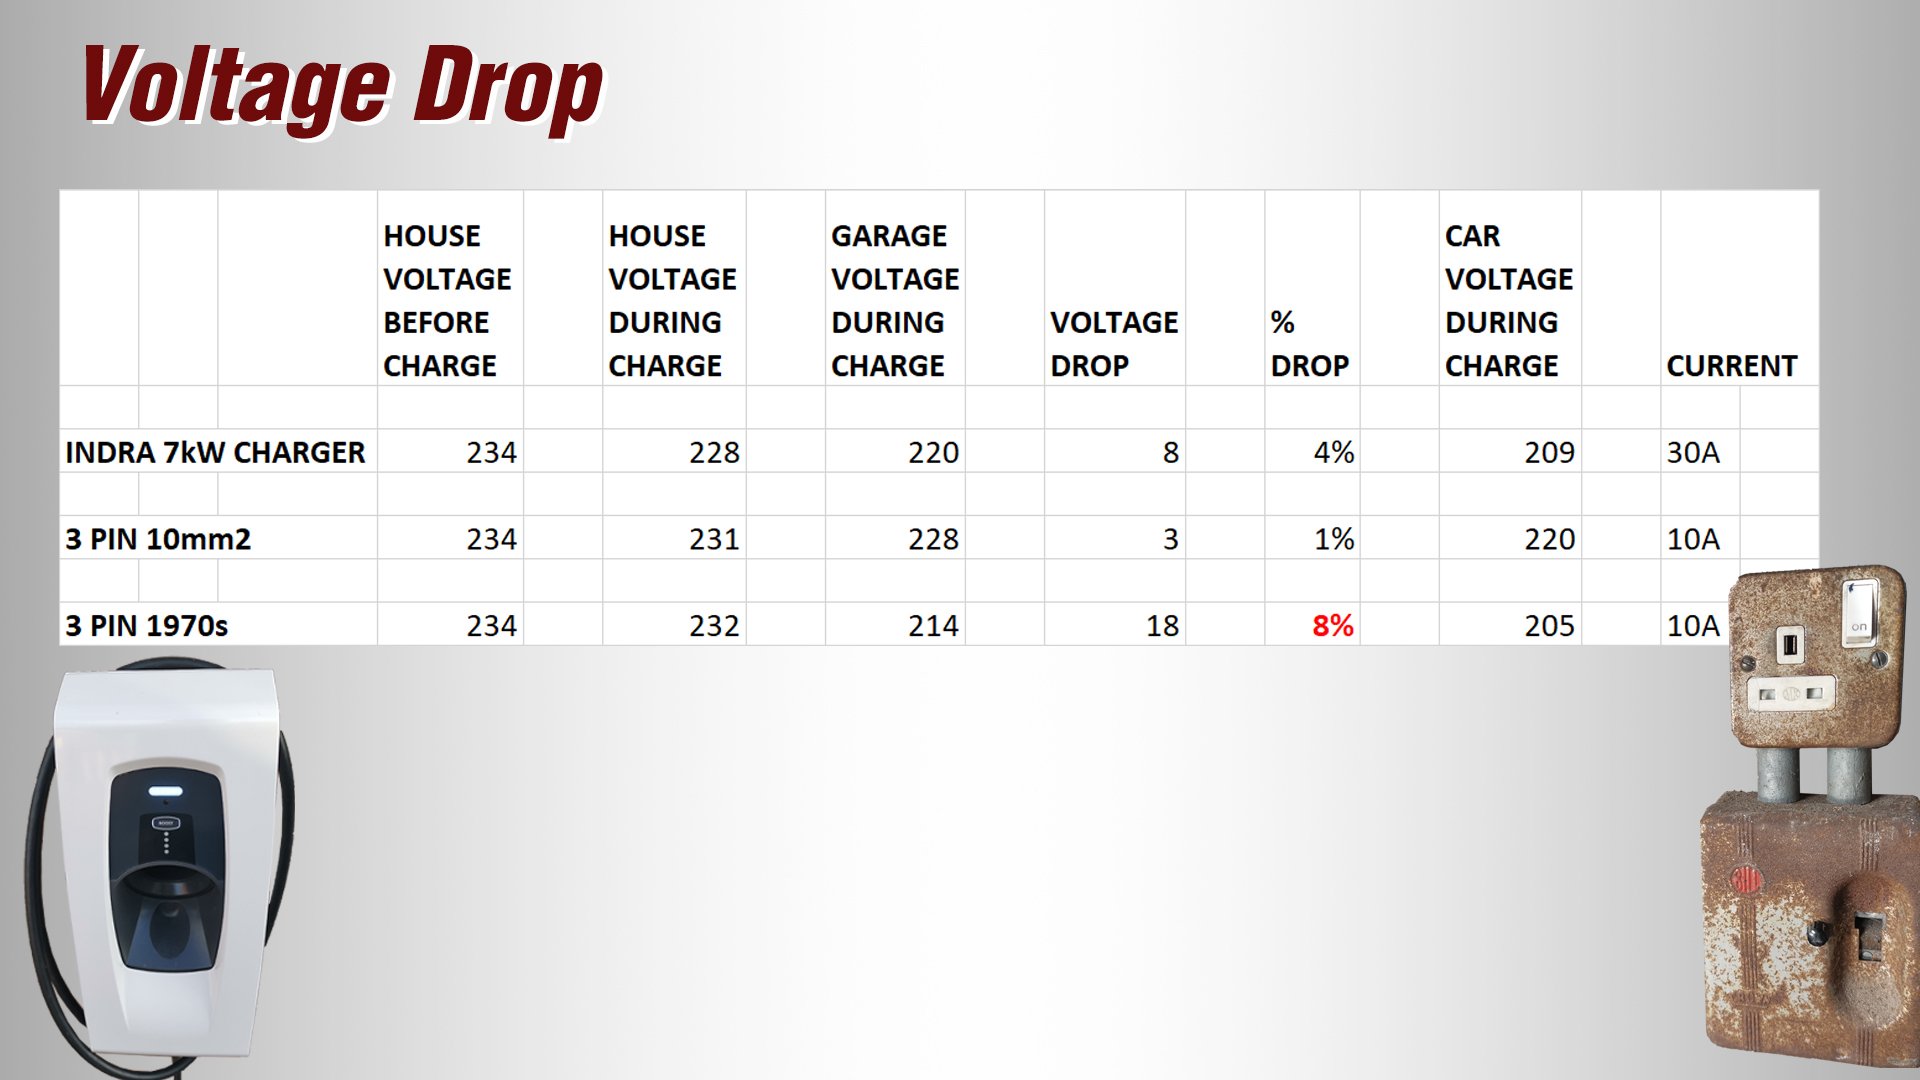
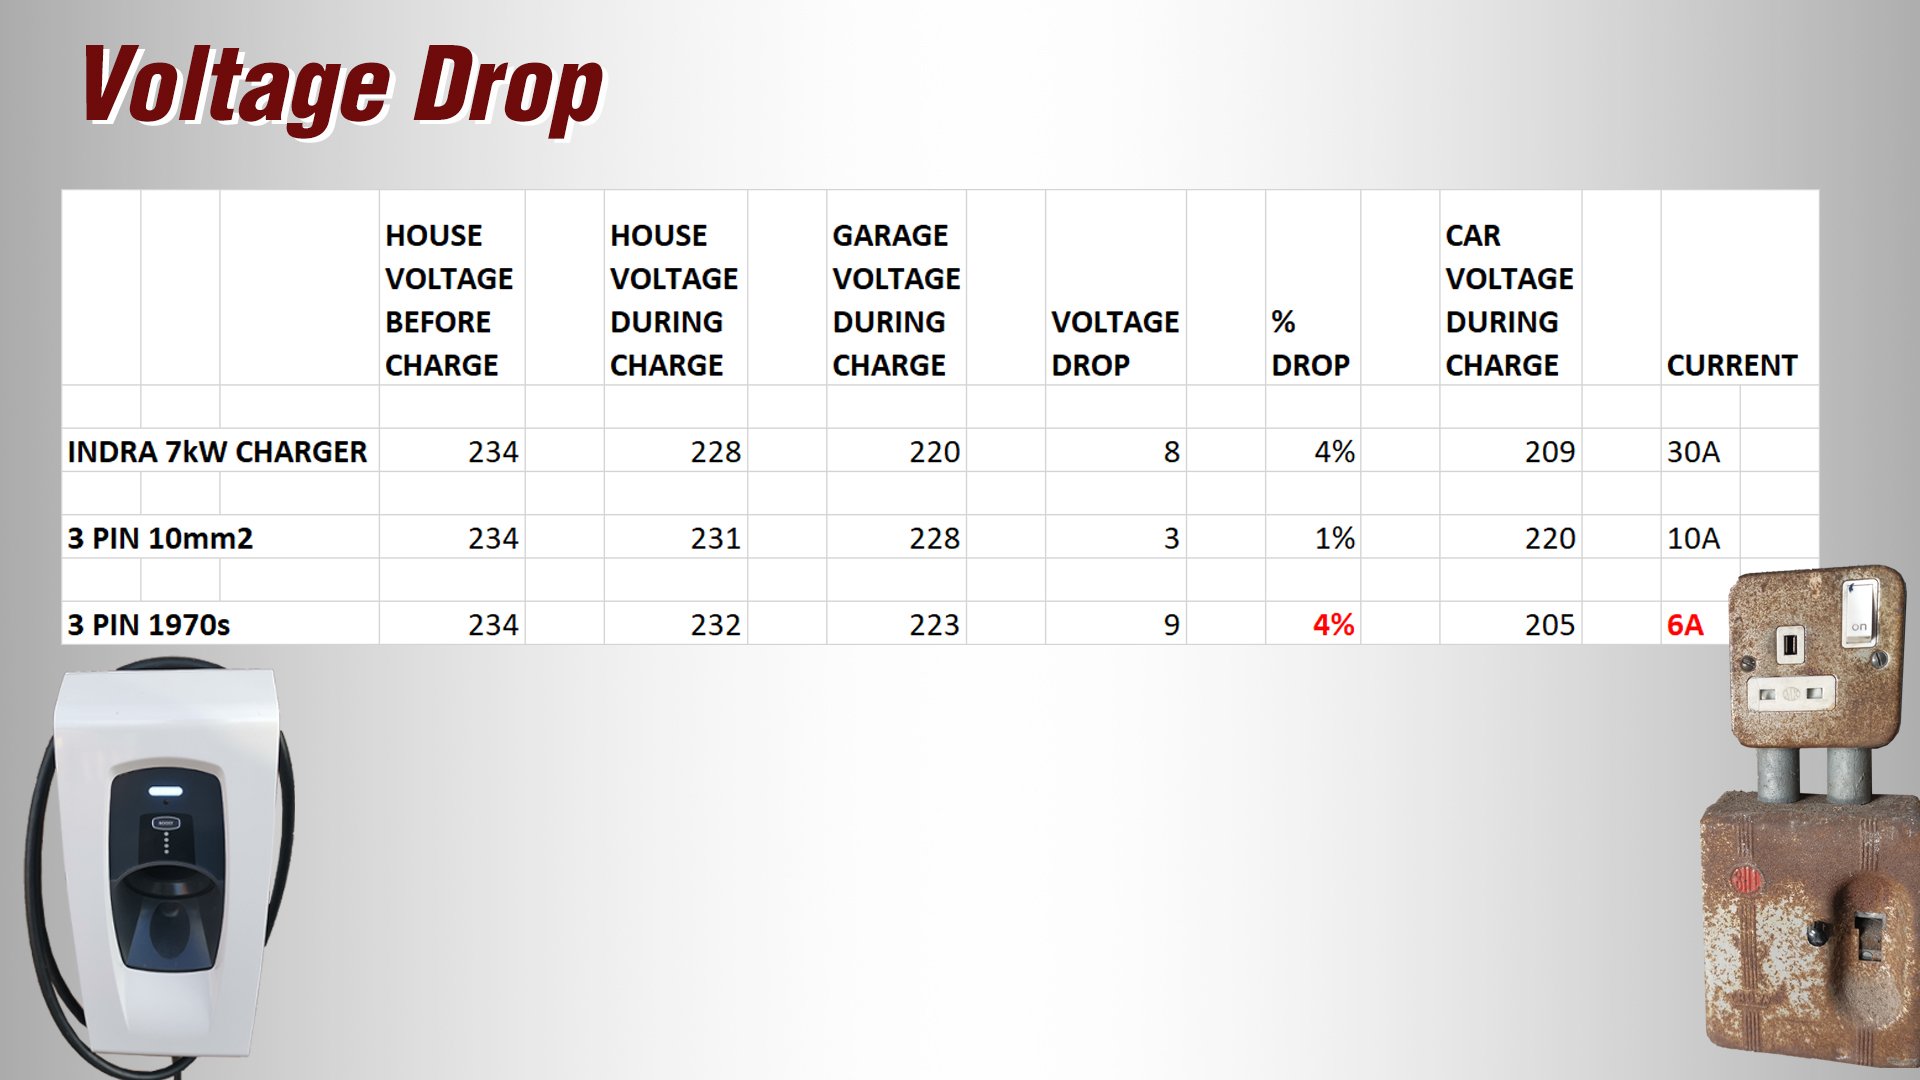
Voltage drops down the length of a cable because of resistance in the cable, and where you’ve got a 1970s cable stretching over 30 or so metres from the house to the garage this is going to be significant. When I up the current flow into the car from 6A to 32A (although in reality 13A is the max flow it’s going to receive from the 3 pin socket in the garage), the car actually limits the voltage from the 3 pin plug to 10A whilst the voltage drops all the way down to 208v.
But that 208v reading in the car is wrong (probably because it calculates voltage from current and power rather than measuring it) - and Polestar need to fix this as people without multimeters will be relying on this misleading voltage reading. You can see from this table the difference between the actual voltage during charge, and what the car’s reporting it as. But the point here though is that, as you can see, the true voltage drop from the old 1970s cable is A WORRYING 8% WHEN charging at 10A but shackling it down to 6A brings the voltage back DOWN TO an acceptable 4%.
Now most of you hopefully won’t be charging your car so far away from the house, but hopefully that little example illustrates that you need to be wary of just plugging your car into any old 3 pin plug socket at home at the full ampage without doing a bit of detective work on the electrics supplying it. Because a large voltage drop can lead to your wiring overheating or even melting.
To decrease voltage drop you have to increase the size (cross sectional) of the cable which lowers the overall resistance of the cable length, but as cable is expensive as you’ll see shortly, you need to find a cable with a cross sectional area that’s large enough without costing you the earth.

To decrease voltage drop you have to increase the size (cross sectional) of the cable which lowers the overall resistance of the cable length.
But, as cable is expensive, as you’ll see shortly, you need to find a cable with a cross sectional area that’s large enough without costing you the earth.
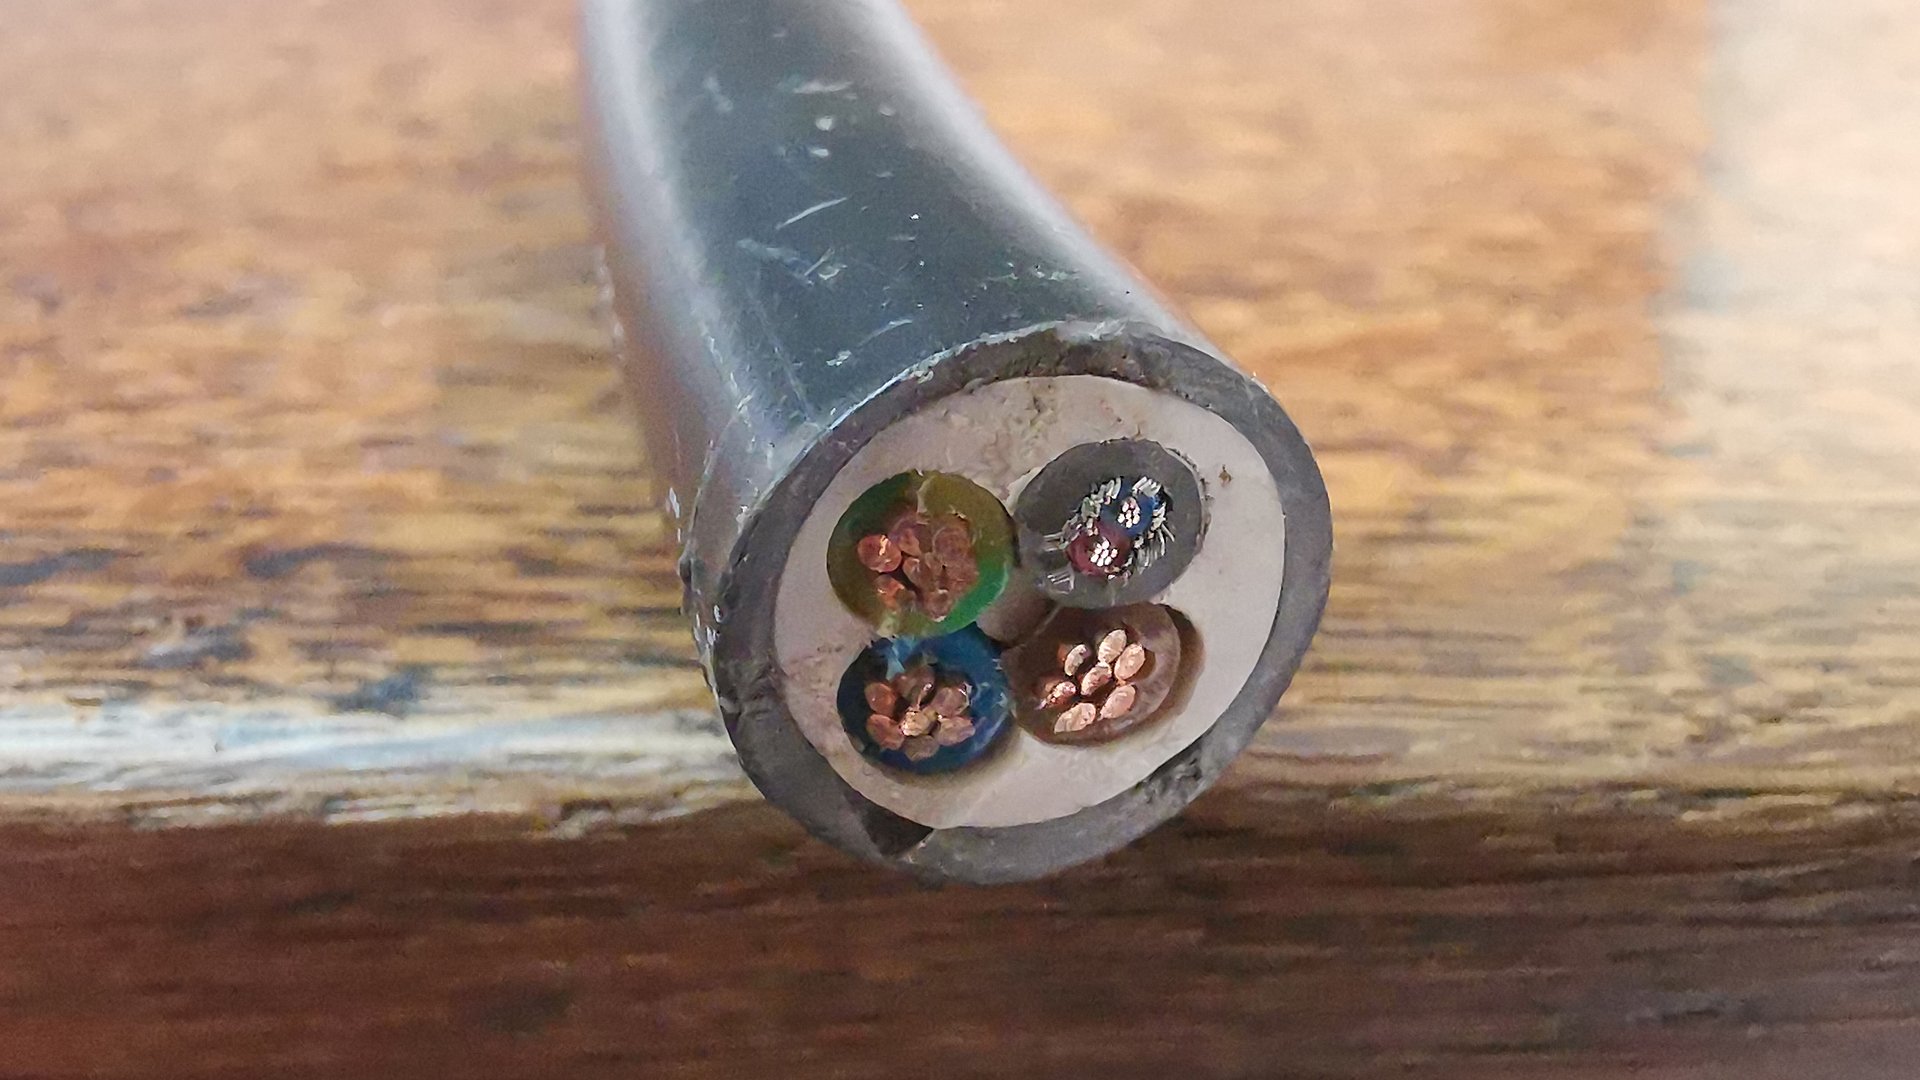
In my case, an armoured cable with 10mm cores is adequate for my 7kw charger - the voltage drop has varied between 2.5 and 4%, and I can’t thanks Dalton and Thomas on my Discord forum for calculating this. There are also cable calculators you can use such as https://www.clevelandcable.com/cable-calculator/ .
CAT 5E Cabling/EV ULTRA
EV Ultra Close Up
Now, the majority of EV installers use EV ultra, typically with 6mm cores as the average cable run from the charger to the consumer unit isn’t that long. EV ultra cable has either one or four pairs of CAT5E ethernet cable built into the cable.
The reason for the ethernet cable is you’ll need at least one pair of wires if your charger has active power management (or load curtailment as Indra, my charger, call it). This monitors power via a CT clamp on the tails in your meter box to ensure your car charger doesn’t overload your power supply.
You may also want a second pair of the ethernet wires if you decide to install solar panels, as the inverter for the panels will also want to monitor the power supply via a separate CT clamp on the meter box tails
And finally depending on what charger you buy, more on that in a minute, you’ll want to connect to it via the app on your phone by either WiFi, 4g or another hard wired ethernet connection
In may case, I obviously needed a 10mm armoured cable which isn’t readily available as EV Ultra - though I suspect you can order it specially. So I decided to install two armoured ethernet cables in the trench. One going to the meter box for the CT clamps (although my EV installer stupidly cut the three pairs he didn’t need off) and a second going back to my home ethernet network - which I’ve used to install Wifi in the garage - useful for security cameras and if we ever decide to convert the space.
So let’s run through some other issues I have encountered on this project…
Main cut out fuse upgrade
The DNO or distribution network operator had to upgrade the cut out fuse in my meter box from 60A to 100A

Why? This is all about the additional load a car charger puts on the system
A 7kw charger puts a 32A load onto your system whilst in use and if like me you only had a 60A fuse, that charger will be using half of all your electricity capacity. The risk is that you could blow the main cut out fuse if you’ve got a lot of other things on whilst charging the car - eg oven, electric shower.
This comes up as part of the onboarding process with EV charger companies like charged.ev which I used, during which they’ll ask you a series of questions like your MPAN number (which you can find on your electricity bill) photos of your existing consumer unit and meter box and they contact your DNO and ask them to upgrade the fuse, which they’ll do for free.
switch fuse and tails upgrade
If the DNO upgrade your fuse to 100A they’ll also change the tails going from the fuse into the meter which for 60A fuses are typically 16mm, and these need upgrading to 25mm. As you can see my tails are 16mm - and so we’re talking not only the tails from the meter to the switch fuse but also those from the switch fuse to the consumer unit. I’m pretty sure the old 16mm tails are embedded in the wall in my downstairs toilet, which is not permitted any more.

So, I’m going to have to work out a new run through ducting from the meter box to my consumer unit so my electrician can upgrade my tails to 25mm and also put in a new 100A switch fuse - my electrician is actually planning to install one of these.
And the same day the utility provider attends on site you’ll also need your DNO, to take out the main cut out fuse to knock off the electrics so that the utility provider can replace the tails between the meter and the new 100A fused main switch, and I guess your electrician, to upgrade the tails going back to your consumer unit to 25mm2.
Luckily my charger has active load management so I could have the charger installer before the upgrade.
looped service
Not relevant to me but I thought I’d mention it. Looped service is where you share your mains supply cable with neighbour. This limits the power you can take and determines if the main fuse can be upgraded or not. It’s another question the EV installer will ask as part of the onboarding process, because to have an EV charger you have to have your own mains grid access.
Earth bonding to gas and water
I have no gas but my supply comes over the telegraph poles and is bonded to an earth stake at the house.
consumer unit upgrade
Now, I decided to take the feed for my new charger from the consumer unit in my house in line with the advice from charged.ev, but some charger installers have in the past connected directly to the meter box. I’m guessing via an additional consumer unit but there’s a video by efixx here which explains why you can’t do this - as the DNO own the space inside your meter box and an additional consumer unit will use up that space which they might not be very happy about.
So the following assumes you’re taking your connection like I did from the main house consumer unit:
have you got a spare way or space for a non rcd way in your consumer unit?
If not, have you got space for a new consumer unit?

My old consumer unit
So I had two consumer units one above the other with 4 rcd circuits in each. Now there wasn't much wrong with this system, installed when I bought the house in 2010, except I didn't have many spare ways left on the second board. So as I was getting my electrician in anyway to connect the new armoured cable to the new consumer unit in the garage, I thought I’d upgrade that second unit in the house to a new metal consumer unit with rcbo’s in place of the rcd circuits I had previously in that second board.

My new consumer unit
Why? Well rcbos are superior to rcds in the sense that they trip individually whereas with the rcd, it takes out all the miniature circuit breakers attached to it. And by having an rcd inbuilt into it, you’re freeing up extra ways on your fuseboard, as each rcd took up two ways on the board.
So what I ended up with was a 40Amp rcbo in the house fuseboard to feed the garage, also with built in surge protection.

Then we’ve got a new fuseboard in the garage with a main switch and individual rcbos to feed the garage supplies and of course, the 40A rcbo for the new car charger.
As my house has an earth stake, we decided to save some money by buying 2 core armoured 10mm cable rather than 3 core and have a new earth stake at the garage.
Charge point location
Nice and simple for me, but you’ll need to think about this. Proximity to the car is the obvious thing but minimising the cable run back to your consumer unit is the other thing you’ve got to bear in mind.
charge speed
7kW charger will now charge my 78kWh battery 0-full in 11 hours
Check what capacity your car’s onboard charger has? Some vehicles are limited to 3.5kw but even if that’s the case you might still want to install a 7kw charger for future proofing.
what charger?
Chargers come in a variety of shapes and sizes, dumb and smart? But the key things to consider are:
Tethered or untethered?
Solar integration? Charge purely on excess solar electricity?
Scheduling to coincide with night tariffs? I’ve actually just switched from Bulb to OctopusGo to access the 4 hours charging between midnight and 4.30am at 7.5p/kWh
Monitor electricity usage & cost
Be wary of car dealers preferred partnerships with charge point operators
And don’t forget, if you have a 3 phase supply you could benefit from installing a 22kw charger

I’ve got the Indra Charger that you can find here.
cable route from charge point to consumer unit

This was the most arduous part of the project for me. The new cable would have to head diagonally across the garden, go under a brick garden wall which I ended up having to demolish because the concrete foundations were too thick to drill through (the dear old guy who owned the house before me was clearly even more OCD than I am). After all that I had to drill new holes in a half metre thick flint and clay cellar wall, to get the cables into the house.
The plan was to dig a 450mm deep trench for the 10mm armoured electrical cable. After digging about 2metres I realised I wouldn’t be able to dig the whole thing by hand and managed to borrow a 3.5ton digger from a friend, fortunate as the local hire companies had no diggers available.
You’ll often want to surround the cable with gravel to protect the cable from stones as the earth settles around it, but I didn’t bother with this as I have a sea of sand about 40mm down with very few stones in it. The other measure you have to take is to lay warning tape above the level of the cable.

The main 50m section of trench was simple enough with the digger but a 10m section would have to be dug by hand as I couldn’t get a digger into the bottom of the garden.

But as the digging unfolded and I realised the extent of the carnage I was creating, I turned my mind to future proofing.
We may at some stage try and get planning to turn our garage into living space for son who has special needs, so I decided now was a good time to get water up to the garage from the house. This meant increasing the depth of the trench to 750mm to lay a 25mm MDPE water pipe at the bottom of the trench. I also decided to lay an additional 25mm2 armoured electrical cable in the trench, partly because it occurred to me that with the possible addition of solar panels and and if we were to convert the garage to living space, the 10mm SWA wouldn’t be sufficient. And finally we had the 2 steel wire armoured CAT5E data cables, which I positioned at the other side of the trench a bit higher than the electrical cables, to minimise any interference those cables might create with the data.
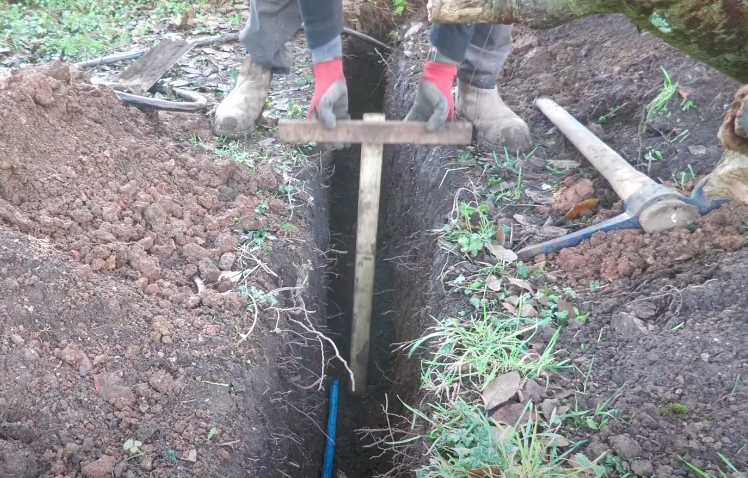
I created this measuring stick to check the depth for water and also for the electrics. Increasing the depth to 750mm made the by hand digging of the 15m stretch at the bottom of the garden particularly arduous, and to deal with this, I dug just a few metres each day.
It’s also very exhausting and time consuming gradually filling the trench to the various depths for each cable run and positioning the warning tapes.
The plan was to get all the cabling in place to minimise for me the cost of the electrician attending on site to connect up the new consumer units. The 25mm SWA cable has a huge radius on it so drilling the cable through the wall at an angle and channeling the radius into the wall helped keep it close to the wall when fixed in place, which I tried to do with these Linian clips - a fabulous product that doesn’t require wall plugs but the blockwork was too soft to hold the 25mm SWA in place so I resorted to more typical cable cleats for this.
who can install?
Specialist installers. When you’re dealing with this much power, it’s got to be installed earthed and bonded correctly to comply with electrical regulations and avoid breaching the charger warranty.
I wouldn’t want to even contemplate a DIY install which is why I went with a recognised installer in charged.ev
Also, I was fortunate to get mine installed before 1 March which meant I qualified for the £350 grant, which again was dealt with by the installer
Electricians who’ve done the course to become an OZEV approved installer can also install, but my electrician hasn’t done the course and isn’t in any rush to do so, which is why I was happy to use him and the ev installer in tandem to get this job done.
What's the cost?

The cost of all this for me was considerable. I say for me, because if you’re installing your charger on the side of your house, you often get 15m of EV ultra cable as part of the install - although annoyingly chargedev didn’t discount the price of my install even though I supplied my own cables.
Running through the figures, and I’ve excluded the 25mm SWA as that isn’t relevant to the install of an EV charger, the hardware came to £412.43. My electrician charged £1375 for supplying and installing the new RCBO consumer units and earth spike up at the garage, and the cost of the charger including install was £774 although it’s likely to be over a grand now given the OZEV grant is no longer available since March this year.
So a combined total of £2561.43 for me, a high price when you haven’t factored in the cost of the EV itself, which luckily we’re leasing through the old soft furnishings business that my wife now runs.

conclusions
Is it worth it? Arguably not on the face of it but you should see it not just on these base line figures but as an infrastructural addition that will add value to your house. As consumers we’re stuck between a rock and a hard place at the moment with rocketing costs at the fuel pumps - 199p for diesel at the garage down the road now!
But the estimated £140 we spent charging the car in February - and we did a lot of miles - is less than we would have spent refuelling our old car, although with our electricity at 19.6p per kwh, not as much as we would have liked.

Having gone this far, the sensible next step would be to install solar panels, now I’ve got the infrastructure in place for them. With the car and much of our home energy needs supplied by solar, and an estimated pay back on solar of 4-5 years rather than the previous 10 given the price of electricity right now, solar is starting to make serious sense and would also provide further justification for the costs of installing that EV charger.
See you soon! Once again, massive thank you for reading and watching. Feel free to leave a comment below and let me know how you get on with your own project.
Oh, and if you’re new to my YouTube channel, click on the link here to subscribe!
I’m always looking for ways to make this sustainable now I’m doing it full time, so if you like my content and to help me keep providing it here on this channel for free, I would be so grateful if you could visit my Patreon page, to support me. For just £5 per month, you have daily contact with me through my Discord member forum behind the scenes videos and automatic entry to my free monthly giveaways. Please click here.
* The Amazon links above are affiliate links. It doesn't cost you anything to click on them but I do earn a small commission if you do.
And here's the legal bit I have to state: As an Amazon Associate I earn from qualifying purchases.