
How to Install Solar Panels - A Complete DIY Guide
I thought I’d do a complete run through of my recent solar panel install - looking at everything from a homeowner’s perspective.
I’m going to be telling you about what you can and can’t or shouldn’t do yourself, and how I’ve got on so far with the solar, inverter and battery system. Click here, or on the video below, to watch me talk about it all.
Why bother?
Well, having just installed an EV charge point it seemed to make sense to me to install solar. Although, I’ll come onto whether it’s actually that beneficial in terms of charging your car later.
Also, with the price cap lift looming in April 2022, I had a sneaking suspicion a lot of people would pile into solar when they realised how much their bills were going to go up. Even though I ordered before April the price hike in May has massively affected availability of solar panels and their fixing kits, inverters, and batteries.
options
Panel type - black or standard?

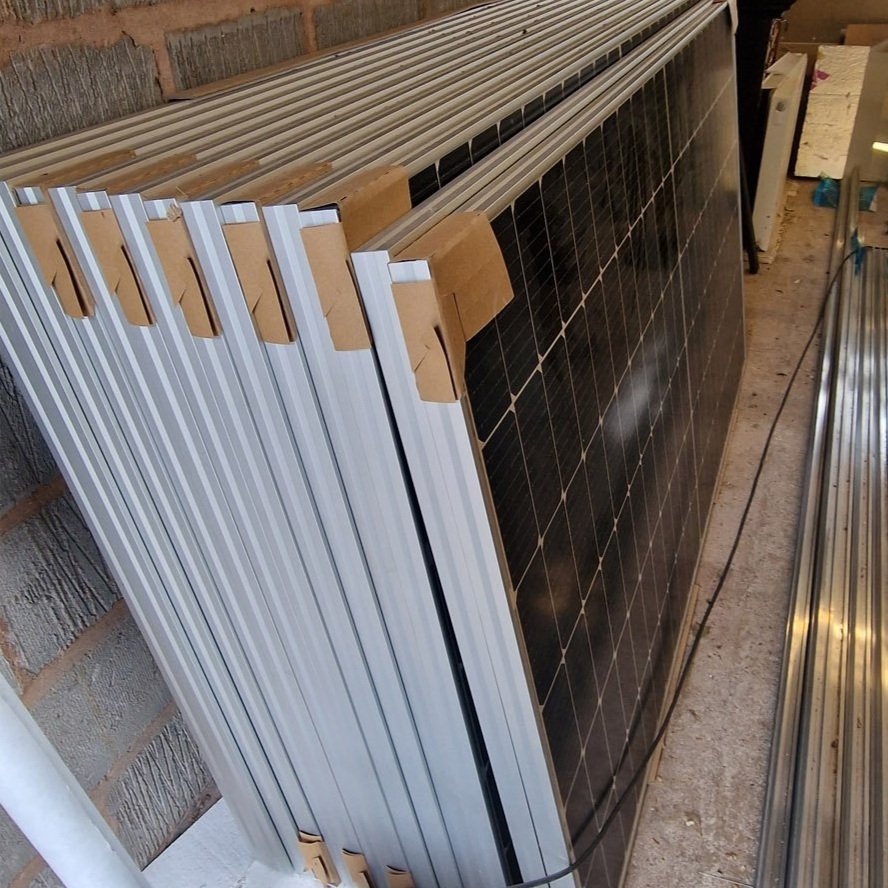
You might be thinking about black panels because perhaps you don’t want to affect the look of the house. Here, you can see my standard panels.
However, black panels are less efficient because the black gaps between each solar cell absorb heat instead of reflecting it. The hotter a panel gets the worse it performs. Black panels are also more expensive than standard panels.
In roof or rail system?
At risk of stating the obvious, the orientation and position that you place your panels is really important. You want them to be on the South, South-West, or South-East roof of your house.
Inverter and Batteries

You definitely need an inverter - these convert the DC current that comes out of the solar panels into AC that your house can then utilise.
They also decide when the power should be channelled into your house or into the batteries, or even exported to the grid if that’s what you choose to do. You will have an app with that inverter which enables you to monitor what’s going on and make changes.
You might not be thinking about installing batteries, but I’d say this is pretty important because otherwise you’re only relying on powering your house during the day when the sun is out. Once the solar panels have charged the batteries you can use that excess energy to heat the hot water tank via the emersion, heat your hot tub, run your dishwasher etc. Also, in the winter when the solar panels won’t be generating so much electricity, if you’re on an EV tariff (giving cheaper prices for electricity during the night) you will want to use the cheap rate to charge up your batteries.
which supplier?
I actually found this surprisingly difficult. I googled and contacted maybe 4 or 5 local companies, a couple of which never bothered to come back to me, one told me to come back to them when I’d installed the new roof, and then one took about 3 months to get back to me with a quote and then told me they couldn’t do anything for me until September.
Fortunately, Sam (on our Discord chat group that you can access through my Patreon channel) had done a similar install up north, and I contacted the company that he used. They don’t install solar panels this far south, but they did agree to supply me with the kit so that I could install them myself. Luckily, their electricians were doing a job down in Cardiff so they kindly took a detour on the way to install my inverter and batteries.
charlie's solar hardware
14 x Canadian Solar 415W Super High Power Mono PERC HiKU with MC4-EVO2 (5.81 kwp system)
8 x End Clamp+ 30 - 50mm Silver
24 x Middle Clamp+ 30 - 50mm Silver
36 x Renusol Roof hook UK Plain tiles/slates (without wood screw)
4 x VarioSole+ Rail connector for rail 50 x 37 mm
4 x VarioSole+ Mounting rail 50 x 37 x 3300mm
4 x VarioSole+ mounting rail 50 x 37 x 4400mm
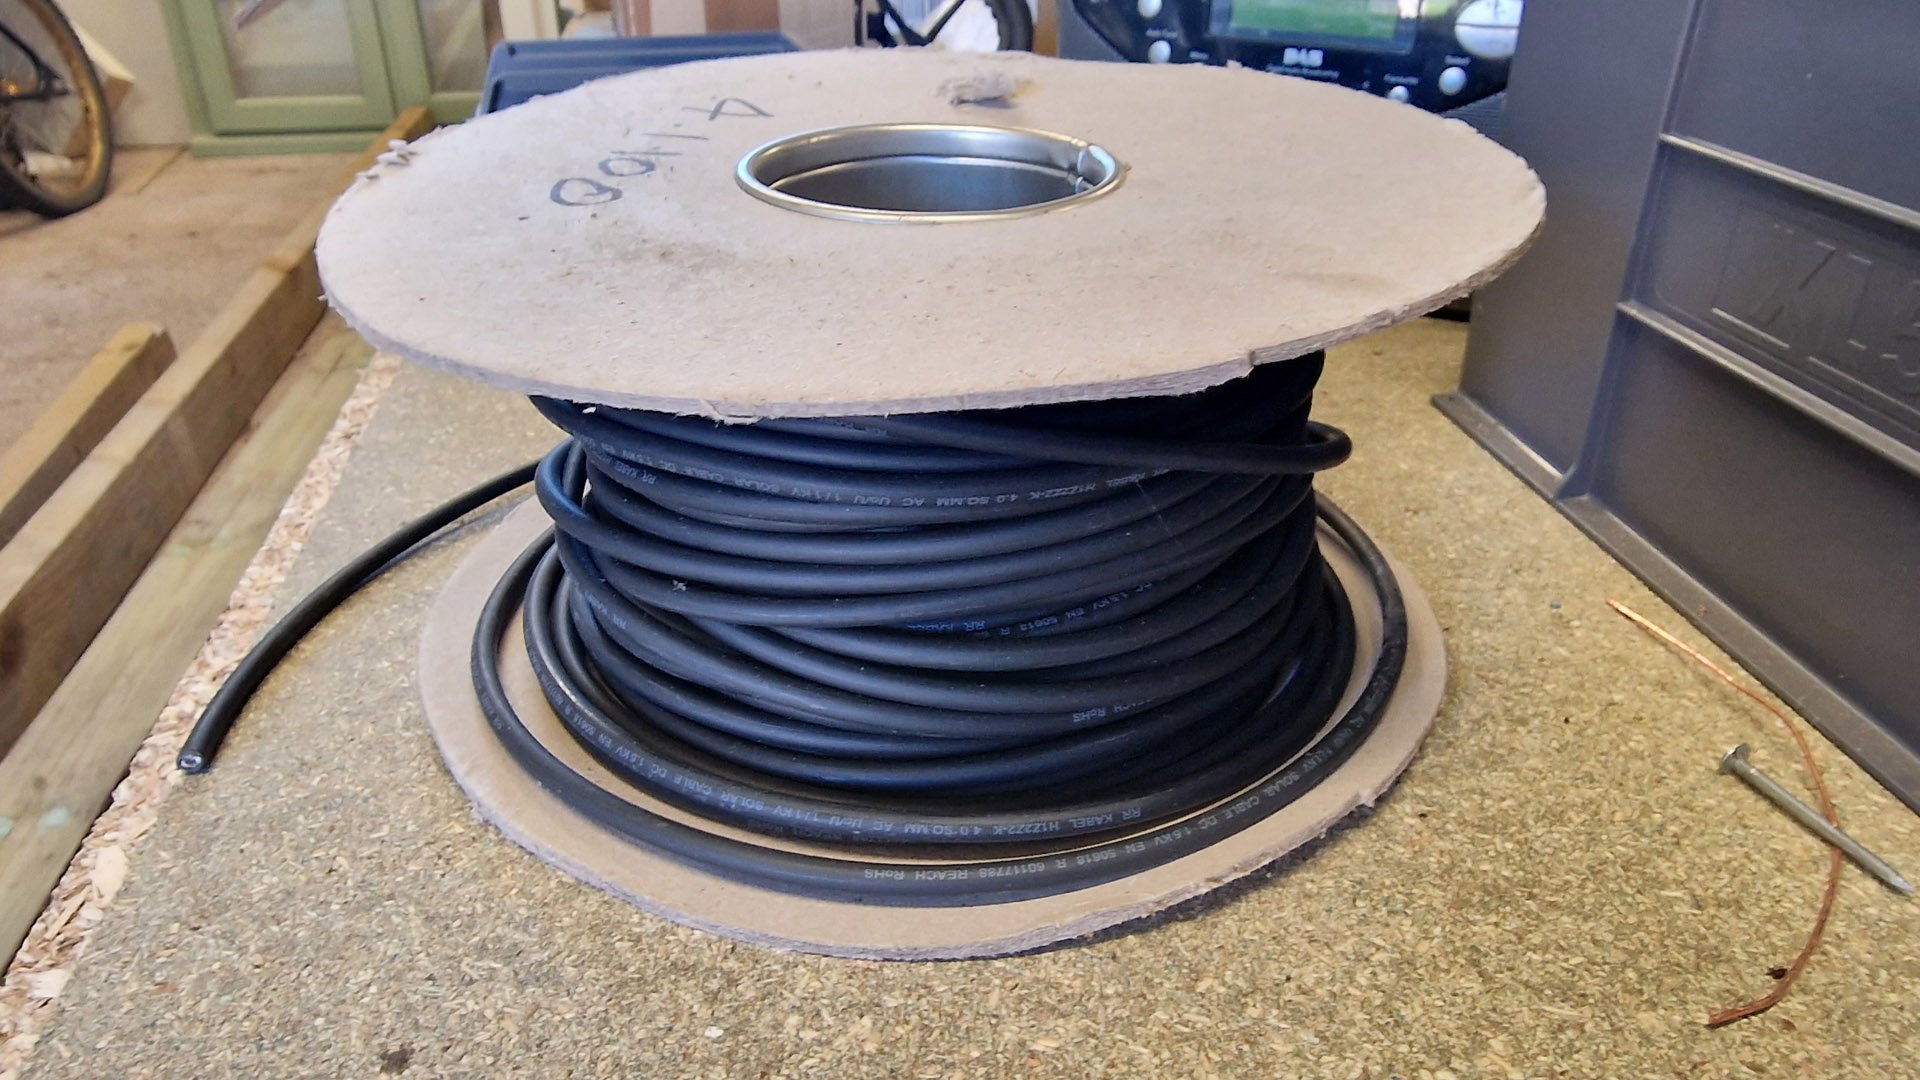
1 x 4mm 2 single-core DC cable 100m Drum - Black
36 x Redtip Hookstop Single
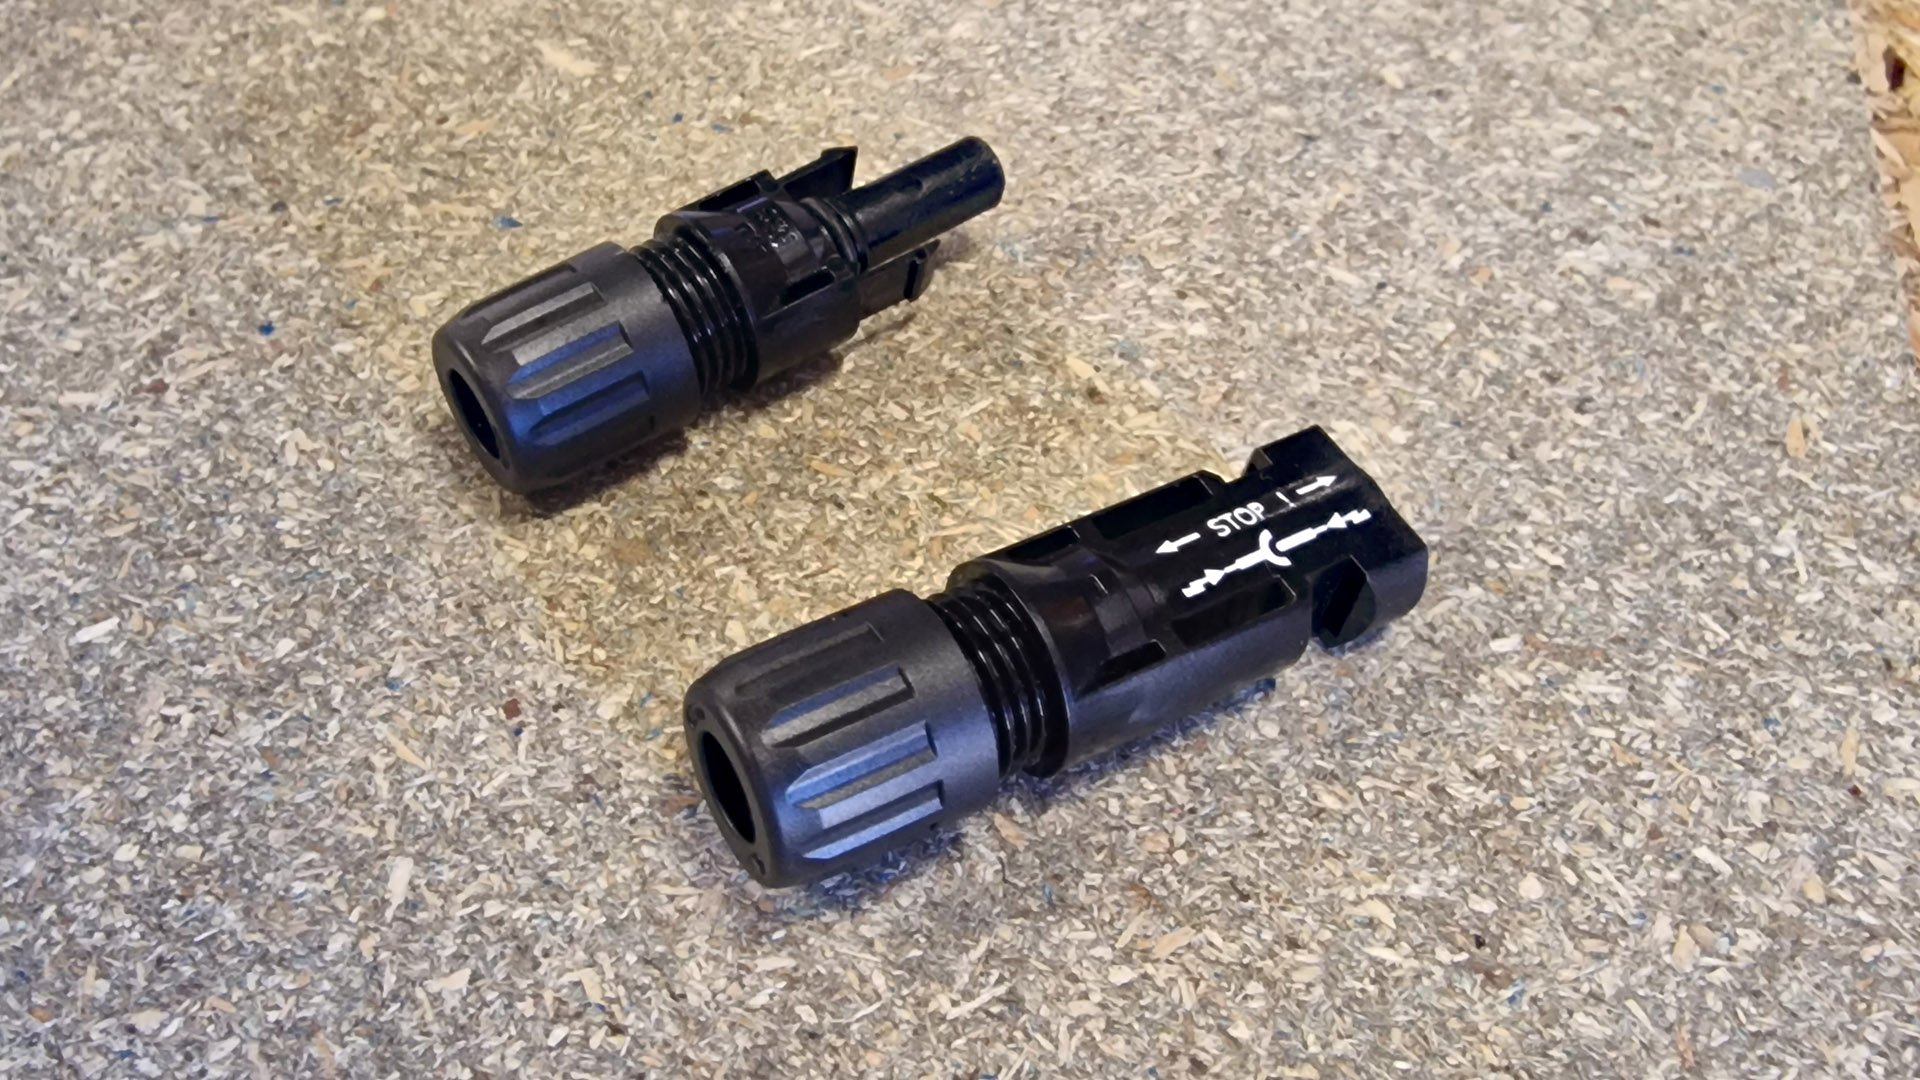
4 x MC4 Connector (male)
4 x MC4 Connector (female)
End caps
Caberfloor TG4 P5 Chipboard Flooring 2400mm x 600mm x 22mm
Lux power 3.6kw hybrid inverter
4 x 2.4kwh pylon batteries (9.6kwh in total)
Data cabinet
Other Tools
Hammer
Impact driver
6 x 80mm marine grade stainless steel A4 wood screws from ebay
Socket set
Crimping tool
Cable clips
Nylon zip bands
Grinder
sequence of events
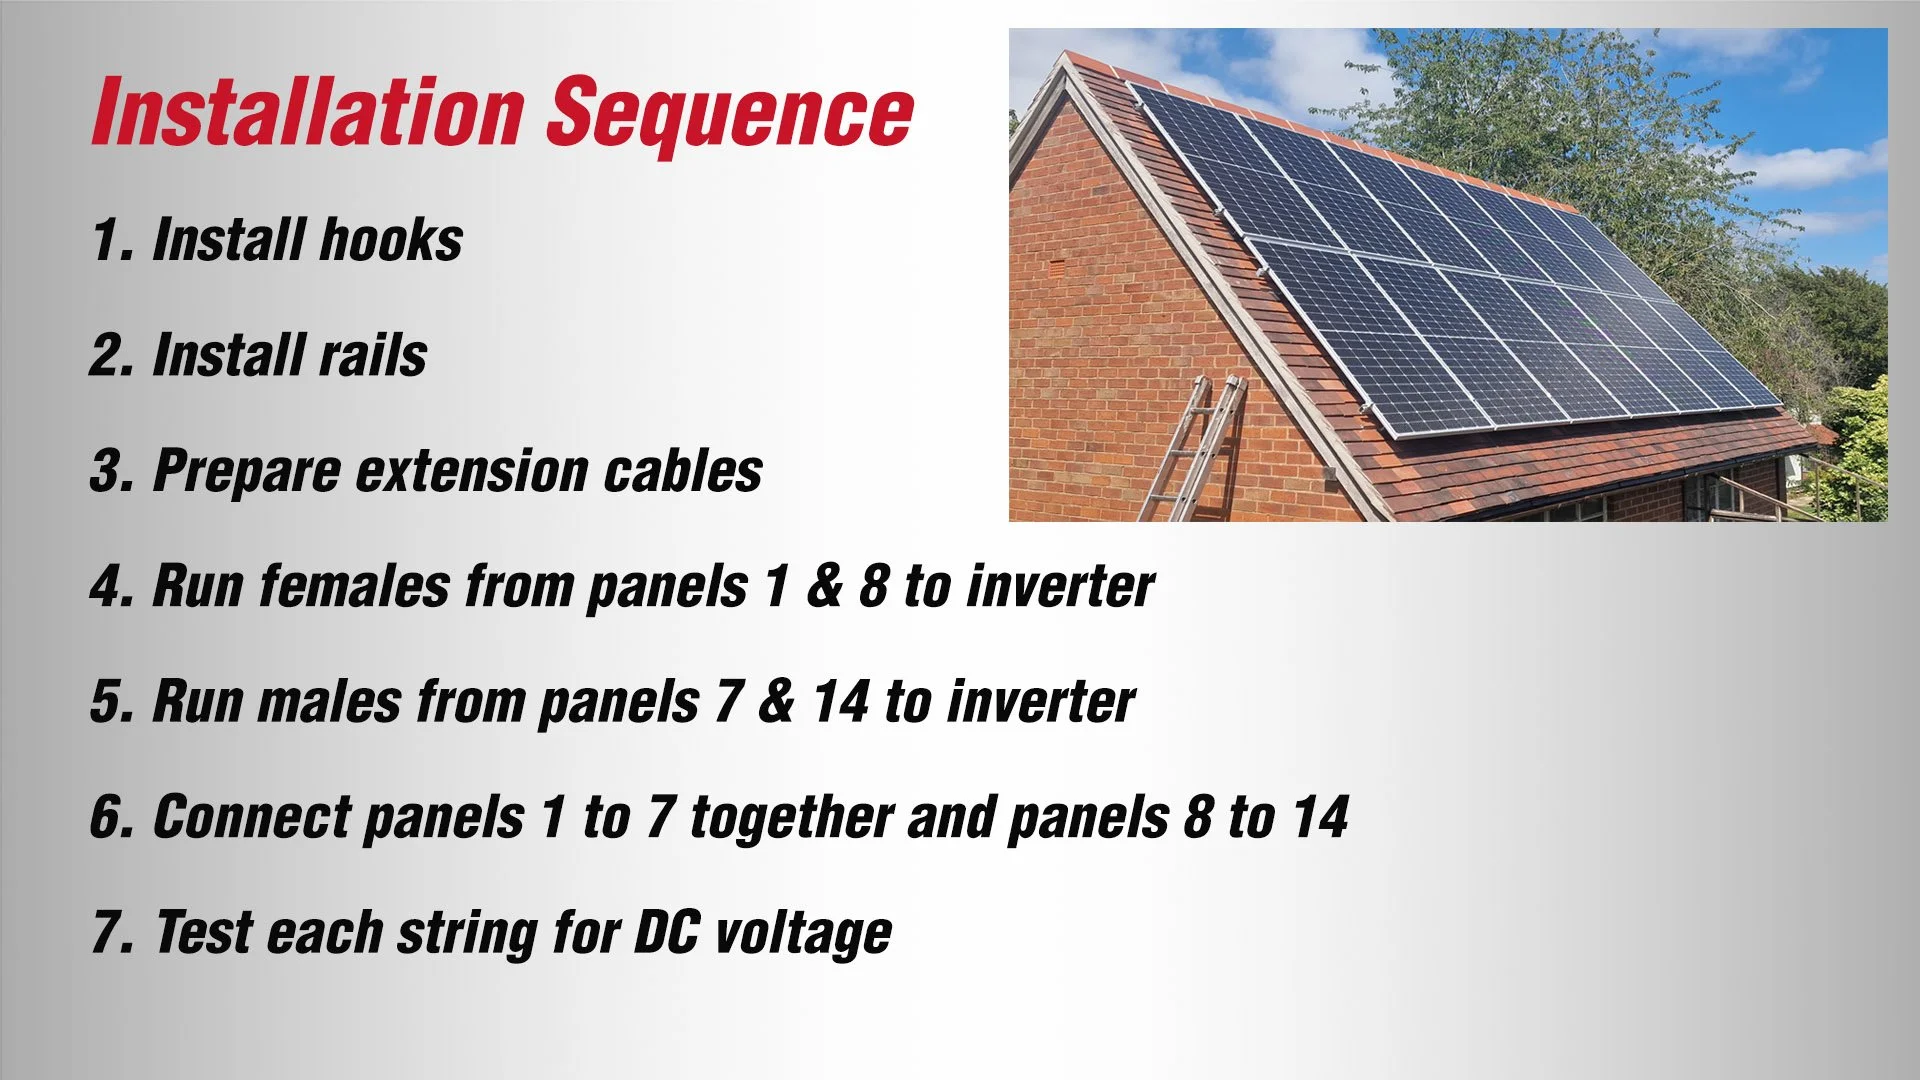
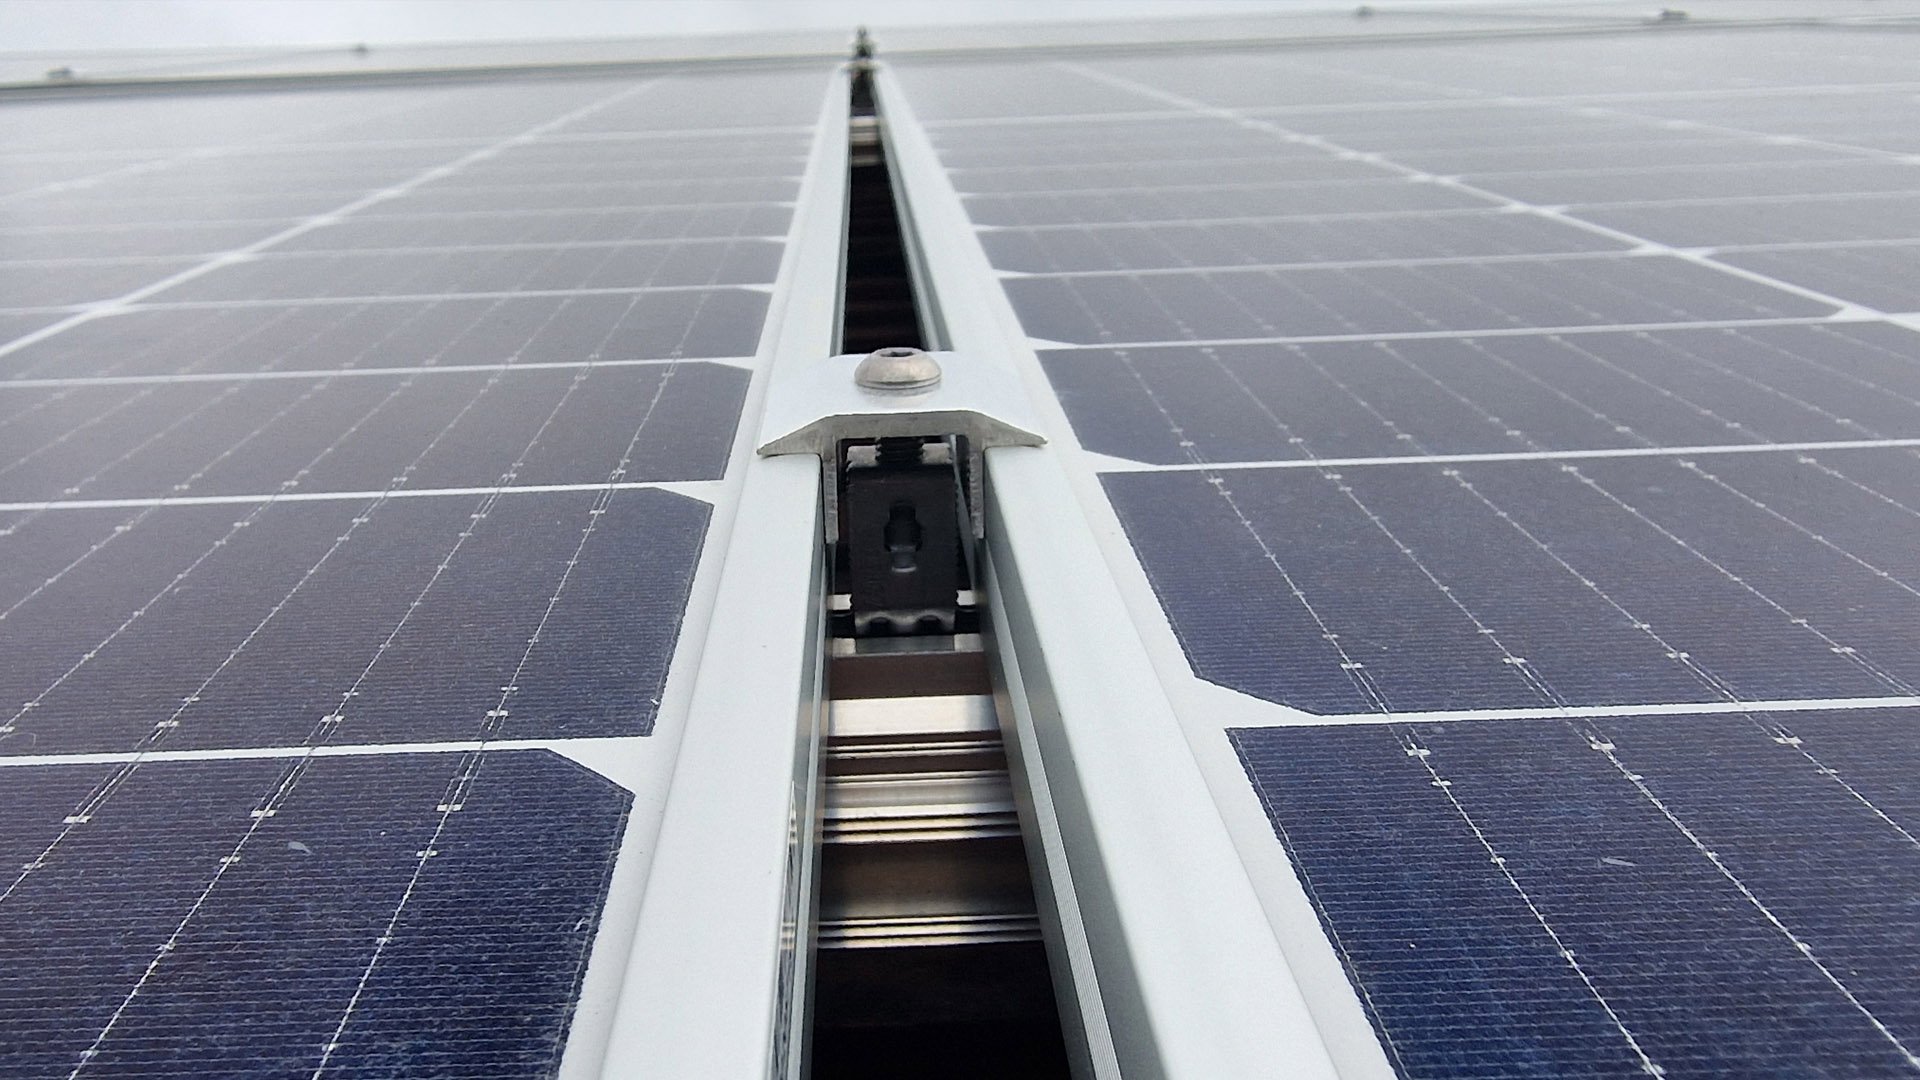
So the first thing I had to do was install hooks using decent wood screws. Renusol was, in the supplier’s opinion, the best mounting solution and uses a rubber hookstop so the tile beneath doesn’t break either when you’re walking on the rails (very important) or later when the elements are buffeting at the panels

However, the rubber hookstops have cavities that give it the potential to collect dirt - so I actually used them the wrong way round upside down. Being honest though, this isn’t the perfect solution.
It creates gaps under the tiles, which could be a potential entry point for rodents/wasps/bats etc. I then decided to fill up the gaps with sand and cement mix. It was a tricky process working out where to position these hooks, so I ended up doing a very lo-fi diagram in Microsoft Word which gave me a bit of an idea of how to space the hooks. The hooks are then screwed into the rafters. Next, it was the question of estimating how far up the roof to position them. I took some markers from the Renusol guide (click here to view) which discussed spacing between panels and more. With the hooks in and the roof tiling nearing completion, it was time to install the rails.

Now this is a very important step. As you can see here, with most of the roof tiled, the rails are a way to walk across the roof safely.
As I was tiling the roof, I put the DC cables in position. I was instructed to wire the panels up in two strings of seven, as you can see in the diagram below.

The cables were at each end of the string, so that panels 1 and 7 go back to the inverter location.
The solar panels come supplied with male and female MC4 connectors, so that they ca be easily connected to each other. But you obviously need to add a male and female MC4 to the DC extension cables at each of the string. For this, you need a crimping tool. I bought this one from Amazon…

I had some fun at this point, realising after I overtightened the MC4 connectors that were designed only to be hand tightened.
Then in terms of the installation of the panels themselves, we started from one end, making sure the first two panels were trued up against the roof verges - not an easy task as the verge wasn’t completely level. The end clamps were bolted in place, and we could then work across the roof, pushing each middle clamp into the rail and then bolting it down to fix the corresponding two panels tight to the rail.
Each string should show a similar DC voltage which is required for the inverter to function.
Is it worth installing yourself? I probably wouldn’t bother, and wouldn’t have done so if A) I wasn’t retiling the roof, and B) I didn’t have a YouTube channel that I thought it would make interesting content for.
It only saved me £600 (which is what the installer would have charged for his team to do it) and the stuff I’ve installed isn’t covered by the installer’s usual workmanship warranty package.
flooring
So with the panels in and wired up in 2 strings, I turned my attention to possible locations for the inverter and batteries, and decided it was better to have them out of the way, up in the garage loft space (which wasn’t boarded and has a lot of clutter in it). My loft needed flooring atleast partially to enable them to install the kit.
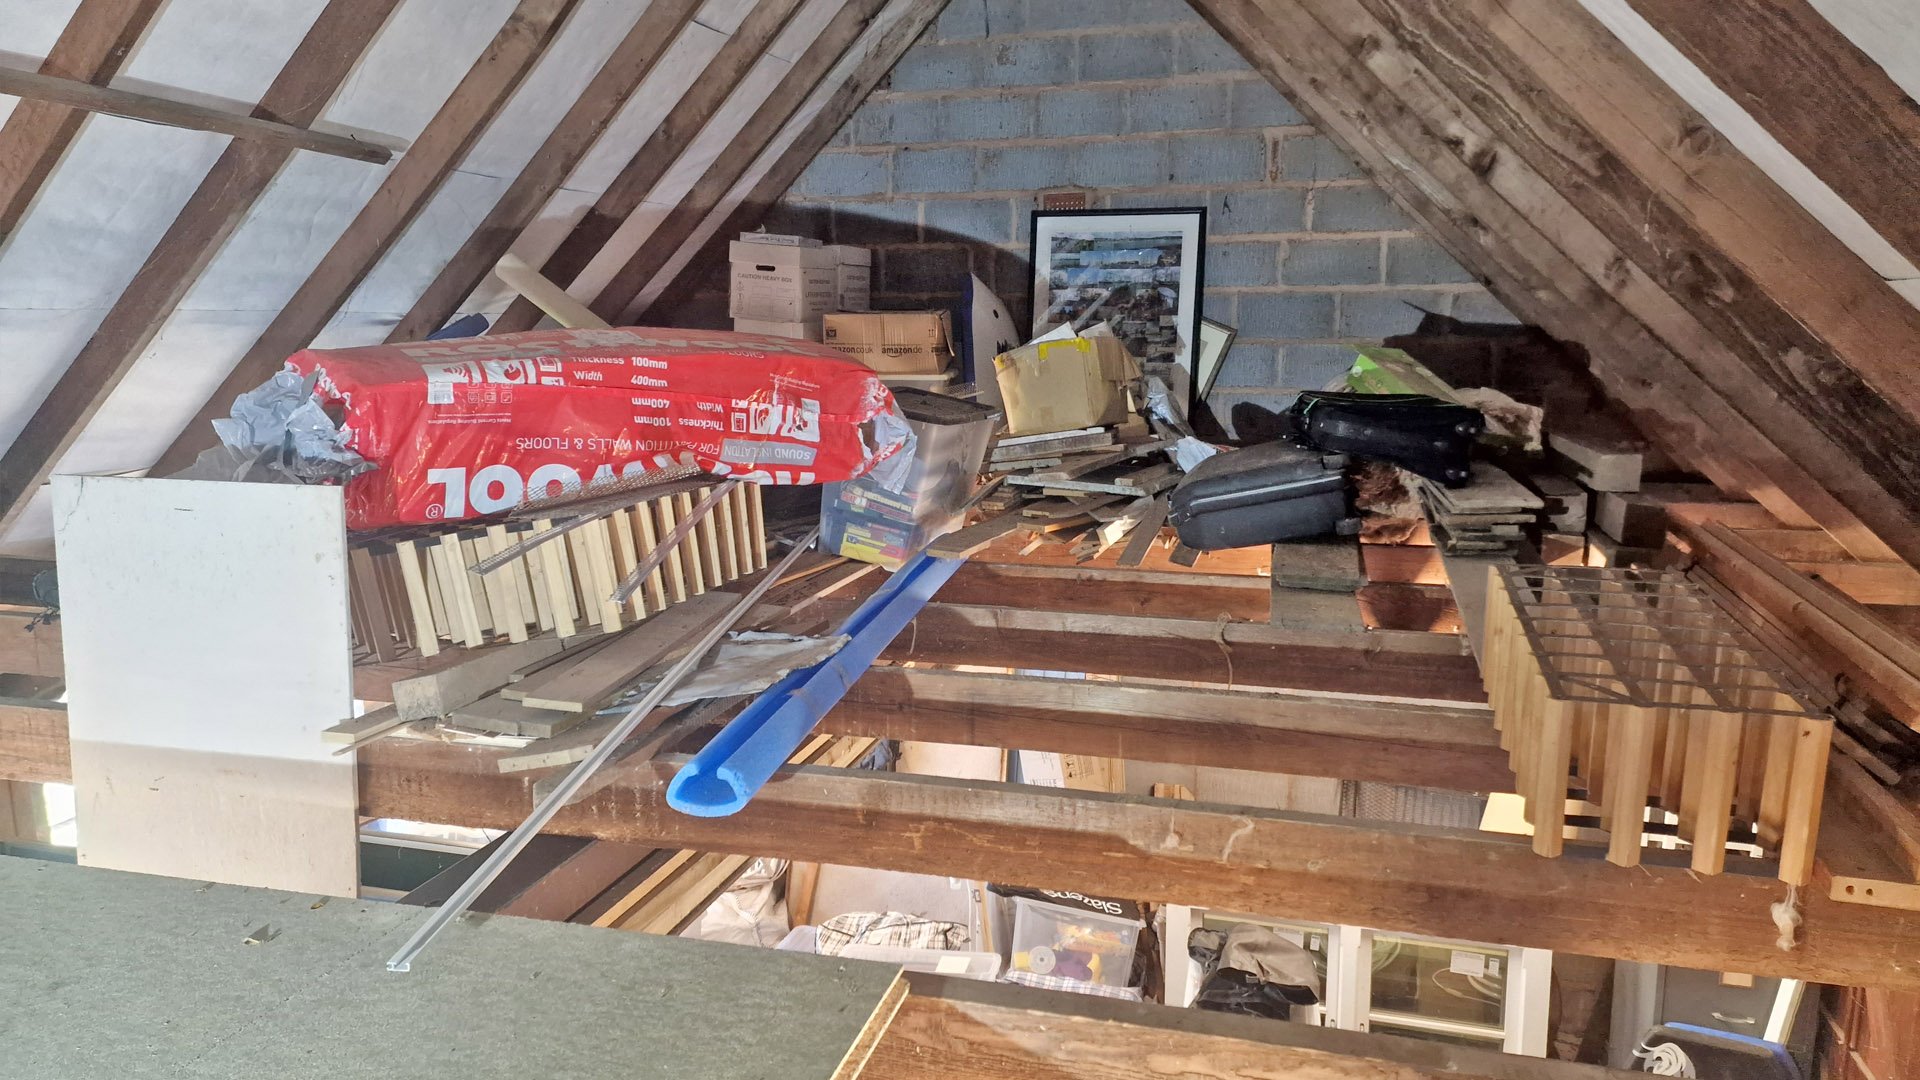
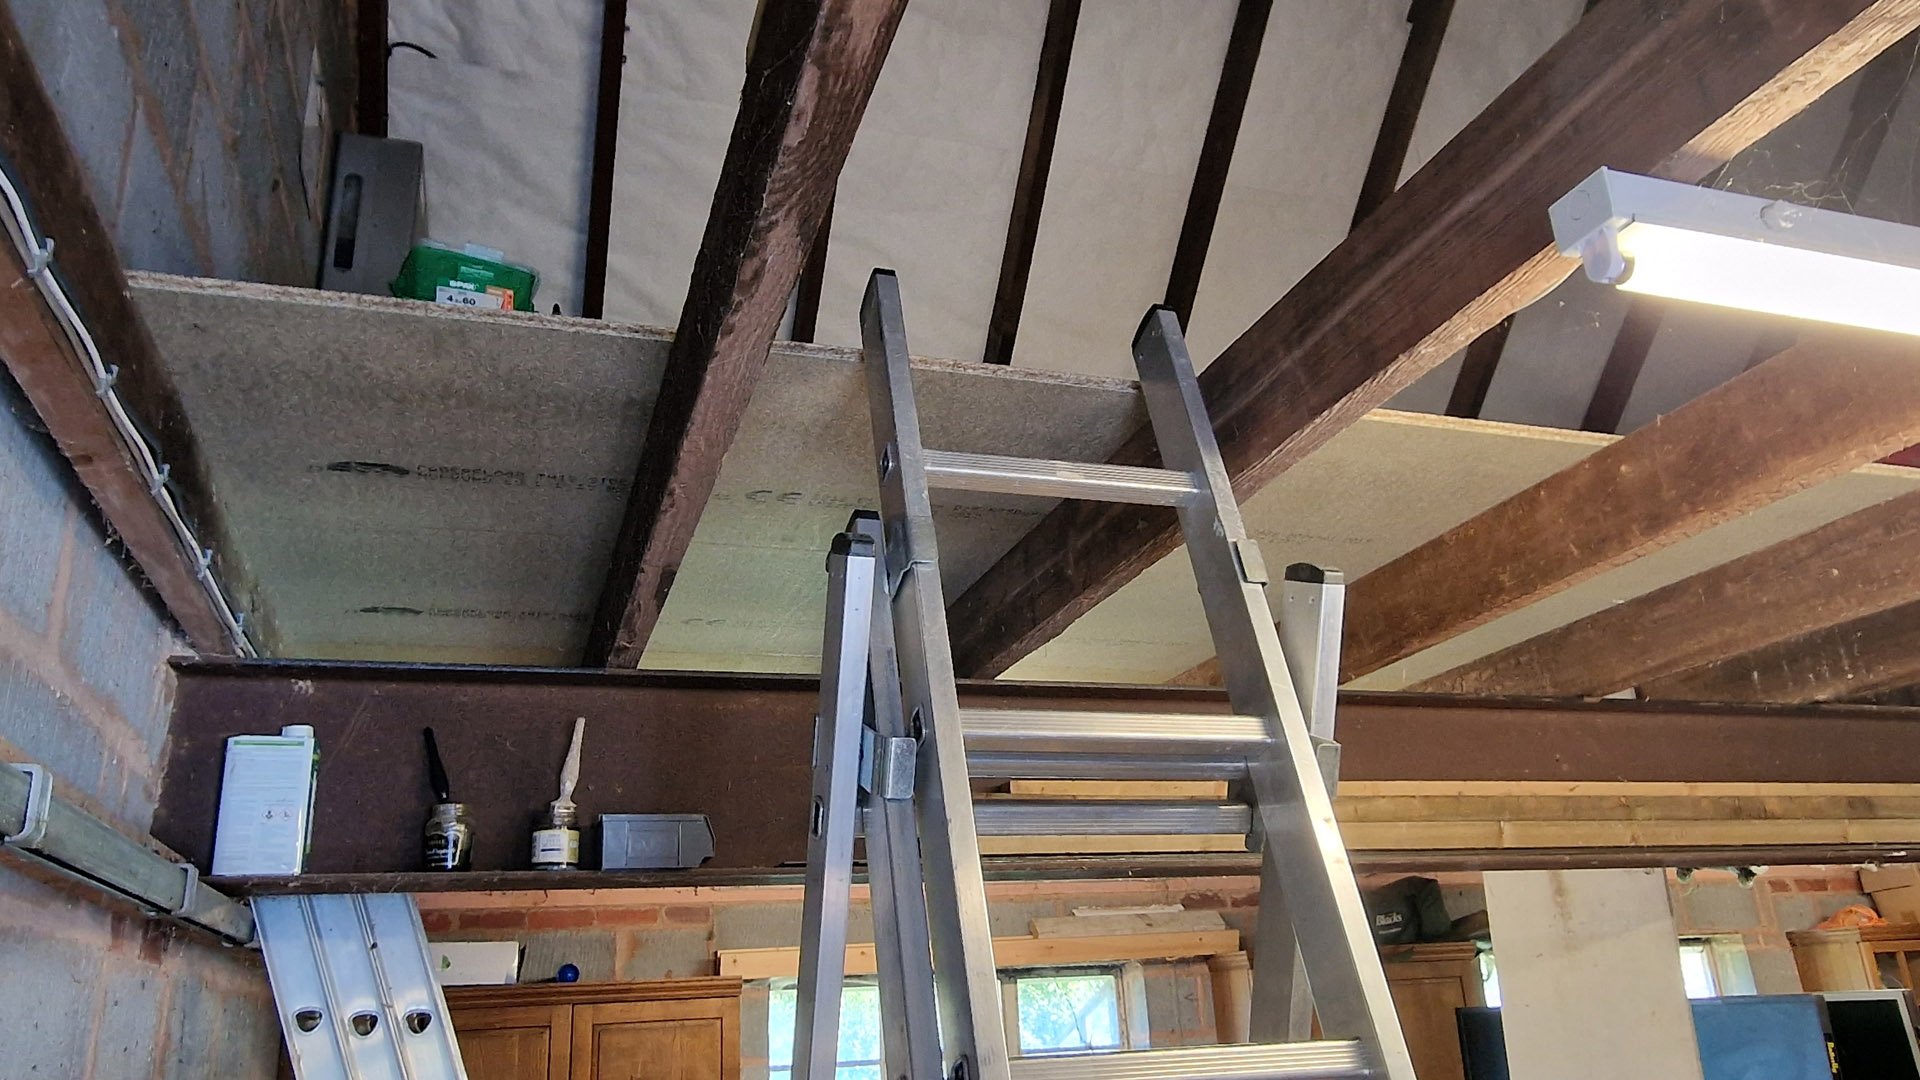
So after a bit of research, I settled on Caberfloor 22mm moisture resistant tongue and groove chipboard flooring. I will doubtless do a video on this at some point, but suffice to say for now, I had an experiment with the rather bizarre but effective plastic rail system that comes with the Ryobi HP circular saw, and glued the boards together with this Egger adhesive and these Spax floorboard screws, purchased - and here’s a first, through Weshop - that I’ll briefly mention at the end of the blog.
I plan to board out the whole loft space when I’ve cleared it out but for the time being it gave the installers a much safer and more suitable environment to install the inverter and battery cabinet.
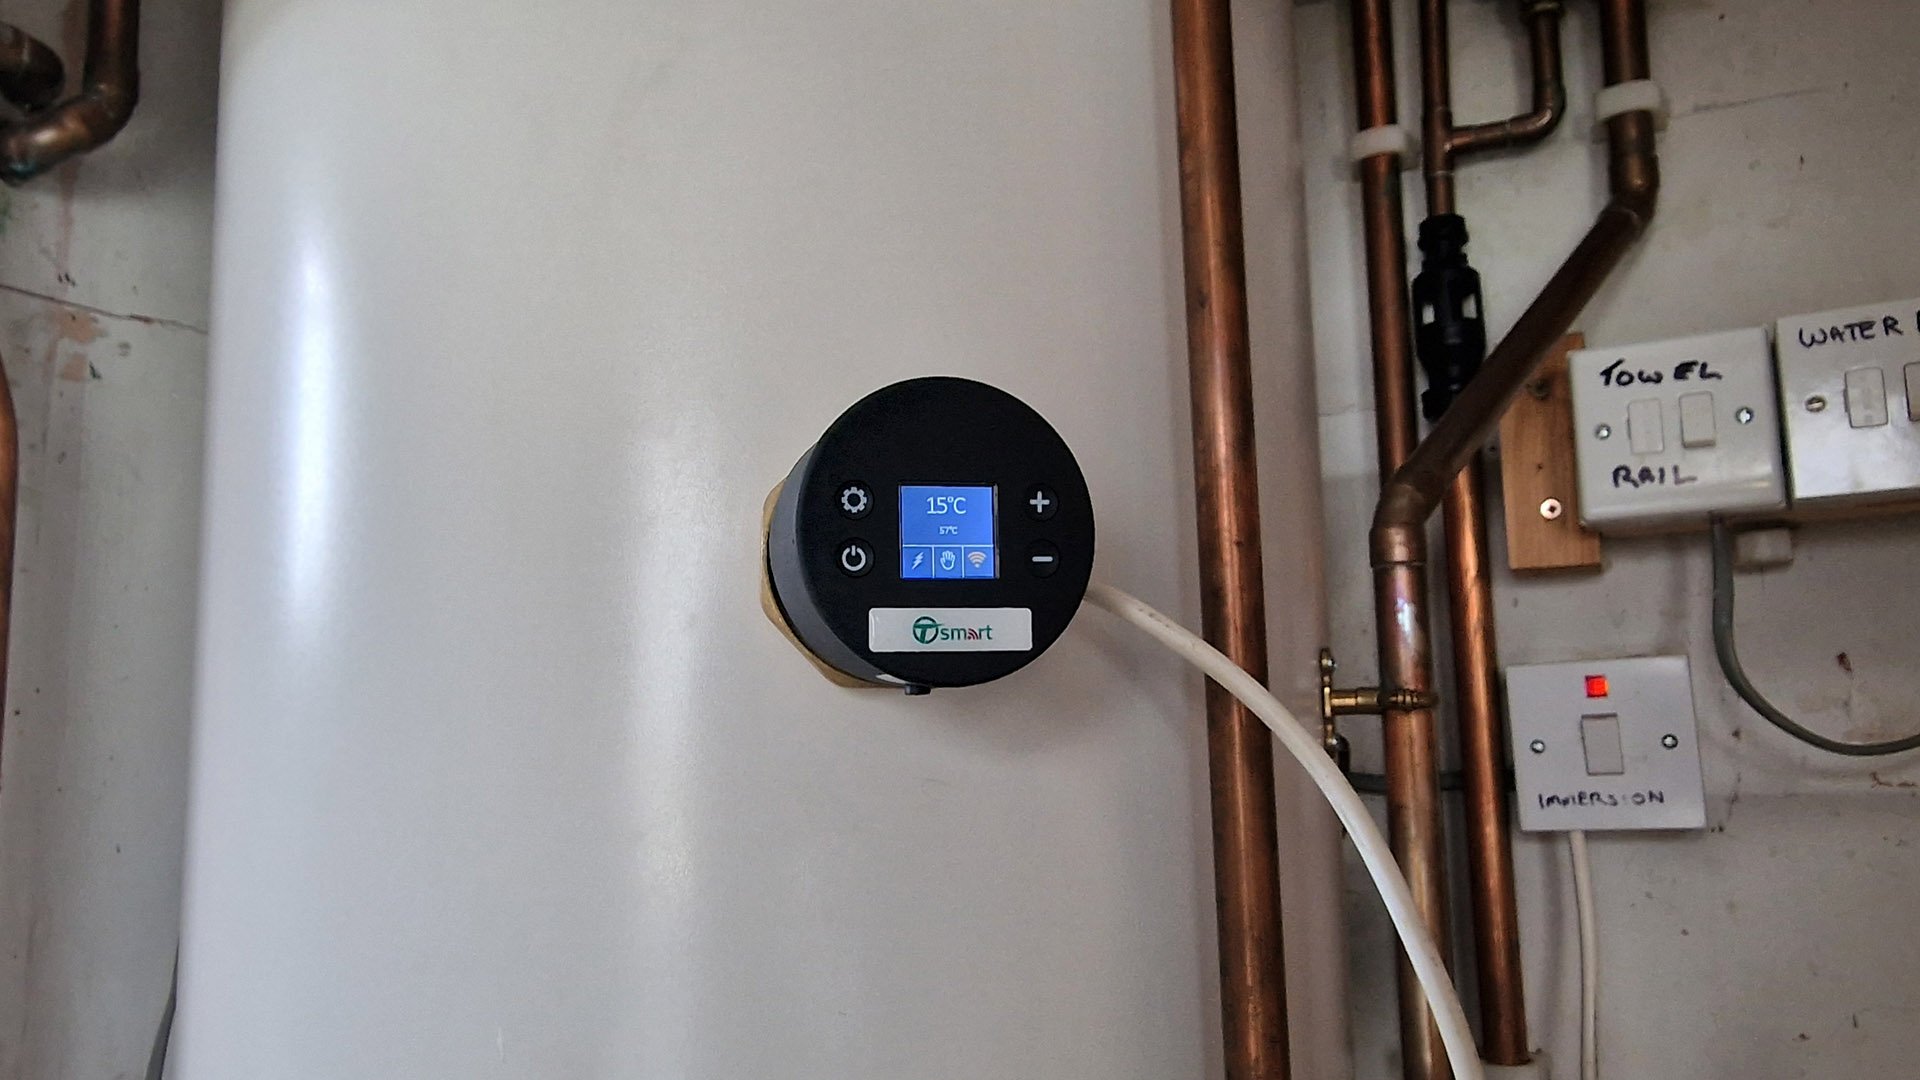
Something else to mention - the inverter is connected to the consumer unit in the garage, and because I’ve got battery storage I needed comms from the inverter to the meter box where a CT clamp connects to the meter tails. I installed an armoured CAT5E cable as part of the charge point install, as the charge point also has it’s own CT clamp, and used a pair of spare wires from that for this connection.
inverter and batteries
Can you self install?
No, because the works will be notifiable under Part P, but even if you did (and I wouldn’t recommend it) particularly where you’re working with DC current from the solar panels, if you plan to export to grid you need a whole host of certification and approvals.
For example, you need an MCS Installation Certificate. You also need to notify the DNO or your district network operator that the installation has been carried out for their approval if you wish to export, as you then need to apply to your electricity provider for a Smart Export Guarantee (SEG) - which involves submitting the MPAN, DNO approval confirmation, and the MCS certificate.
Other point - I only saved £600 installing that kit myself. If you're not replacing your roof I would say it probably isn't worth installing the panels yourself.
is it worth it?
Cost wise, a system like mine will cost you about £10k to £12k. For a full run down of the pricing head over to my Patreon page.
So is it worth it? And will I recoup it, and how quickly? With the average bills set to soar to £3200 from October, payback for the solar outlay should be quicker than ever before. But what will my monthly bills be like with this new system?
Well, let’s have a look at how the Inverter app works. With the Lux Power inverter there’s a very intuitive interface which, at a glance, shows you exactly what’s happening.
When the batteries are fully charged, you’ve got the massive satisfaction of seeing the grid sat on its own totally disconnected from the house and therefore not costing me anything.
In the screenshot below you can see how, with the batteries fully charged, all 3.6kw required by the house is coming from the electricity generated by the solar panels.
And here, with a larger 7.5kw draw (that’s the car charging), you see the batteries kicking in to help with the supply, and note we’re also feeding from the grid.

And with the house requiring just 524w, and the batteries fully charged, we’re exporting to the grid, and at this point, the solar charging has kicked in.
The app also allows you to see a full timeline of your solar and battery charging status, consumption and what you’re drawing from the grid over a 24 hour period.

I’ve got to say I’m having massive problems with the Indra charge point. It’s randomly charging at full power when it should be waiting for the off peak tariff, and is a law unto itself as to when it kicks into solar.
For example, it should be charging at the time of writing - but isn’t. In solar mode there’s no battery priority, margin or DC coupled mode to tell it only to charge the car from excess rather than drawing from the house battery. More fool me not buying a solar ecosystem product like the Zappi, but things have moved so quickly when I got the charge point (at which time I had no idea I’d be installing solar panels). Also, when you’re charging in solar mode, you get anything between 1 up to 3kws - similar to a three pin plug so it will be charging very very slowly.
I only had the system installed on 28 May and so I can’t tell you the drop in consumption yet before and after install, and of course, consumption will be less because we’re in a heatwave at the moment. But the times when I’m off grid are obviously going to impact on my bills. The two things that skew the situation for me are the EV, and items like my hot tub - but now I know what I’m consuming in real time, I’ve become slightly obsessed at running the hot tub like a large water tank - only charging at night or when I can draw electricity off the solar/ batteries - and now I’ve installed the Tesla immersion on my hot water tank, I could in theory heat that too from surplus electricity rather than the boiler.
The EV does complicate matters. Without it, I would have been tempted to switch onto the Octopus Agile tariff, where you can sell back electricity at higher prices.
These prices are dynamic and change all the time - it’s been over 30p per kwh recently, but the Agile tariff isn’t compatible with Octopus Go. Remember, you have to agree an import tariff for your day-to-day electricity and an export tariff if you want to sell back, and they often aren’t compatible (Agile isn’t compatible with Go) as the suppliers obviously don’t want you to have your cake and eat it. However, with Go I am at least only charging the EV at night to take advantage of the 4 hours 7.1p per kwh electricity, compared to the 29p I’m paying during the day.
So all in all, being so aware of what my electricity consumption is, what I’m paying and when is bound to be having a massive impact on my bills, and I’ll let you have an update in 12 months time. Suffice to say, they used to quote a 10 year payback on solar, but now with sky-high electricity prices it seems to be more like 4 to 5 years.
conclusion
So, what’s all of the WeShop malarky I’ve mentioned?
Well, please hear me out on this one. WeShop got me involved a few months ago as a founding influencer. What’s quite cool about this platform is that you get shares when you buy things - they’re giving away 90% of the company to people who shop on it. Most of the major retailers are signed up - and what I personally like about it, is experimenting with it. I’ve bought everything from dishwasher tablets to nail guns. I’m now supporting a lot of UK retailers that we tend to forget were out there before Amazon came along.
You get 20% of the value of what you buy in shares, and if you post about stuff that people then buy themselves, you get 10% of that value, and if you bring people onto the platform you get 1% of what they spend.
You can do all of this by downloading the app here and signing up, and you can put in my username charliewhite (you can’t just sign in randomly). Then you can have a look at my profile and where I have a load of wishlists that mirror the store I have got on Amazon, alongside posts and video clips of things that I’ve bought. It’s a bit like exclusive content you’d get from me on Patreon, but here, you get shares every time you buy!
Now the reason I’m a bit loathed to push this as a hard sell to you on my videos and blogs is that I don’t know what will happen to the WeShop platform or how well it will be taken up by the British public. But I’m buying things I would be buying anyway, I’m supporting British retailers, and getting a potential nest of shares. Have a play around with it and let me know what you think.
See you soon! Once again, massive thank you for reading and watching. Feel free to leave a comment below and let me know how you get on with your own project.
Oh, and if you’re new to my YouTube channel, click on the link here to subscribe!
As usual, I’m always looking for ways to make this sustainable now I’m doing it full time, so if you like my content and to help me keep providing it here on this channel for free, I would be so grateful if you could visit my Patreon page, to support me. For just £5 per month, you have daily contact with me through my Discord member forum behind the scenes videos and automatic entry to my free monthly giveaways. Please click here.