
MY DIY Trench Digging Nightmare
Back in January, I dug a 65 metre trench to connect up a new car charger from the garage to our house. I also laid a new water pipe in the trench - just in case we ever decided to try and convert the garage. The trench was still open at the bottom of the garden so I thought now would be a good time to make the final connection of the water pipe to the mains - and in the process gravel over the path at the back of the house that gets muddy in the winter.
I thought it would be an easy job. How wrong I was….
I’ll show you the problems with a job like this, where I went wrong, the obstacles I came up against and what I’ve learnt from this part of the dig, in the hope that it helps you if you’re planning something similar. Click here to watch the video on YouTube.
What I Never Learn
So, I started this job armed with my trusty mattock pick - the same thing I used when I dug the decking down at the bottom of the garden. I also used it when I was trying to dig the trench at the top of the garden for the car charger. What I have realised is that I never learn from one project from another. It was INCREDIBLY slow going and I hit loads of stones underground. There was a drain I had to get through AND an entire wall buried below the surface of the ground. I also realised after starting that I hadn’t made any plans as to where I was going to put all the soil that I was excavating, so I set up a very DIY soil sifter! This meant I could sift the decent top soil from the stones, gravel, and everything else, in the hope I could then use the top soil to spread on the garden.

Whilst it did the job okay, what I realised was that I needed some mechanical help…
tools for the dig

…so I hired a micro-digger from a local company, which then arrived a few days later.
I’ve never used one before, but these micro-diggers are fantastic!
You’ve got tracks which can go inwards so that you can get them through doorways, they’re powerful enough to dig foundations, and I even pulled out a couple of tree stumps with it.
However, sadly on this job it has only been of limited use - I mean I say limited - it dug a reasonable amount of the trench which was helpful, but limited as I didn’t realise just how many services there were below the path.
Looking at the trench from the bottom of the garden, there are two brown plastic pipes with some protective concrete above. I also had a redundant pipe lower down to hack through. Further along, I had another two pipes to dig underneath, again taking soil and grey water.
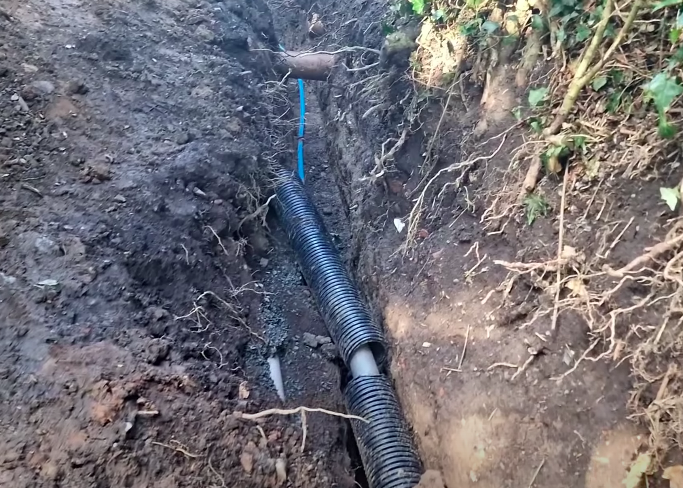
And then there was this little beauty - the water main.
Any of you who have been following my Instagram account the last couple of weeks will have heard me whinging about the placement of this pipe.
When I had my new septic tank fitted several years ago, I paid a contractor to install it and also to replace the existing services - namely the soil pipes and the drainage pipes off the roof. At the same time as doing all of the digging, he ruptured the water main, and so replaced it with a new MDPE water pipe from where the main came into the house.
I don’t know about you (I’m obviously not an expert on all of this) but what I have realised in the course of doing all of this digging is that water pipes have to be 750mm minimum below the surface. They should also ideally be protected with warning tape.

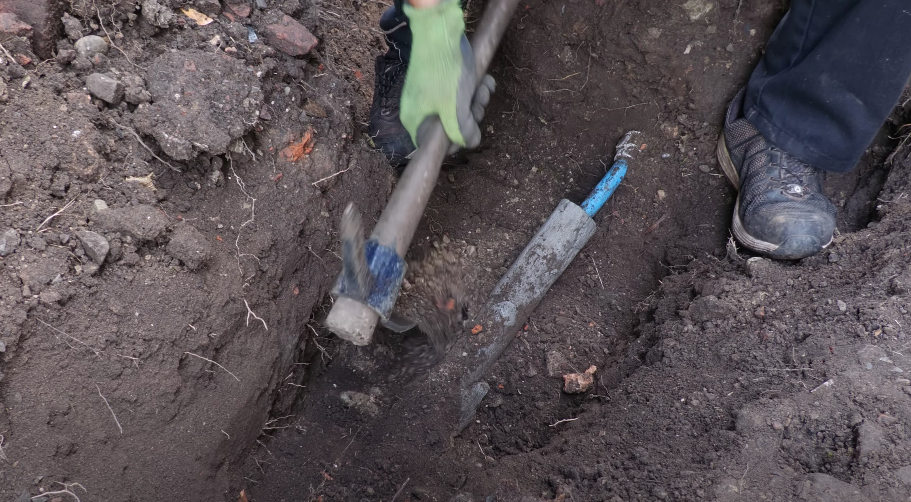
But my new water pipe was only 200mm maximum below the path. As you can see here, I snagged it with the micro-digger. Which I was doing very carefully, as I knew the water main was on the course I was digging - I just didn’t realise it would be so close to the surface!
Now, a few people on Instagram have pointed out to me that what I should have been doing when I was using the micro-digger is keep the teeth of the bucket horizontal as I drag it back through the soil. Obviously I wasn’t doing that, but what I was doing was being incredibly careful, and I wasn’t scooping with the bucket, but literally dragging along. It was in this process that I snagged the water main. Thank God I didn’t rupture it, as my water pressure here is insane! It’s about 7 Bar, probably more… so there would have been an absolute geyser had I gone through it with no means of capping that off (where I was digging was on the main side of the stopcock).
So, my advice to you is that if you are doing this sort of digging and you’re not sure where your water main is have yourself one of these water pipe squeeze tools in case you have to do an emergency clamping of the pipe on the water main -

Now what the contractor had done was lag the MDPE pipe and also put it inside a perforated land drain. I suppose because having known that he wasn’t sinking it to the right level he was trying to make sure it didn’t freeze in the winter. But I was understandably aggrieved because I paid a lot of money, about £15,000, to have the septic tank and all of the additional works carried out as part of that project.
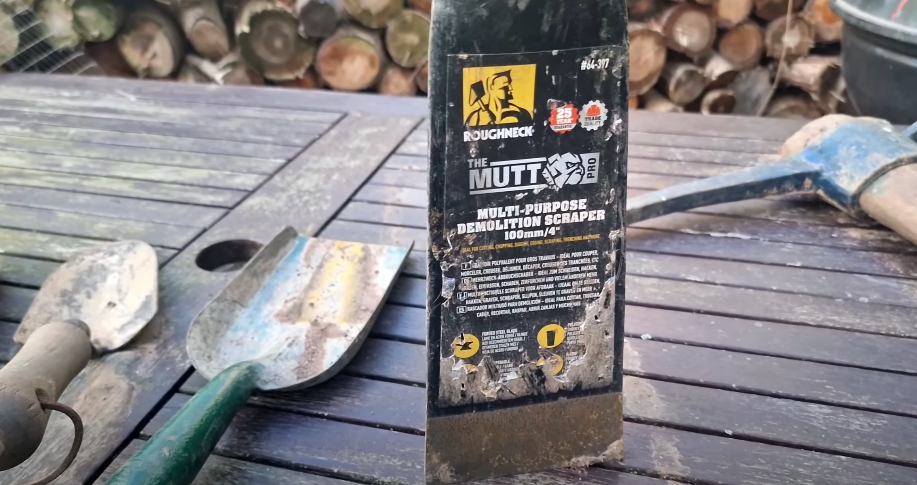
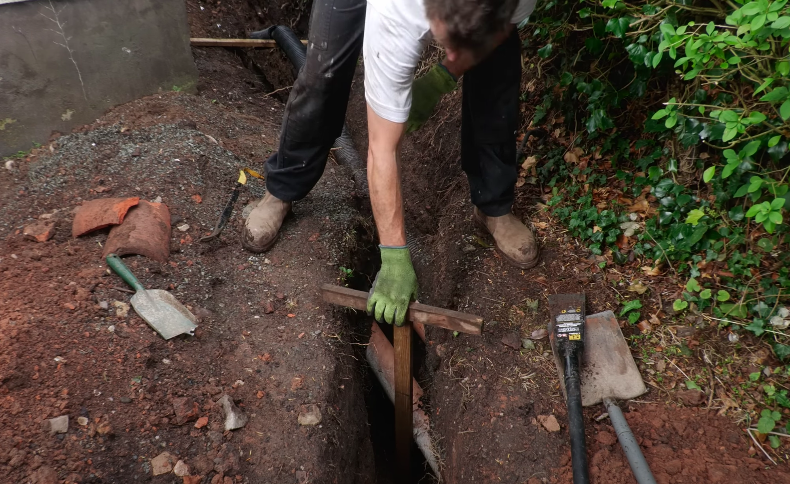
But I thought, to hell with that, he didn’t do it properly, I am going to do it properly. I want to dig my new trench to 750mm down. I set about doing this with a combination of the micro-digger (using that as the brute force tool where I was confident that there wasn’t too much danger of any services being there); and where I knew there were services I proceeded a lot more carefully with mattock pick, which has been brilliant. I even used a couple of trowels. And this Multi-Purpose Demolition Scraper which I bought from ScrewFix - initially I was slightly disappointed at its digging power, but I’ve got to say it’s been a fantastic tool on this job, particularly where you need to get underneath the pipes.
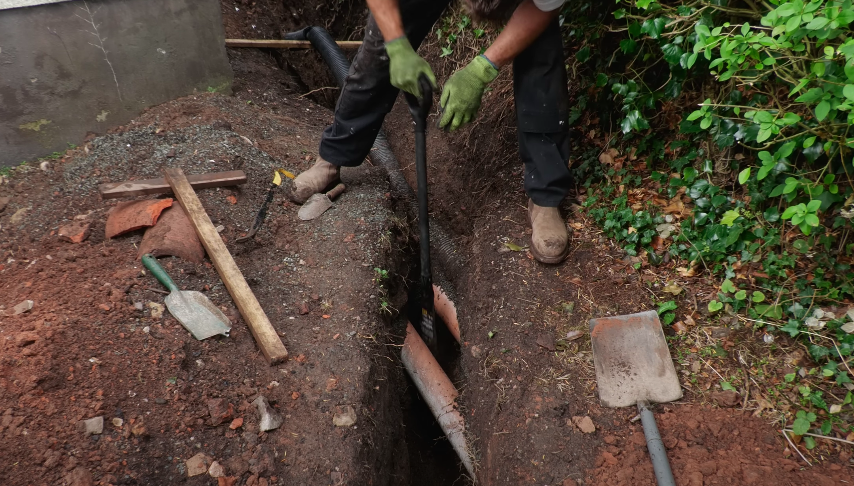
I also used my Mac Allister Concrete Breaker to get through concrete and underground bricks.
Furthermore, I had another quite amusing incident having dug a lot of trench work with the digger down the path. . .
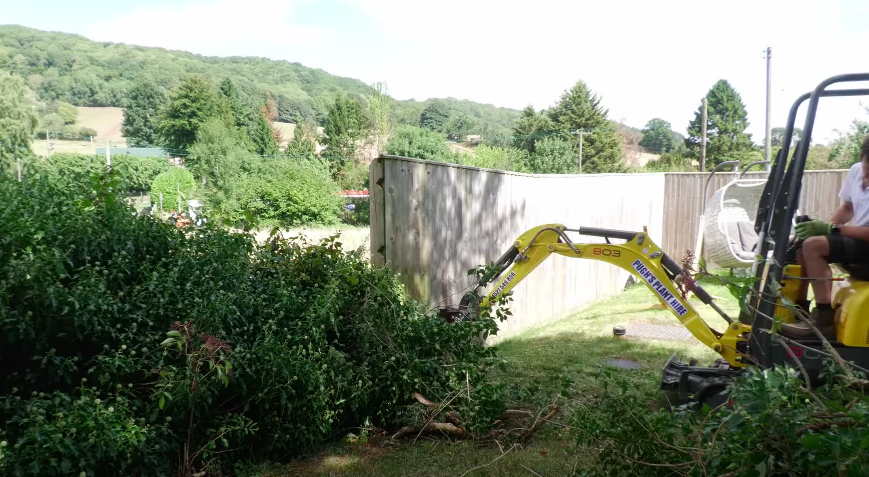
I realised I had no means of getting the digger back out when I had to hand it back 2 days later. So what I had to do was unfortunately demolish a stretch of my hedge just here.
Luckily, it wasn’t actually too much of an inconvenience because at some point I need to finish building the fence anyway!
bedding material
Now what’s crazy about this property is from about 500mm down there’s a mad seam of builder’s sand. So it was pretty straight forward for the old trench bedding the various cables and water pipes in this lovely ground. But for the new section that I’ve just dug, there’s a lot of rocks and gravel. I’ve developed a new respect for the regulations on bedding in these services since analysing the water main when I was digging it up.
As you can see here, there was a lot of sand and rock around the pipe that my contractor put in. He had lagged it but the lagging had been torn when he put it in - which he casually overlaid
When I was digging, I then found a lot of rocks and stones pushing up against that pipe, because don’t forget when you start compacting the trench everything gets compressed together. So with that in mind, I’ll be encasing the MDPE water pipe in soft sand and also ordering some pea gravel to replace the pea gravel that I had to dig away around the brown plastic. As a precaution, I’m going to contact my local water utility company to check that they don’t need to do an inspection before I fill in the trench.
I also ordered some Type 1 aggregate gravel for the path, but more on that in the video next week…
connecting the pipes
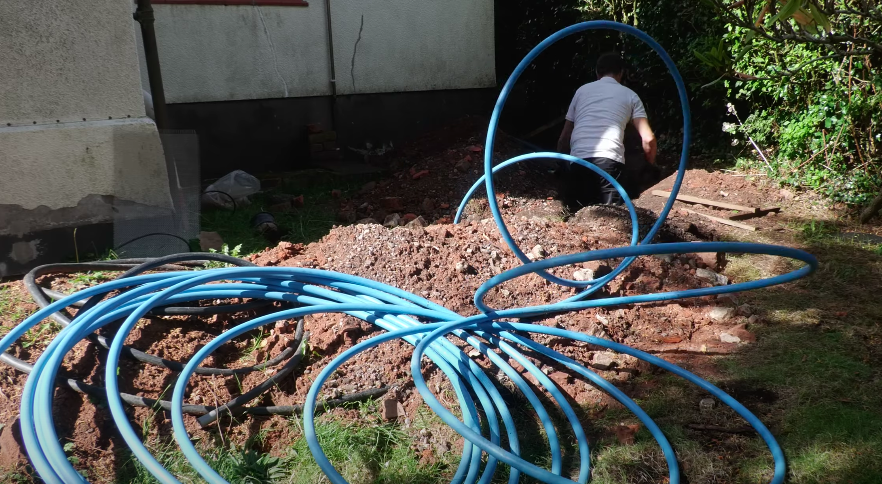
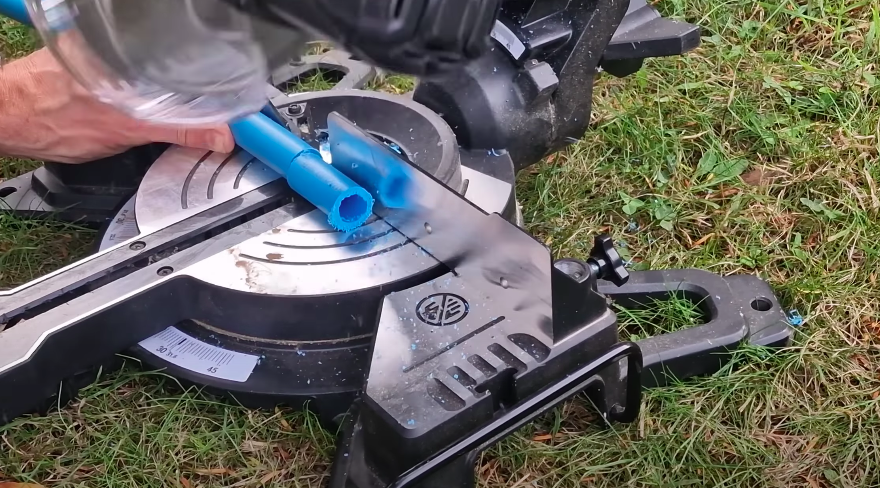
So now to the final job, threading the 25mm MDPE pipe into the newly dug trench, and connecting up the water main to the new pipe that goes up to the garage. I bought these Plasson 90 degree Compression Ts from my local farm DIY supply shop. The first one I fitted with a blanking plug so that I could connect another line into it should
I ever decide to install water further down the garden. The second, after switching off the mains supply, I connected up to the pipe that comes off the water main that supplies an outdoor tap. I used my reciprocating saw to cut through the pipe and also a mitre saw to get a really clean 90 degree cut, deburring the pipe with some 120 grit sand paper, before pushing in inserts to strengthen the pipe when under compression. Plassons say the 25mm fittings can simply be hand tightened and my experience using this is that there is no need to use any tools to further tighten the fitting.
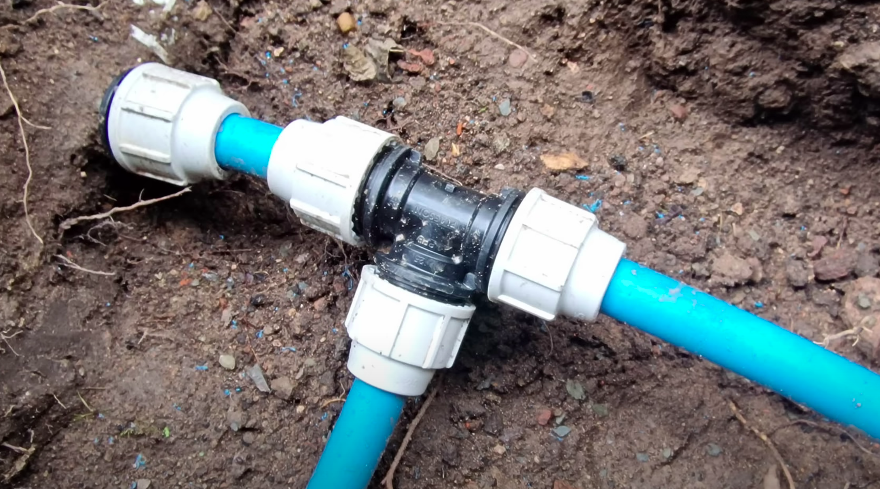
I’ve re-lagged the pipe down to the point where it’s 750mm deep. I had a near escape with one of the nuts on the compression fitting - which it looked like I managed to sever into with my mattock pick. Luckily I had a spare one I could replace it with!
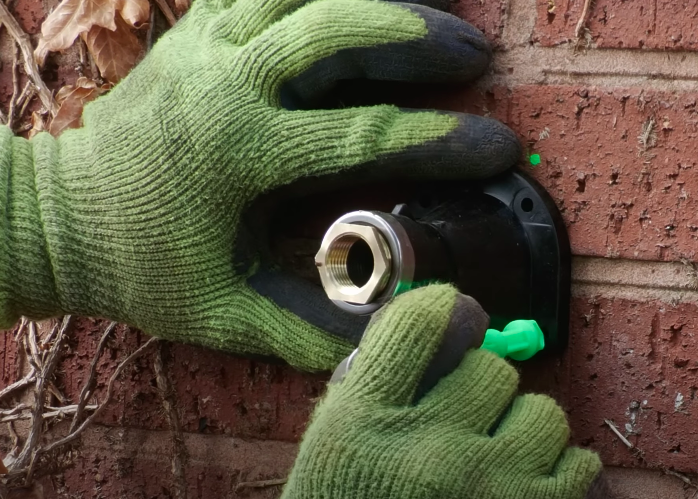
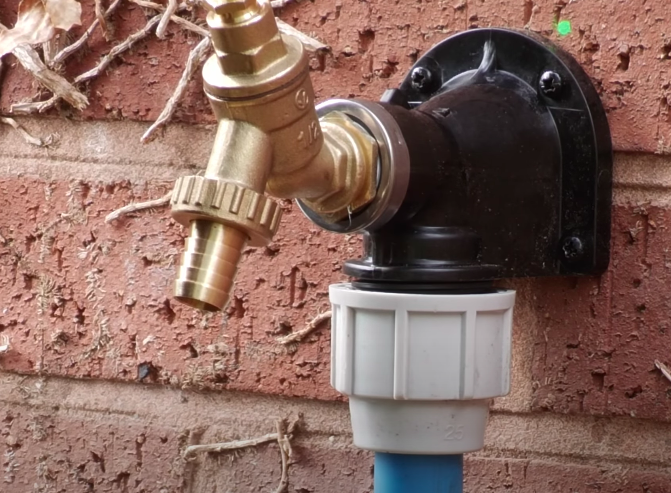
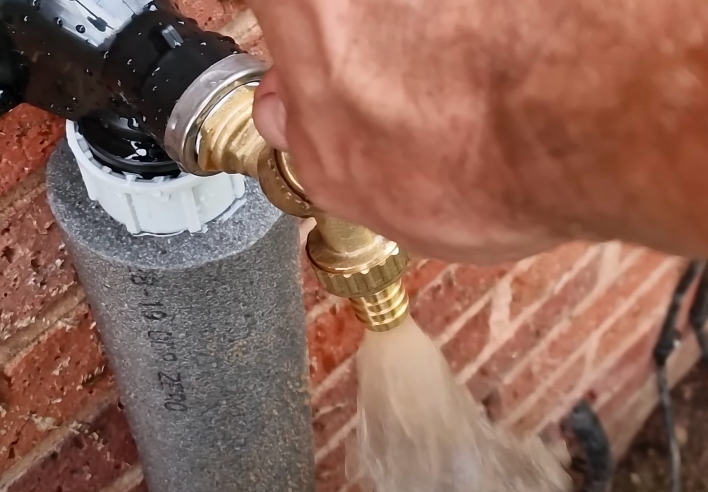
At the other end of the water pipe up at the garage, I fitted a wall plate elbow to the garage wall, marking the screw holes with the brilliant marksman pen. After drilling 4x7mm diameter holes for brown wall plugs, I fixed the wall plate elbow in place with some 4x40mm Exterior Tite outdoor screws and then applied a fair amount of PTFE tape to the brass reducer and brass tap thread, before screwing these into place. Don’t forget, for outside taps you need a tap with a double check valve. I then wrapped the pipe in thick lagging and may at some stage fit a wooden surround to the tap, just to make the whole thing look better. And the moment of truth, testing the tap…
So that’s it for another week, and I’ve got to say this has been a really tough challenge. Whether we should be doing these things single-handed, I don’t know, I’ve just about got there in the end and at times have got pretty de-moralised with this one.
What I’ve really found interesting about this job is the learning curve, as per usual, when we embark on these DIY challenges. I’ve never used any of those Plasson compression fittings before but that’s another one to tick off the list!
I hope you’ve found this in some way useful. In my next video and blog on this, I will be showing you the process of re-pathing along the back of the house. If it wasn’t for having a YouTube channel I probably would have shoved a load of weed-matting down and some gravel, but with the need to do these things properly I’m looking into getting some grid mesh and really going to town on this. Again, as part of the learning curve, I’ll be using any techniques that I learn from this on the path at the front of the house which urgently needs replacing.
It may not be next weekend, as the problem I’ve got is having dug the trench down the middle of the path there will be a lot of slumping going on once I’ve filled the trench, even if I properly compact it. I’ll probably have to leave that for a few weeks for it to settle before laying the path.
Thank you again for reading! Here are some links to some of the things I used today:
You can buy everything featured today through WeShop
Oh, and if you’re new to my YouTube channel, click on the link here to subscribe!
As usual, I’m always looking for ways to make this sustainable now I’m doing it full time, so if you like my content and to help me keep providing it here on this channel for free, I would be so grateful if you could visit my Patreon page, to support me - lots of exclusive content. For just £5 per month, you have daily contact with me through my Discord member forum behind the scenes videos and automatic entry to my free monthly giveaways. Please click here.
I thought I’d also mention a new shopping platform that I’ve been using recently. WeShop is a new concept merging social media with shopping. You can get 20% of the value of each order you make through the platform in shares - they’re giving away 90% of the business to those who shop on it.
Over the last ten years, I’ve been a bit addicted to Amazon, so I’m trying to start helping and reconnecting with other UK retailers who are signed up to the site. I’ve bought anything and everything from dishwasher tablets to nail guns.
You also get access to an exclusive connection of my own videos because I post regularly about all of the things I like using. If you recommend friends, you get a small referral commission (as I do from you if you come onboard). You can download the app from Google Play or the Apple Store, and simply need to sign up using my name ‘charliewhite’ - all one word. Have a bit of fun and let me know what you think!
Now I don’t know quite how this will pan out, I don’t know what will happen to the WeShop platform or how well it will be taken up by the British public. But I’m buying things I would be buying anyway, I’m supporting British retailers, and getting a potential nest egg of shares. Have a play around with it and let me know what you think.
* The Amazon links (if any) above are affiliate links. It doesn't cost you anything to click on them but I do earn a small commission if you do.
* I'm not being paid anything for the WeShop mention here, but I do earn a small % of shares if you sign up through my link, but it doesn't cost you anthing to do so, and once you're in, you can start earning shares from referring friends too!