
How To Install An Outdoor Hot and Cold tAP
So, my gravel mesh reinforced path is now installed - click here for a link to my video on this - and the next thing I wanted to do was install a hot and cold tap, so I can shower the dog after our winter runs (rather than dousing her in freezing cold water from the hose pipe).
I’m going to tell you how I did it, and how my original plan was transformed in the nick of time into something much more professional by some very cool advice from James at Plumberparts, and as usual all the mistakes I made along the way.

So here’s the outdoor space where I wanted to install the taps - the main reason being the kitchen sink is immediately behind this wall, giving me the perfect opportunity to re-route the hot and cold water through the wall.
Before I started I thought I’d tidy up the wall by scraping off the remains of some climbing ivy with the wire brush attachment on my drill, because I wasn’t getting anywhere scraping it manually with a wire brush. The plan was to paint the wall after doing all the messy drilling work - just as well as it turned out.
master plan
The plumbing under the kitchen sink was done by a local company back in 2014 when we moved into the cottage and had a new central heating system and kitchen installed.
It was a bit shoddy, with the original sink drain not filled in, and none of the pipes clipped against the wall.
I didn’t really give much thought to the plumbing, other than the fact that I’d need two holes drilled in the wall in a position that would be convenient to work on inside the kitchen cupboard, and also at a reasonable height outside.
drilling
So I drilled the initial hole from the inside and was too lazy to look for a narrower drill bit than a 16mm SDS bit. This was an error, because my Tyrolean render is notoriously liable to blow off dramatically if not carefully drilled, and this time round it didn’t disappoint.

But with the external position now marked, I could drill the second hole from the outside, guaranteeing a much cleaner hole. A bit of spare 15mm copper pipe just about squeezed through but I wasn’t happy with how tight a fit it was, so I enlarged the hole to 24mm and would find out if that was a good idea or not shortly.
render repair
So I had a large hole to repair, and as the Tyrolean had separated from the render beneath I decided to prime it with watered down PVA, not required for the filler but a useful way of glueing the two layers back together.
I then mixed up some of the excellent Toupret masonry repair filler you might have seen me use in a recent crack repair vid - there’s a link to that video here - and tooled it into the gap, propping it up around the hole with a little pipe and stick contraption, and texturing it to a Tyrolean type finish with an old toothbrush - which gives a much better finish than that other patch repair you will already have seen on this wall from the old sink drain pipe.
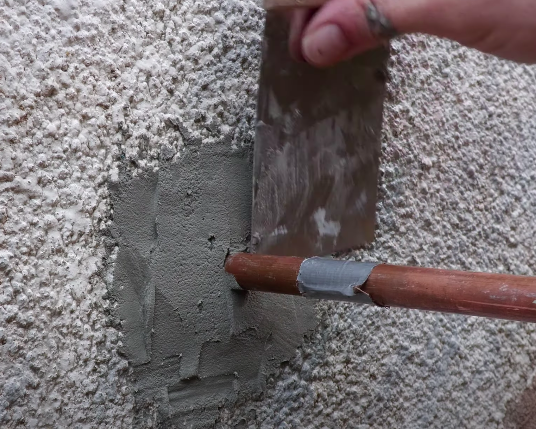

The following morning I could remove the pipe, fine tune the opening with a countersink and masonry drill bit and the repair was complete.
Next I needed to mark the position of the wall plate screw holes on the wall, which I did with the brilliant marksman marking pen and carefully drilled the holes.

I started with one of those 5mm universal bits and worked up to the 7mm diameter required for the brown plugs I decided to use, and as the brass screws have quite a wide neck I even slightly widened the start of the hole to 8mm to minimise the chance of the screws blowing the render - as, with a 24mm diameter hole for the water pipes, the screw holes were quite close to the edge. One hole on the repaired section did blow, so I increased the angle of the hole and repaired the surface with the Metoset epoxy resin crack repair filler that you’ll also see in that crack repair video here.
And then it was time to give the wall a quick lick of the brilliant water repellent, self cleaning, breathable Emperor paint I used on the front of the house - there’s a link to that video here. I’ll finish repairing the rendering and properly paint this section of the house in the spring, so watch out for a video on that.
With the paint dry it was time to screw in place the wall plates and tails - which by now I had measured and cut to size. At this point, I decided to spray some expansion foam into the hole between the pipe as I fed it in - an advantage there of that wider 24mm diameter hole - just to give the pipe a little bit of protection from frost in the winter. I generally find slot head screws quite tricky to drive home without camming out but after all this careful prep and the screws ideally suited to the wall plugs, they tightened up beautifully, with no sign of cracking - even on the repaired section.
the plumbing

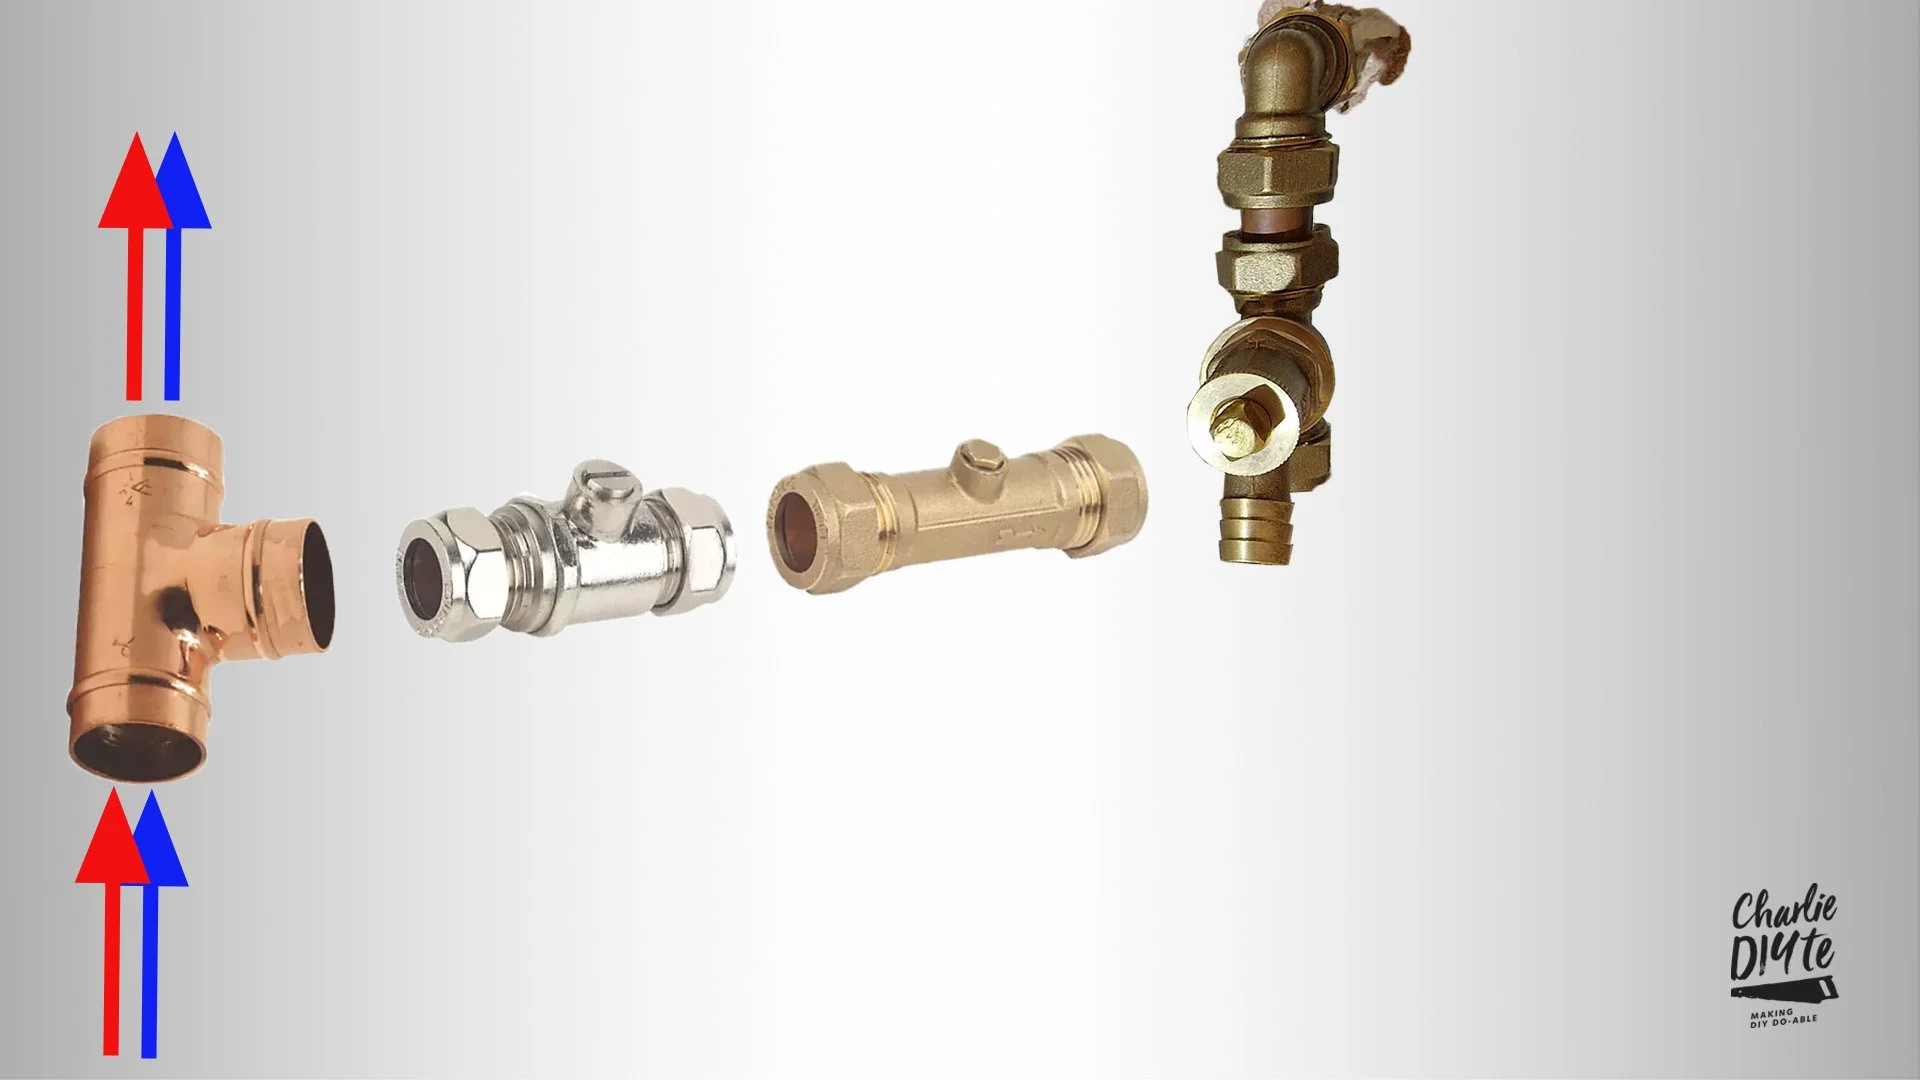
I was initially planning to T off the hot and cold pipes straight through the wall, a bit like this. But then luckily James from Plumberparts, professional plumber and YouTube legend intervened with a spot of advice.
Following this advice, I now had to find room for an isolator valve, non-return valve, and drain off between the existing hot and cold feeds and the new holes, and so I came up with a plan.
With the holes now drilled I had limited space to fit all those additional components in, so I decided the first thing I needed to do was lower those two isolator valves to give me more room to play with. So after switching off the mains water stop cock and hot water I set to work dismantling first the cold water pipes.

So after switching off the mains water stop-cock and hot water I set to work dismantling first the cold water pipes. I thought I’d properly clip the pipes to the wall whilst I was at it and so drilled and plugged the plasterboard wall for the clips.

I decided to upgrade the isolators to full bore - meaning they allow water to flow pretty much the full internal diameter of the pipe - as you see here with this old 22mm version, rather than shackling it down to the much smaller aperture I had previously.
I used a Fernox jointing compound on the olives. I can’t say I’m a massive fan as, possibly because the cap had a break in it but the stuff is basically like silicone and keeps setting in the neck of the tube. Tightening compression joints is something you get used to with a small amount of practice. You want it reassuringly tight without over tightening, but with enough give to give it another ¼ turn if required.
I also cut down the length of the original pipe that T’ed into the dishwasher, to give me more room to T off above it for my outdoor tap.
pipe deburring
Now let’s have a quick chat about deburring. When you cut a pipe with even a new reasonably sharp pipe cutter, it reduces the diameter around the cut, essentially curling it in, and there are videos abound on youtube showing how the turbulence created by this can produce pin holing in the pipes. Deburring takes off this lip and removes any source of turbulence. Problem is, it takes time to deburr pipes and the plumber who installed my new unvented water tank told me his boss didn’t like him deburring, but clearly I’m going to.


I’ve never owned a deburring tool so I’ve always done it with a razor blade but I did cut my fingers on this job on the back of the blade, so I thought I’d buy a couple of deburring tools to try.

I had high hopes for the Silverline but found it awkward to use and found it produced a messy end result. Much better was the razor blade approach and this tool produced consistently good results whilst protecting my fingers from being cut.
system assembly
So the system was coming together nicely, with me assembling everything dry first, and when I was ready I would solder a section before moving on.
Something the plumbing police might pick up on is my use of Yorkshire fittings - these being fittings with a ring of solder inside which melts as you heat the pipe up removing the need for solder. In short, they’d say they’re a bit of a DIY option. I’ve used Standard joints you have to add solder to, and Yorkshire fittings in the past and find Yorkshire fittings a joy to use. Maybe the criticism is that there might not be enough solder to properly complete the joint - again let me know in the comments, but I’ve never had a problem with this.
A lot of plumbers are using press fit now, but the machine is over £1000 - pricing this option out for us DIYers, and a few people on my Discord forum have experimented with Tectite fittings recently - a metal version of push fit. It would be good to hear what you use in the comments section.
So, a quick clean of the pipe with some wire wool, and there’s some Flux on the part of the pipe that’s going to be pushed into the joint. Then, a wise man once told me to wipe off the Flux residue, and to use a wet kitchen cloth wrapped around that old messy joint that the previous plumbers did to stop the solder melting when I soldered a new joint. I also used a soldering mat to protect what’s beneath it.

And then the joyful process of heating up the pipe until the solder starts to flow, and I find working from one joint to the next is the best way to approach this, as when the solder flows in the first joint the coupler is sufficiently hot that when you heat the next joint the solder flows almost immediately.
Now a plumber I know (not James) has suggested my assembly is a bit compression joint heavy. Well, I wanted to put a 90 degree compression joint on the tails coming into the cupboard from outside in case I ever need to remove and relocate them.
Also, I’d gladly have used solder joints, but I’m not aware of any solder joints for isolator valves, non return or double check valves and drain offs, but let me know in the comments if I’m wrong about this.

I thought things were going so well, and then disaster struck…
I put the non-return valve, before the drain off, so nothing will drain off! So I’m going to have to flip it over somehow…
non return valves
Let’s have a quick chat about non-return valves. These were brought into plumbing to stop fluids flowing in the wrong direction - particularly important where, like here you’ve got a pipe that supplies drinking water as well as water to clean that dog.
Now James and I have referred to non return valves but these days, the job is done typically by check valves which are a more comprehensive way of stopping fluids going the wrong way.
Having initially bought a double check valve tap which would have removed the need for this little chap, I decided having the valve in the tap might be a problem for drain off as I’d want to open the tap fully before draining the pipe. So I decided to install a standard tap instead and put the valve further down the pipework.
So I undid the compression joints and replaced a section of pipework to relocate the valve in the correct position, and started redoing the plumbing to add the isolation valve, check valve and drain off for the hot water pipe, using my pipe bending tool to add a slight bend in this section to take the hot water pipe out of the way of the cold.


Don’t worry if you haven’t got a pipe bender because you can use obtuse elbows to create the same result.
But I hadn’t finished there, because the eagle eyed amongst you will have noticed that the check valves I fitted are in fact single check. I suspect given proximity to drinking water and the chance of detergents being involved I should have fitted double check valves, and so for belt and braces, I took the system apart yet again, and installed double check valves in their place.
What I really love about this new system is the rigidity of the pipes - they won’t be knocking around anymore! I haven’t put any clips on here, as I don’t think it’s particularly necessary.
tap hose temperature mixer
With all the internal plumbing done it was a simple job of installing those two bib taps - with some liberal use of PTFE tape around the threads to make them water tight.
I was pretty much done and all that remained was to install that outdoor tap hose temperature mixer. This is the kit I bought - which I have to say I assumed was a Hozelock product given the branded hose pipe but in putting this video together, I realised it’s actually a totally bespoke product the brainchild of a couple who couldn’t find a kit on the market to give their dog a warm shower after muddy walks.


You’ll have seen me use PTFE tape on this project - for the drain off valve and it’s also pretty essential here, to create a water tight join between the tap thread and the brass base plate.
On connecting the temperature mixer I found this leaked pretty badly, and so a quick application of PTFE tape on this too, and the whole assembly was completely water tight.
There are some good adjustable spray settings on the nozzle head, and after going for a run together this morning, this blog wouldn’t be complete without bringing on DIY dog to demonstrate the mixer in action! Lovely and warm…none of her usual cowering away from the hose pipe.

today's toolkit
Let’s have a quick look at today’s tool kit:
Outdoor tap hose temperature mixing kit Wall plates with 15mm copper tails https://geni.us/tQ0hvA1
Brass bib tap standard https://geni.us/O8oJO
Brass bib tap double check valve https://geni.us/wQv6T
Full bore isolating valves 15mm https://geni.us/3Dlv2dT
Butterfly handle isolating valves 15mm https://geni.us/8vUCAQ
Pipe clips https://geni.us/PTHk7
Yorkshire fitting 15mm copper Tee https://geni.us/P3SkY
Yorkshire fitting 90 degree elbow https://geni.us/WEZ4Mw
1/2" type A draw off c@ck https://geni.us/1nFEt7i
1/2" compression centre Tee for draw off c@ck https://geni.us/tkkz
Compression elbow 15mm 90 degree https://geni.us/wp9mRxl
Gun grade expanding foam gun https://geni.us/i53Q8gl
Expanding foam https://geni.us/C4vq2
Ryobi SDS drill https://bit.ly/3Ul3L2K - 16mm x 400mm SDS drill bit https://geni.us/kPCz
24mm x 450mm SDS drill bit https://geni.us/6CZb
Rothenberger blow torch and propane kit including bag and pipe cutter https://geni.us/nScUq5
Bahco 15mm pipe cutter https://geni.us/XXePXbB
Wire Wool https://geni.us/QAfaC
Flux paste https://geni.us/ZEOF
Fernox LS-X jointing compound https://geni.us/PoB3
So that’s it from me today! Thank you so much for reading, and please leave comments below to let me know how your projects go.
Oh, and if you’re new to my YouTube channel, click on the link here to subscribe!
As usual, I’m always looking for ways to make this sustainable now I’m doing it full time, so if you like my content and to help me keep providing it here on this channel for free, I would be so grateful if you could visit my Patreon page, to support me - lots of exclusive content. For just £5 per month, you have daily contact with me through my Discord member forum behind the scenes videos and automatic entry to my free monthly giveaways. Please click here.
I thought I’d also mention a new shopping platform that I’ve been using recently. WeShop is a new concept merging social media with shopping. You can get 20% of the value of each order you make through the platform in shares - they’re giving away 90% of the business to those who shop on it.
Over the last ten years, I’ve been a bit addicted to Amazon, so I’m trying to start helping and reconnecting with other UK retailers who are signed up to the site. I’ve bought anything and everything from dishwasher tablets to nail guns.
You also get access to an exclusive connection of my own videos because I post regularly about all of the things I like using. If you recommend friends, you get a small referral commission (as I do from you if you come onboard). You can download the app from Google Play or the Apple Store, and simply need to sign up using my name ‘charliewhite’ - all one word. Have a bit of fun and let me know what you think!
Now I don’t know quite how this will pan out, I don’t know what will happen to the WeShop platform or how well it will be taken up by the British public. But I’m buying things I would be buying anyway, I’m supporting British retailers, and getting a potential nest egg of shares. Have a play around with it and let me know what you think.
* The Amazon links (if any) above are affiliate links. It doesn't cost you anything to click on them but I do earn a small commission if you do.
* I'm not being paid anything for the WeShop mention here, but I do earn a small % of shares if you sign up through my link, but it doesn't cost you anthing to do so, and once you're in, you can start earning shares from referring friends too!