
How To Build A Path
I’m going to show you everything that I had to do whilst building a sloping gravel path down the back of my house: removing all the brick and debris littered soil; lowering a soil and mains water inspection chamber; building a raised gulley; installing the edgings, the sub-base and blinding layer; gravel grids; and finally the gravel.
I’ll explain each steps of the process, the tools and materials I used, the costs of installing the path, and what I’ve learnt.
If I didn’t have a YouTube channel I might not have gone to town like I did (my wife calls it the most over engineered path no-one will ever see), but I’ve never built a proper path before so I thought I’d do it properly. So by building the path to the highest possible spec, I’ll be showing you all the possible processes that are involved, to give you everything you need to know if you’re thinking of doing something similar - so you can decide which processes to repeat and which you can do without on your project.
the master plan
I’ve been wanting to turn this muddy, overgrown, weed strewn path into a tidier space for some time now, and so although there are lots of important jobs waiting for me around the house, with winter coming I thought I’d get on with this now - particularly as I had only recently finished digging up much of the path to connect an MDPE water pipe to the mains.

So the plan was to line the path with a 100mm deep tanelised gravel board. I would excavate 110mm deep. Click through the slideshow below to see the progression of my plan.


This would allow me a 50mm type 1 sub base, with a 10mm sharp sand blinding layer (basically filling any imperfections in the sub base).
Followed by a 29mm deep gravel grid - to give the gravel some stability and structure and most importantly, to stop it migrating down the slope.
And finally I'd fill the grid with 10mm gravel, with a 20mm layer above to hide the Grid - all of which was to finish flush with the gravel board and the inspection chambers and gully which peppered the path.
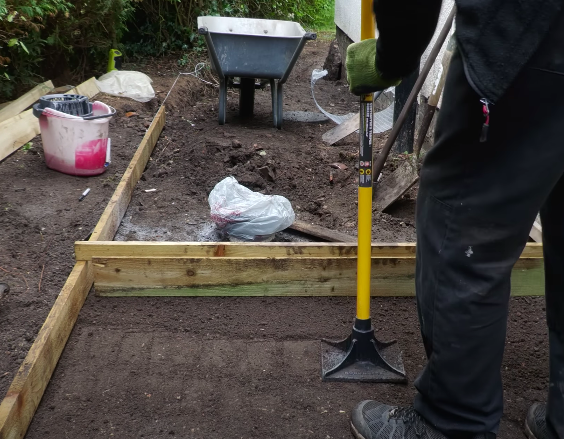
Excavation
So the first job was to mark out the position of the path - which I did with a string line and some tent pegs. With the inspection covers littering the path I thought I’d make it nice and wide - 1500mm - to give me plenty of room to walk around everything on my way down the the path. With the string line in position I could mark the rough position of the path with a line marker spray.


And then it was the painfully slow process of excavating the path with my mattock pick and spade. The spray line was just there as an approximate guide when hacking away soil with the mattock pick. The string was a more accurate guide for the edging when I came to concrete this in later.
One of the issues with building a path is working out what to do with all the material you excavate. As I explained, I’d be removing 100mm of earth. The earth I excavated was littered with building waste, bricks, broken clay pipe and lots of small stones, so I stretched a wire mesh over my wheel barrow and sifted the soil from the rest of the debris. The soil went on the main lawn to help level it after the trenchwork in January for the car charger cabling had left it incredibly uneven, where the digger I hired from a friend sunk into the soft ground. I used the rest of the debris to part fill the trenches already partially filled with sharp sand and pea gravel to protect the water and electric cables below, and the left over materials went in a skip.
gravel board edging
With enough material excavated I could start preparing the edging, constructed from 100mm Tanelised gravel boards bought from my local timber yard. I had some lengths of Tanelised 3 x 2 left over from a previous job, and I cut these into 28cm lengths, to serve as posts for the gravel boards with a 45 degree angle at one end to go at the top of the gravel board - the idea being that by angling this and setting it down 15 - 20mm from the top of the board it would be hidden when backfilled with soil. I treated the posts with bituminous paint - perhaps overkill, but if I have to replace the boards at any point it would be great if the posts were still intact.

Whilst the posts were completely covered in bitumen, I left the gravel boards untreated - except for the cut edges.
This was partly an aesthetic choice, but also I’ve since dug another trench for some bay window foundations on the other side of the house, and the gravel boards laid 10 years ago are still looking in pretty good condition, so hopefully these new ones will last a while yet. If I do have to replace them, the posts should be okay.
I spaced the posts at 1.2m intervals along the boards, and dug holes just over 300mm deep - so the posts could be set just below the surface. I used a combination of the roughneck mutt pro digging tool, my SDS drill in chisel mode because, you’ve guessed it, there were bricks and things to get through, and the gorilla bar - all very effective tools to dig a narrow diameter hole like this.

I decided to screw the posts to the gravel boards rather than set them in concrete first. That way I could get the gravel boards mm perfect using the string line as a reference.
I placed the posts on a shallow bed of gravel, and then filled each hole ⅓ full with water before pouring in the fast setting post concrete mix - which you fill until the concrete domes out of the water, and then tamp down the concrete with an old batten to remove any air or dry pockets. 10 minutes later, and the concrete is set.
Inspection Cover Lowering
The next job was to lower the riser on a soil pipe inspection chamber - something else I hadn’t done before. I read there are guidelines on the riser - and so I cut through these with my reciprocating saw. After experimenting also with my grinder, this was the easiest way to get through the riser. The problem was, with this done, the riser didn’t slot into the chamber, so I removed the flat section at the bottom of the riser, bevelled the edge with my belt sander and then the riser fit really snugly in the inspection chamber.

I also had to lower the inspection chamber for the water meter - because it was also sat above the gravel board edging. But this was a more simple task of unscrewing the inspection collar, and trimming the pipe down (again with my grinder).
Tidying Up Jobs
Other tidying up jobs included using my SDS drill in rotary mode to chisel away concrete below the path, and a grinder to trim and tidy up the edge of the concrete path. Also, to remove a redundant iron pipe that was sticking into the path. What that pipe was for is anyone’s guess!!!
With these jobs done and half the gravel boards in place, I was making decent progress. More digging and excavating and the remainder of the path, complete with slope, was more or less done.
As I excavated I installed more gravel boards, including this tricky section around a hedge root that couldn’t be cut away. I infilled the back of the gravel boards with stones sifted from the excavation, finishing off with top soil.

levelling method
To get the path level, I decided to screw a 2 x 1 inch roof batten to the house - exactly horizontal with the gravel boards as they sloped down the path. I then screwed a piece of feather edge fence board I had lying around to another roof batten left over from the garage reroof project, just wide enough to span the gap between the edging and the batten i’d screwed to the wall. This not only enabled me to get the path horizontal, but also by moving the feather edge board up and down on the batten, I could set this new levelling tool to each level as I built up the path foundations, so I could get the depth of each exactly right.
There have been so many obstacles in my way on this job, and one of them was a layer of concrete that the previous owner had laid below the lawn - I think to prevent water getting into the cellar - although I haven’t found removing it to have any effect on water ingress.
With the final part of the path excavated I could screw the last few gravel boards into place and set their posts in concrete.
fine tuning path base
I’d excavated a bit too deep before I put my levelling tool together to check the depth, and as I had quite a lot of surplus gravel infused soil left over from earlier trench digging, I decided to spread this down the length of the path, levelling it off for a super accurate, true base before infilling. To level the material I used a short piece of feather edge board - a crude but very effective way of smoothing out the material, which I kept using for each subsequent layer for the rest of the job.
In hindsight adding this additional layer was a bit of a waste of time, as the MOT-Type 1 sub-base would have been more than adequate at doing this. However without it I wouldn’t have achieved the right depth of MOT from the top of the path (I bought 2 x 1 ton sacks and used both), and it was good to start off the infill with a near perfectly prepared base - not to mention a good way of honing or practicing my levelling skills!
weed matting
It was time to spread out some weed matting down the length of the path to suppress the growth of any weeds through the path - it can also help stabilise the ground when loaded with the sub base material. Most of this was left over from the decking build a couple of years ago. I just had to buy a 1.5m section to go down at the bottom.


I then cut the weed matting around the inspection covers with a razor blade.
type-1 mot sub-base
With all the path preparation done, it was time to start building up the foundations with the sub base. This is an M.O.T Type 1 sub base - basically a crushed aggregate dust to 40mm in size. The reason for this is that I’ll be laying a gravel grid and this needs a solid foundation. The gravel grid manufacturers recommend 50-100mm in depth. Given the quality of the preparation below the sub base and the nature of the path, I decided to go with the minimum 50mm depth. I ended up needing 2 x 1 ton bags (each holds roughly 50 x 20kg bags in it but £46 for a ton it’s so much cheaper to buy a 1 ton sack than the individual bags - which cost between £3 and £5 depending on where you get them from.
To get the sub-base level right, I adjusted my feather edge levelling board so it projected 40mm below the gravel board edging. That way, when I tamped down the sub base I had achieved as near as possible a 50mm depth of sub-base - or 50mm below the top of the gravel board.
To compact the sub base, I started using my roughneck 10” tamper which was very effective and I would say adequate for a path of this size.
raising the bottle gully
As I worked down the path it became obvious the kitchen waste bottle gully was too low. I could probably have bought a riser to raise the height but this would have clashed with the kitchen sink waste outlet. So I had a better idea, and used a few brick tiles I had unearthed in the garden over the years to create a new raised section. Trimming them down with my Titan 9” angle grinder, clamping them together and then cementing them into place with a strong, sharp sand mix of approximately 3 parts sand to 1 part cement, bolstered with some waterproof admix. I sloped the cement into the gully to divert any splashing water down into it.

And I’ve got to say, I’m pretty chuffed with the results, and the next day, I could continue with laying the sub-base.
wacker plate
So up until now I’d been using the manual tamper. I was, however, curious to see how a wacker plate would compare, and I knew you lot would be pointing out I should have used one. It just so happened my local agricultural / DIY store had recently bought an Evolution Hulk Wacker plate, so I hired it for £25 for a day. What did I think of it? Well, clearly it’s more effective, quicker and less physical to use than a manual tamper.

You can see here just how useful it is at compressing the sub layer - and therefore essential for larger paths or driveways. But it did displace material if you weren’t careful with it, particularly when changing direction. Also, you still need a manual tamper to get into the corners, so after using it for a day, I returned it as I felt I could manage with the manual tamper for the next layer.
sharp sand blinding layer
With the sub base successfully laid, levelled, and tamped, it was time for the sharp sand blinding layer. The gravel grid manufacturer recommends installing a 10mm - 15mm bedding layer of sharp or grit sand. This is used to blind off the coarser sub-base material and fill in any voids in the surface of the sub-base. It also enables the final levels to be achieved. The bedding layer is then compacted and left ready to receive the gravel grid.


gravel grids
And now with all the hard work done, it was time for the fun bit - laying the gravel grids. The purpose of these grids is to create a firm, free draining surface that stablilises the gravel and makes it easy to walk, drive, and even cycle over. And in my case, prevents the gravel migrating down the slope of the path.
I bought my 18 gravel grid sheets - Nidagravel 129 (at full price without discount) from https://www.nidagraveluk.co.uk/ who are now offering a 5% discount if you use the voucher code CHARLIEDIY5

The grids have a membrane underneath, which is designed to prevent the gravel falling through the bottom of the grid causing the grid to rise to the surface. There are two overlaps of the membrane, one short and one longer, on the opposite sides of each sheet. So that when you butt the sheets up to each other there’s a decent overlap.
I went with the lightest duty, 29mm thick grid, which is 1.2m long by 0.8m wide. With my path 1.5m wide this left a gap at each side (they recommend a small gap but perhaps not this wide) but I thought it wouldn’t matter as I wouldn’t be walking along the edges, but actually as I laid the grid, I decided to infill the majority of the edges - particularly down the slope - with off cuts, to stabilise as much gravel as possible.

You can cut the grid with either a hand saw - I found my Irwin floorboard saw particularly good - or a grinder.
The manufacturer says you can use a grinder, but the blade on mine isn’t wide enough to go through, so I ended up using my reciprocating saw. It was particularly useful for cutting around the inspection chamber covers.
laying the gravel
So, after all that hard work I found myself at the final and most blissful stage of this project - infilling the mesh with gravel. You need to check carefully what gravel is recommended for the mesh you’ve bought. In my case, 10-12mm is the maximum recommended size, and so I took myself off to my local builders merchants to see what they’d got.
So I went for the golden gravel, and bought 2 x 1 ton sacks - on the basis that I’d so far got through two sacks of the Type 1 to fill a similar 50mm depth - an error as I’ll come onto shortly. The golden gravel is at £111 per 1 ton sack , quite expensive, so I decided to part fill the new grid structure with some of the cheaper pea gravel (£50 per bag) I had left over from infilling around the services on my recent trench dig.
And onto this I poured the golden gravel levelling it as usual with my trusty piece of feather edge board and with the batten, now dismantled from it’s feather edging. I’d now unscrewed the guide piece from the wall of the house, so with no reference to keep the path level, I balanced the spirit level on top of the batten - which helped me to ensure the gravel was spread out to a consistent depth - 20mm above the grid structure.

And that was it. The job was finally complete.
the cost
That error I mentioned earlier - remarkably, with the infilling I’d done with about ½ a sack of the cheaper gravel - which I had ordered thinking it was pea gravel - I needed just one 1 ton sack of golden gravel - for a 1.5m wide x . So I’ve got £110 of wasted gravel sat on the drive - but it won’t go to waste as I’ve got a log store build coming up next on the channel.
Which leads us neatly onto the cost. If you take off that accidental bag of gravel and exclude the tools, I’ve spent just over £700 on the path, over £300 of which was the gravel mesh grid. Admittedly a fair wack of money, but good value if you consider what it would have cost to get a contractor in to do it, and the way I’ve built it, I think it’ll be here for a good few years to come. The full itemised costings will be going up on my Patreon channel very shortly, which don’t forget also gives you access to my Discord chat forum where you can have pretty much any DIY question answered by our wonderfully friendly community, and the chance to chat with me each day, as well as a monthly live catch up amongst other things.
today's toolkit
Gravel Grids: - I bought my 18 Nidagravel 129 gravel grid sheets from Nidagravel (at full price without discount) from https://www.nidagraveluk.co.uk/ who are now offering a 5% discount if you use the voucher code CHARLIEDIY5
MOT Type 1 Sub Base 2 x 1 ton bulk bags
1 ton bulk bag sharp sand
1 ton bulk bag golden gravel 10mm
JCB Reciprocating saw (no battery or charger)
Ryobi SDS Drill (no battery or charger)
So that’s it from me today! Thank you so much for reading, and please leave comments below to let me know how your projects go.
Oh, and if you’re new to my YouTube channel, click on the link here to subscribe!
As usual, I’m always looking for ways to make this sustainable now I’m doing it full time, so if you like my content and to help me keep providing it here on this channel for free, I would be so grateful if you could visit my Patreon page, to support me - lots of exclusive content. For just £5 per month, you have daily contact with me through my Discord member forum behind the scenes videos and automatic entry to my free monthly giveaways.
I thought I’d also mention a new shopping platform that I’ve been using recently. WeShop is a new concept merging social media with shopping. You can get 20% of the value of each order you make through the platform in shares - they’re giving away 90% of the business to those who shop on it.
Over the last ten years, I’ve been a bit addicted to Amazon, so I’m trying to start helping and reconnecting with other UK retailers who are signed up to the site. I’ve bought anything and everything from dishwasher tablets to nail guns.
You also get access to an exclusive connection of my own videos because I post regularly about all of the things I like using. If you recommend friends, you get a small referral commission (as I do from you if you come onboard). You can download the app from Google Play or the Apple Store, and simply need to sign up using my name ‘charliewhite’ - all one word. Have a bit of fun and let me know what you think!
Now I don’t know quite how this will pan out, I don’t know what will happen to the WeShop platform or how well it will be taken up by the British public. But I’m buying things I would be buying anyway, I’m supporting British retailers, and getting a potential nest egg of shares. Have a play around with it and let me know what you think.
* The Amazon links (if any) above are affiliate links. It doesn't cost you anything to click on them but I do earn a small commission if you do.
* I'm not being paid anything for the WeShop mention here, but I do earn a small % of shares if you sign up through my link, but it doesn't cost you anthing to do so, and once you're in, you can start earning shares from referring friends too!